JMRI has numerous capabilities for connecting RFID systems and for using RFID data to track trains as they move around your layout, to automate operations, and to keep track of where your rolling stock is on spurs and in yards. This document integrates information from multiple sources and adds step-by-step detail to describe some of the ways you can use RFID data within JMRI. While it does not provide information on how to decide which RFID system or connection method to use (there are multiple sources on the internet and in user groups for that), it will explain how to:
For more information on other operations and monitoring functions of JMRI, see the PanelPro and OperationsPro help pages.
This document is a WORK IN PROGRESS and will be edited and expanded based on user feedback via the JMRI and RFID user groups. It is up-to-date as of JMRI Release 5.5.4.
If you have already created a Layout Editor or Control Panel Editor panel in JMRI that corresponds to your layout, here is a way to start tracking your trains as they move around the layout:
That's it! OK, step 5 can be a few steps itself, but now you can track your train from the time it is seen at an RFID reader as it occupies different blocks around your layout. JMRI handles that part automatically!
 [Go to top of page]
Another important use of RFID is tracking cars as they are moved around your operational layout, particularly on spurs and in yards. For this use, you do not need to have any type of panel defined, although these features can all be used together. Here are the steps:
That's it! OK, steps 5 and 6 can be a few steps themselves, but now you can track your cars as they move from one reader in one location to another around your yard and your layout. See below Linking OperationsPro tables to RFID info. Another example of JMRI's capability with RFID.
 [Go to top of page]
There are several ways that JMRI can receive information from your RFID readers:
Using JMRI Version 5.5.4 or earlier, it is recommended NOT to add User Names in the Reporter Table as this causes some confusion on JMRI startup. This issue has been documented in the JMRI code repository.
[Go to top of page]JMRI stores information in tables that can be saved to files on your computer. All JMRI tables are available via the user interface of all JMRI systems (PanelPro, DecoderPro, and OperationsPro). Most tables used by PanelPro functions are stored in a combined xml file (sometimes called a "panel file" or "panel and table file") while OperationsPro and DecoderPro table contents are stored separately in individual xml files (see Loading Storing Your Work for more information).
Depending on how you intend to use RFID data, these are the tables you may encounter:
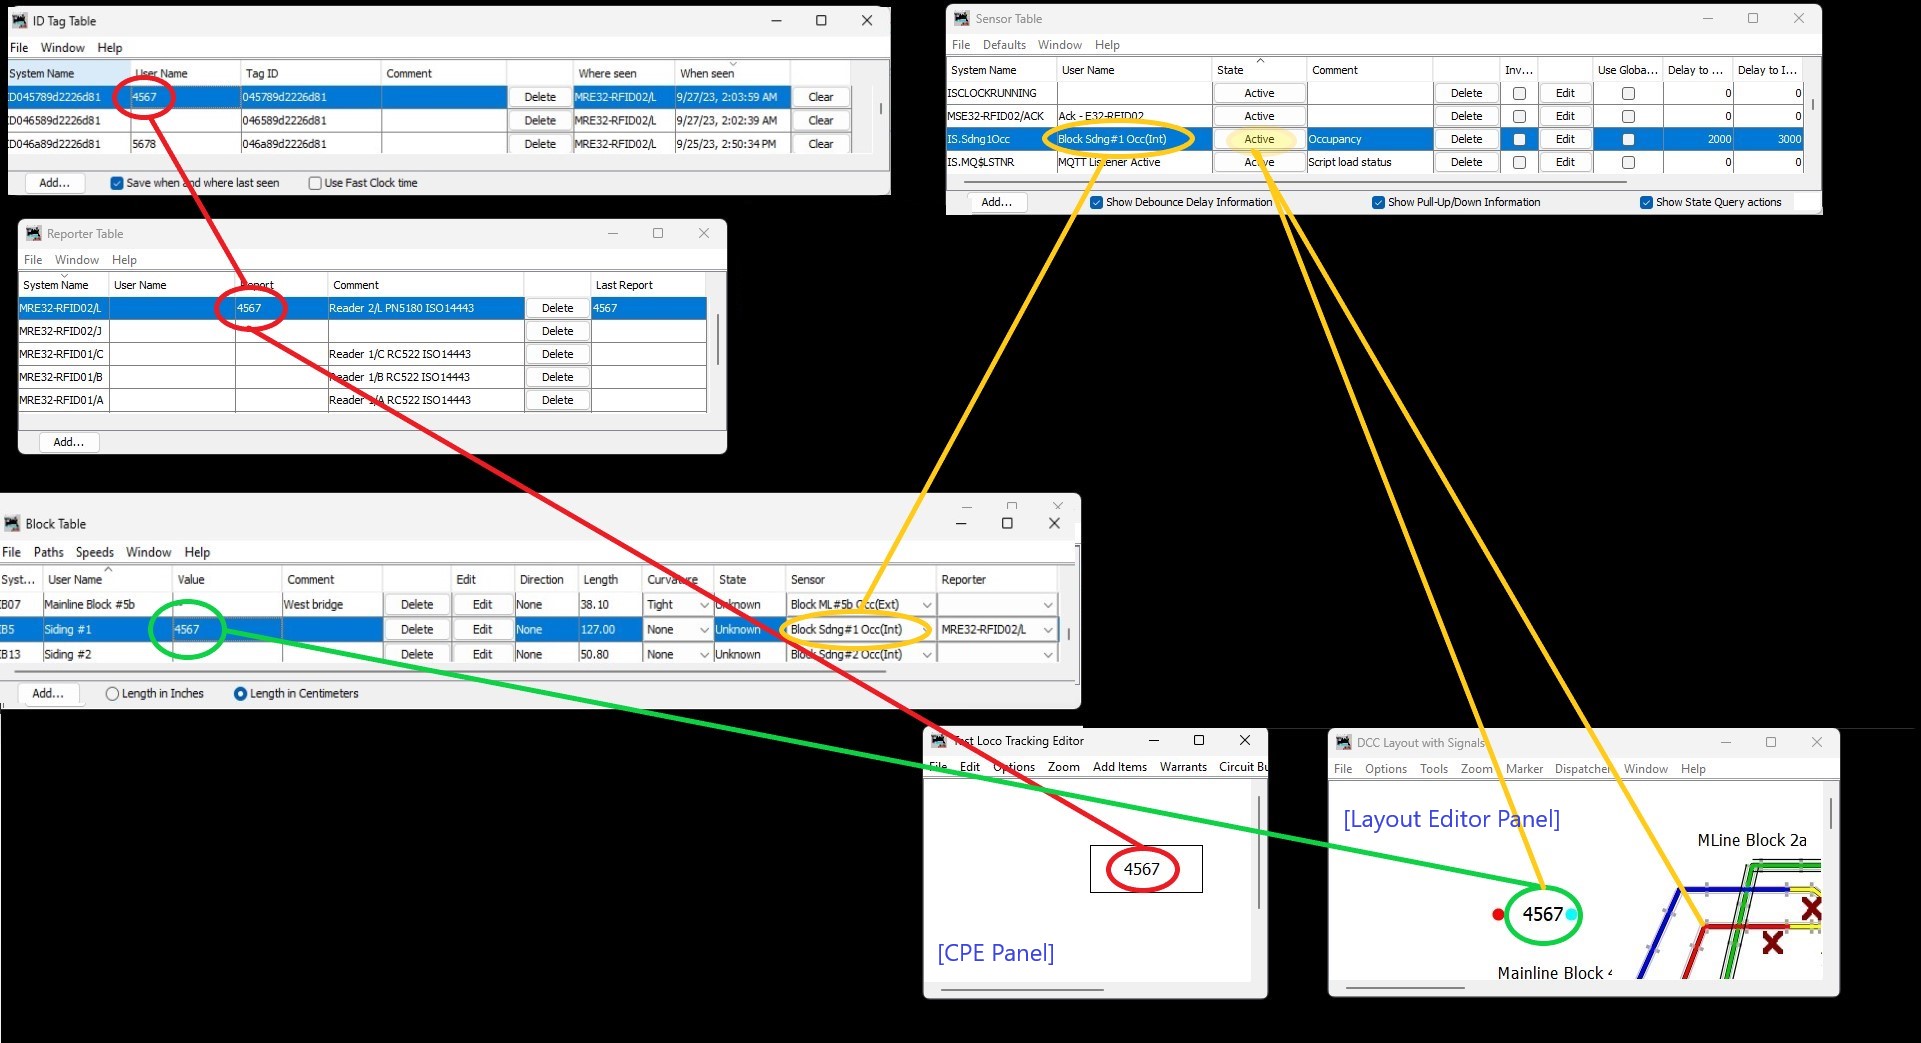
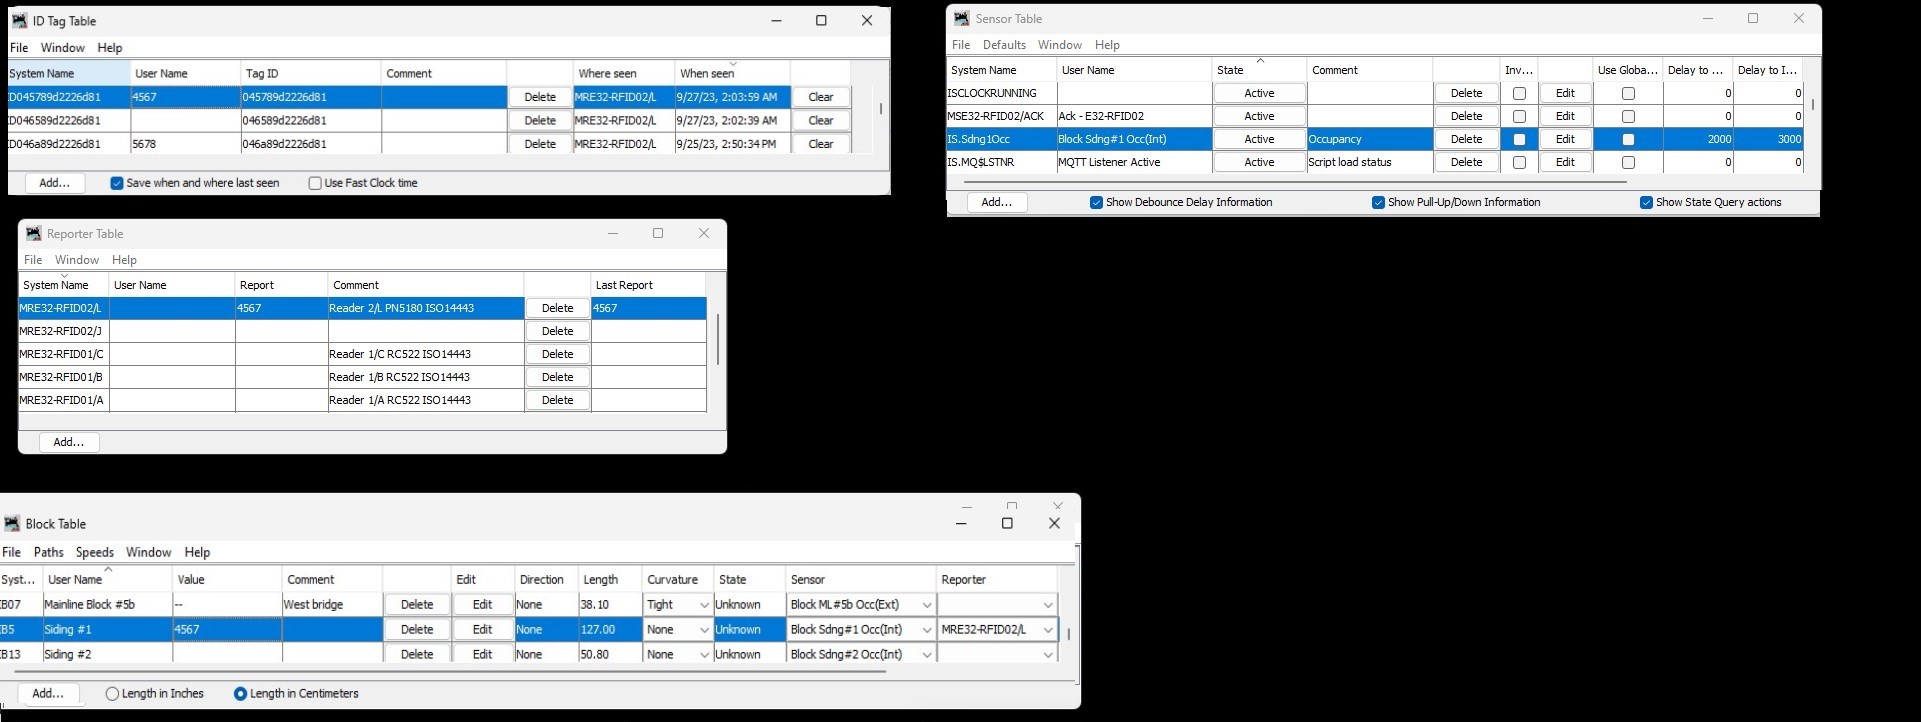
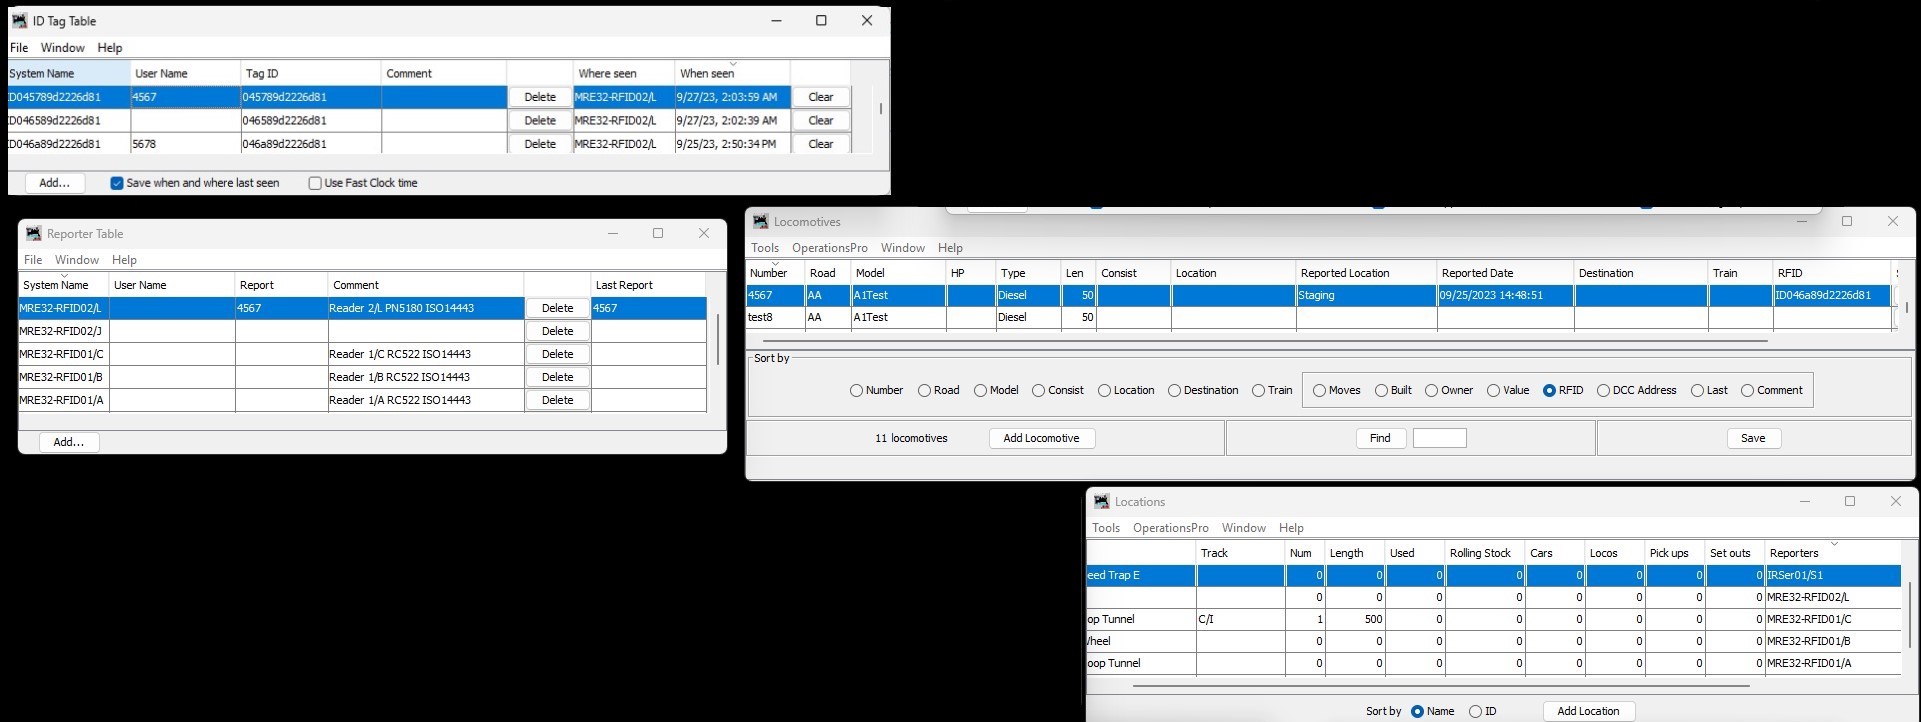
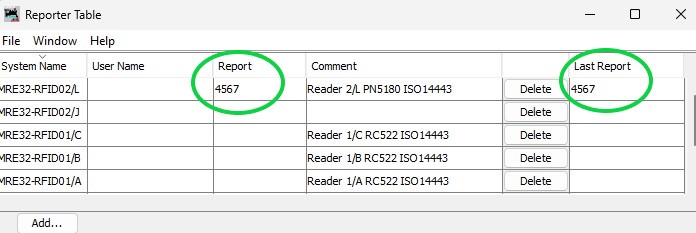
Reporter Table: one entry per RFID reader necessary to recognize each RFID reader. Entries may be created automatically the first time a message is received from an RFID reader depending on the communications protocol you use (see Reporters help page). If an entry is not created automatically (or even if it would be), you can create an entry manually. The Reporter Table contents is saved when you do a File⇒Store ALL...) from the main PanelPro menu or elsewhere. [NB: The Reporter Table is also used for other kinds of reports from the layout, such as transponder messages and real-time positioning system information , hence its more general name.]
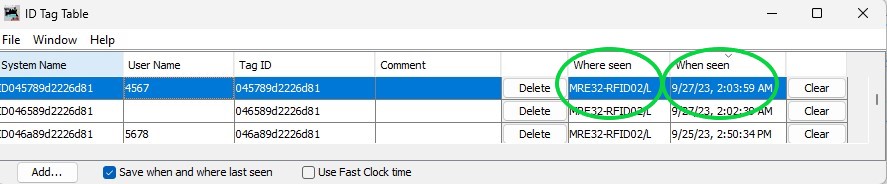
ID Tag Table: entries are created and saved automatically when an ID tag is seen at a reader. See also: ID Tag Table help.
Block Table: Blocks can be defined for groups of track on Layout Editor Panels. An RFID reader can be assigned to a Block so that the ID Tag seen by that reader can be displayed on that panel. This is known as the "Block Value". Block Table contents is saved when you do a File⇒Store ALL...) from the main PanelPro menu or elsewhere. See Block Table help page.
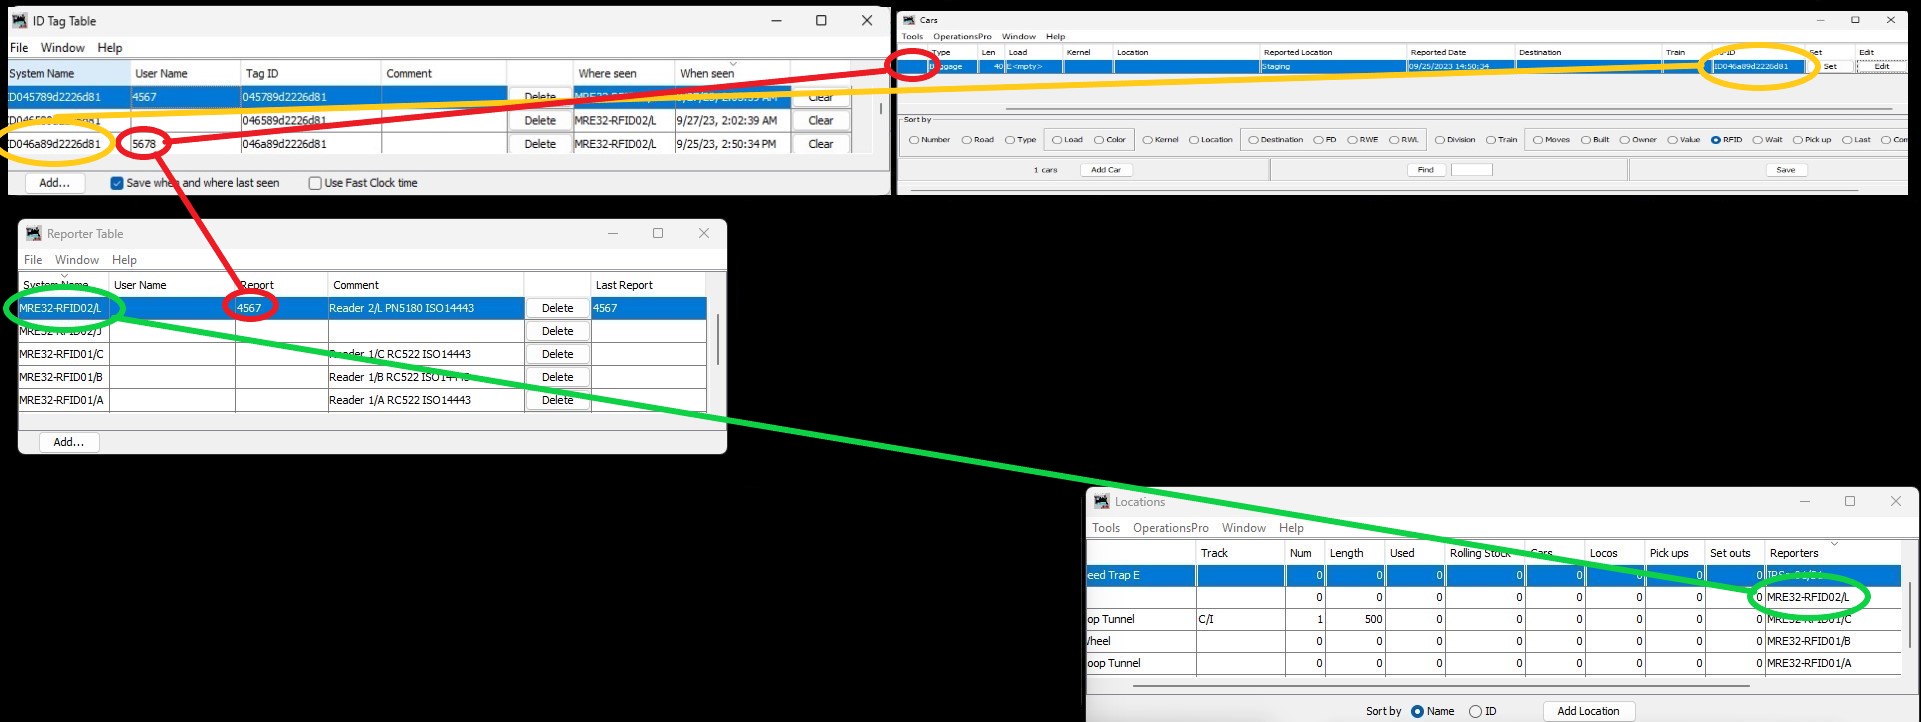
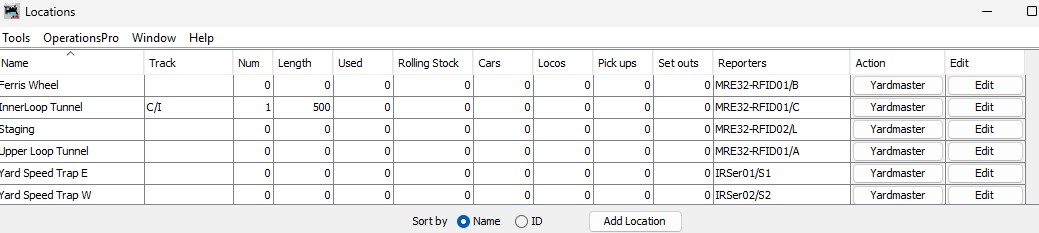
Location Table: this table, if used, has entries for track locations around your layout. Entries can be created for locations at which you have RFID readers. The Location Table contents is saved automatically to a disk file.
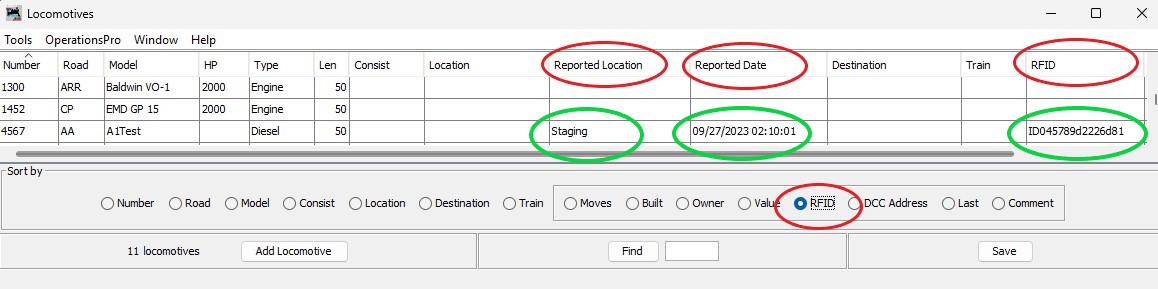
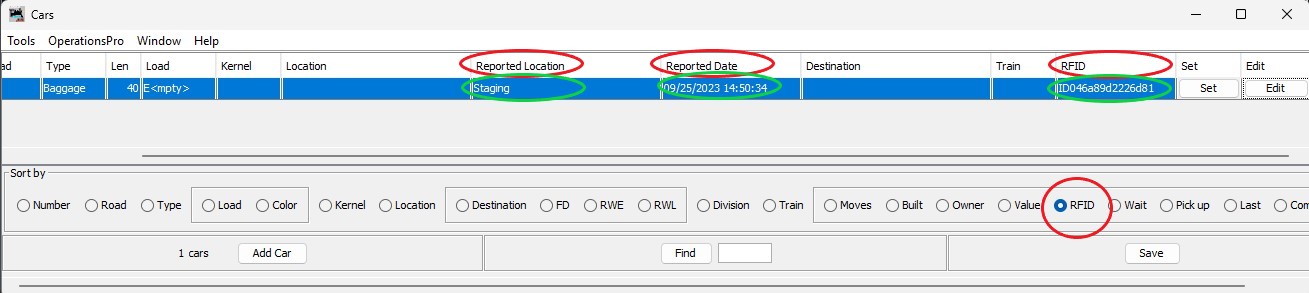
Locomotive Table, Car Table: these tables, if used, have entries for your rolling stock. Entries can be created for locomotives or cars (wagons) to which you have attached RFID tags. The Locomotive Table and the Car Table contents are saved automatically into separate files on disk.
Roster: contains one entry per locomotive in your fleet. While the Roster contains a lot of information about each, it does not currently (as of JMRI Version 5.5.4) have a specific field for RFID tag. However, the Roster can be used to populate the Locomotive Table and RFID tag numbers can be entered there. The Roster contents is saved when you make changes and select File⇒Save or "Save to Roster". The Roster contents is saved into a separate xml file.
While JMRI is an integrated set of systems, different functions were implemented at different times by different people. This means that some capabilities are not fully linked across functions and some data may appear to be in the "wrong" place, missing, or replicated (as for example, with the DecoderPro Roster and the OperationsPro Locomotive Table). As a result, some types of data linking has to be done manually to fully use all the JMRI functionality:
This section expands on the information above to do this linking. [The following section tells you how to link OperationsPro tables.]
To identify which RFID tag is attached to which piece of rolling stock, use the "User Name"
field in the ID Tag Table. Enter the locomotive or car number (must be unique) into the
"User Name" by right-clicking on the field and selecting Rename). Other choices
are Remove (useful if you mistype a number) or Move User Name if you are
moving an RFID tag to a different piece of rolling stock. [If you are just getting started, a
jython script in the examples
library will open a window for you to enter user names when RFID tags are encountered for the first time.]
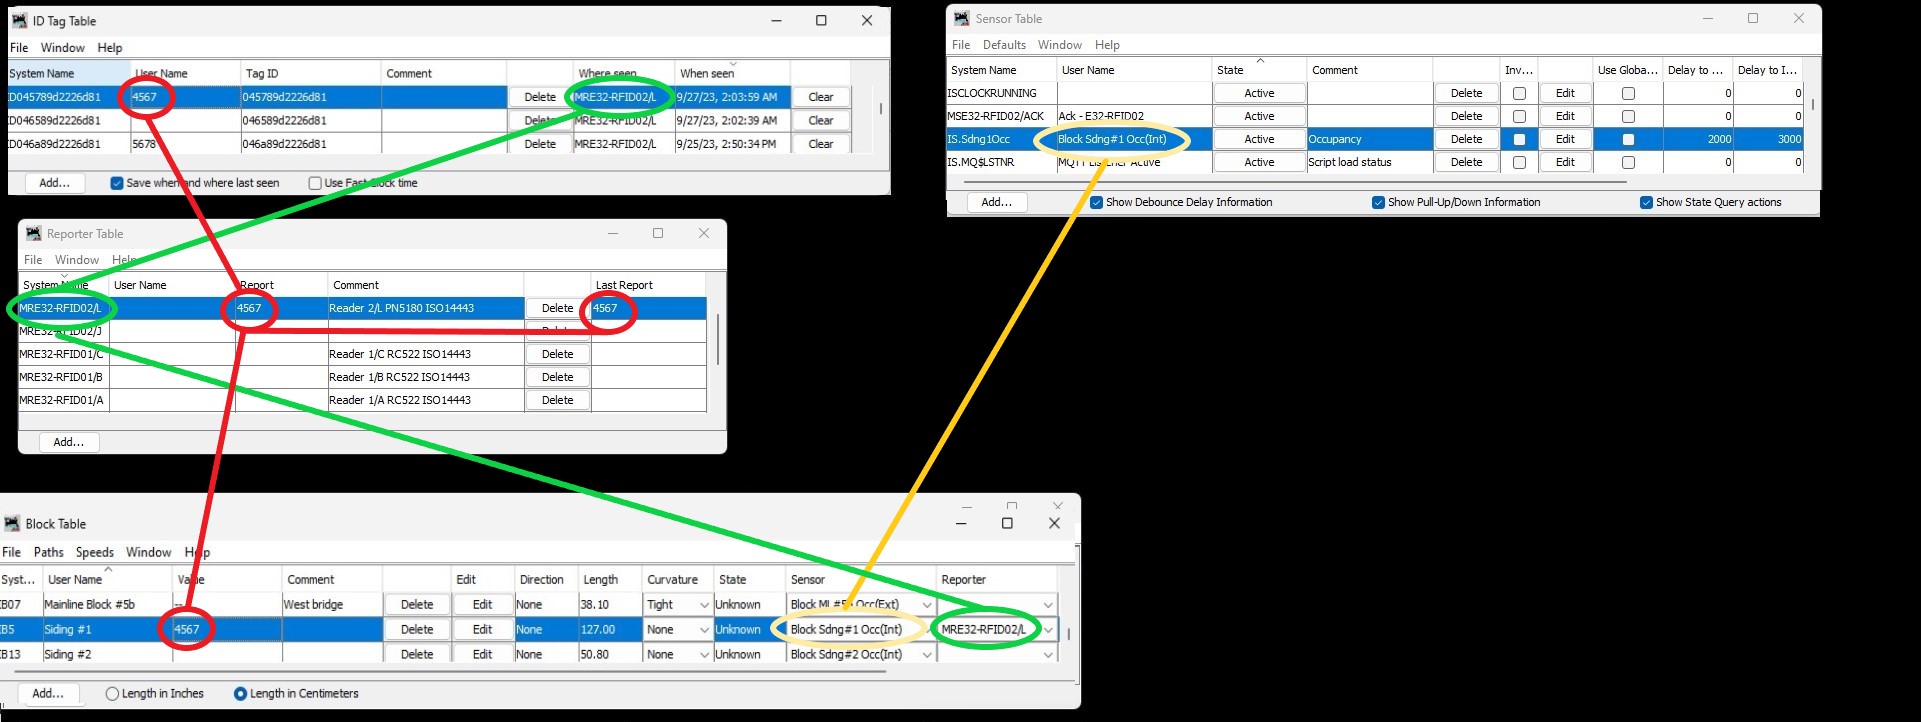
If you created a Layout Editor Panel you can see the train name for as long as it occupies a block by linking RFID readers to blocks on the panel. Repeating instruction 5 above:
Alternatively, you can use a script such as ReporterFormatter.py to parse the information in the Reporter and copy what you want into a Memory. That Memory can then be displayed on a Layout Editor Panel.
If you created a Control Panel Editor Panel you can only display the "reports" from Reporters, i.e. the train name associated with an RFID tag, for as long as the reader reports that RFID tag. Once the reader report clears, the "report" is blank and the CPE Panels will not display the name. Unfortunately, CPE Panels do not have a way to display "Blocks" and "Block Values" but have their own concept of "Occupancy Blocks" (part of the Dispatcher capability) which do not link to RFID information.
[Go to top of page]
To use RFID information with the Locations, Locomotive, and Car Tables, you first enable the assignment of ID Tags. This is done via the OperationsPro "settings" selection. Start on the main PanelPro menu and go to Tools⇒OperationsPro⇒Settings⇒Tools⇒Options⇒ [scroll to "Options" near the bottom of the page]. Click the check box for "Identification Tag Fields". If you now open the Locations Table, you will see an additional column labeled "Reporters" (for entering RFID Reader names). If you open either the Locomotive or Car Tables, you will see an "RFID" option in a box near the bottom of the window. Clicking on that will display the additional RFID information fields. Note that this box must be re-checked each time the table windows are opened (i.e. it is not "sticky", as of JMRI Version 5.5.4).
Operational information related to RFID will be filled into the various tables automatically by JMRI as RFID tags are read around the layout -- once you have entered the linking information between tables:
The Edit Location window allows you to select a Reporter to associate with a particular location
(OperationsPro⇒Locations⇒["Edit" a particular entry]).
The RFID reader name can be added to the field "IdTag Reporter at this Location" on that window
from the drop down list. Readers listed in the Reporters Table will be listed.
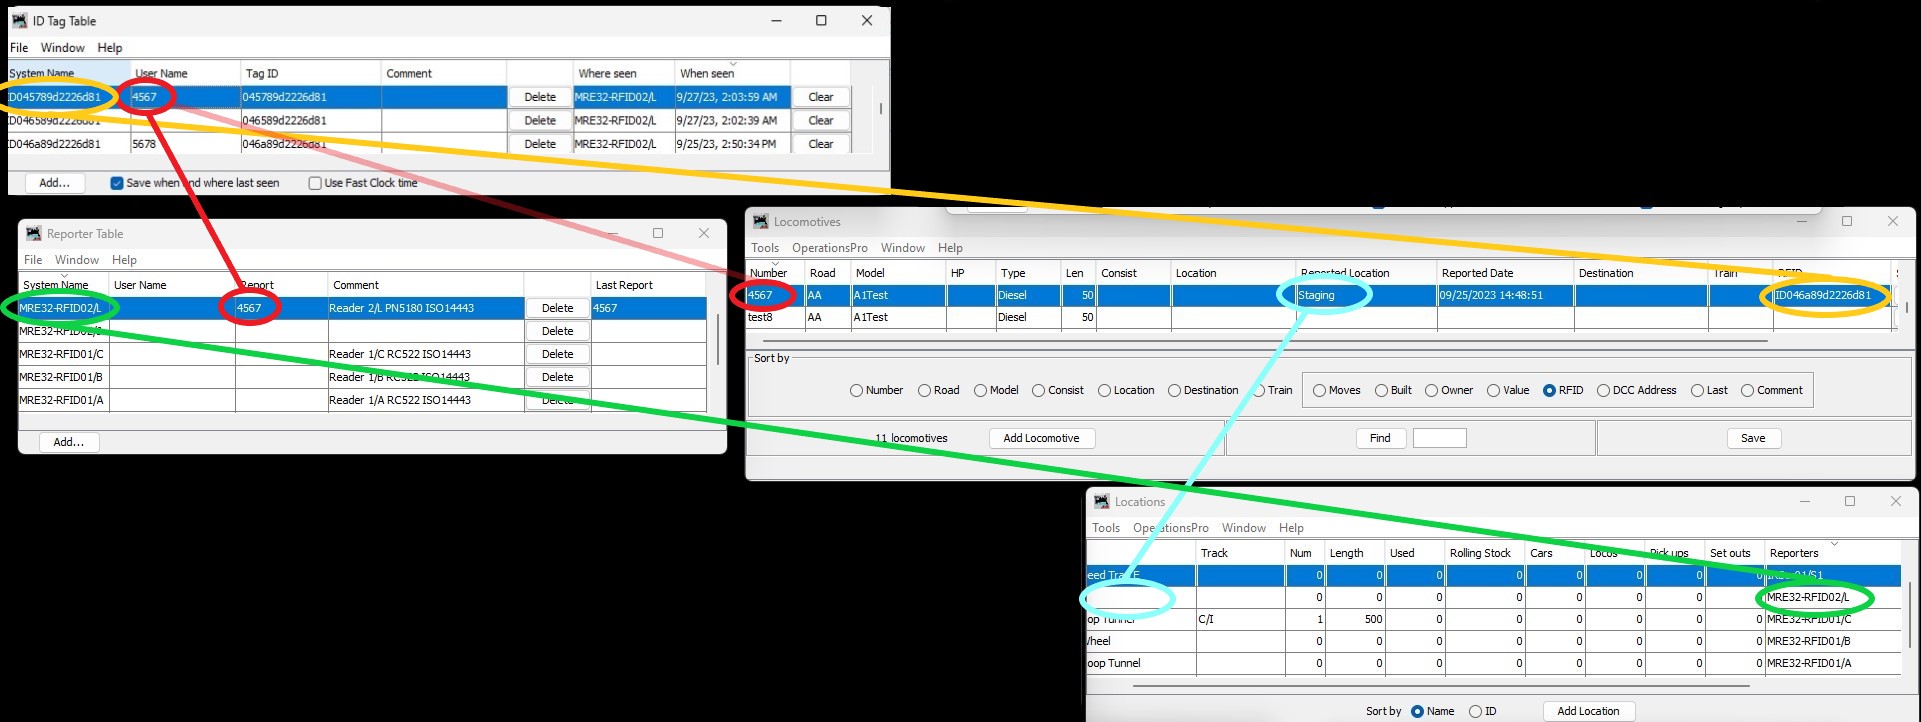
The Edit Locomotive and Car windows allow you to select an RFID tag to associate with a particular piece of rolling stock (OperationsPro⇒(Locomotives, Cars)⇒ ["Edit" a particular entry]). The RFID tag ID can be added to the field "RFID" on that window from the drop down list. ID Tags that have previously been seen by a reader or been entered manually will be listed.
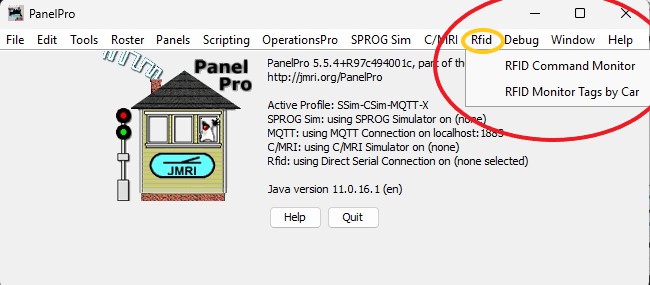
If your RFID reader is connected to JMRI via a Preferences RFID Connection, you can also
use another feature of JMRI. You will see "RFID" on the main PanelPro menu. Selecting that gets a drop-down menu
including "RFID Monitor".
As a tag is read, this will show the ID tag, and, if that tag ID has been associated
with a car in the Car Table, it will show the "Road Name", "Car Number", and the "Location" associated with
that car. If the tag does not match a known car, a button will pop up a list of cars that have not been associated
with a tag, to allow you to set that association.
[If you are just starting out with many ID Tags being seen for the first time, a jython script to aid in this process is available at https://jmri.org/jython/AssignIdTagToRS.py. This script will pop up a window when a new or changed ID Tag Table entry is encountered and will automatically populate the Locomotive or Car Table if you check the appropriate box. This script will work regardless of how your RFID reader communicates with JMRI.]
If you have not yet populated the Locomotive Table, JMRI provides a short
cut. From the Locomotive Table, select Tools⇒Locomotive Roster⇒Import
from JMRI Roster. Select which Roster Group or "All Entries" in the popup window, and JMRI will
create entries for the listed locomotives. Note that certain fields may be truncated ("Owner") and
others may need editing (e.g. road name or model), but it is a start.
BE CAREFUL:
if you add the wrong roster group, or you add the same group a second time, JMRI will add these
additional entries to the table. Luckily, you can find the previous saved file as "OperationsLocomotiveRoster.xml.bak"
in the "operations" subdirectory of the user files location.
If the linking steps described above have been completed successfully, you are good to go! Here is what will happen when RFID tag IDs are sent to JMRI by your readers:
ID Tag Table: If the ID Tag has been seen before, JMRI will update the "When Seen" and "Where Seen"
columns [see next step] in the corresponding ID Tag Table entry. If the ID tag has not been seen
before, JMRI will create an entry, prefixing "ID" to the tag ID to create a "System Name", and will also put
just the tag ID in the "Tag ID" column.
The "User Name" column will be left blank and you can fill it in (or not) at any time.
[A jython script to aid in this process is available at
https://jmri.org/jython/AssignIdTagToRS.py]
Reporter Table: If an entry exists in the Reporter Table for the RFID Reader received, the "Report"
and "Last Report" columns will be filled in for the appropriate entry.
If an entry does not exist, and the communication method is LocoNet or an RFID Connection method, an entry
will be created and these fields will be filled in.
Locomotive or Car Table: If the RFID Reader is listed in either the Locomotive or the Car Tables,
the "Reported Date" (and time) column will be updated for the appropriate entry. If the RFID Reader is
also associated with a particular Location in the "Locations Table", then the "Reported Location" column
in the Locomotive or Car Table will also be filled in.
Other JMRI help pages that might be of interest:
OperationsPro Tables with RFID information: