LogixNG (Logix "Next Generation") is a modular layout automation tool developed for JMRI in 2018 - 2021. It is similar to, but a complete rethinking of, Logix. It is designed to be easily testable, highly maintainable and readily expandable. Key concepts of LogixNG are:
The main building blocks in LogixNG are actions and expressions. An action does something, for example throwing a turnout, setting a signal, or running a script. An expression asks a question, for example if turnout LT2 is closed, if sensor IS255 is active, or does an expression script return true or false.
The actions and expressions are organized as trees; each tree is a ConditionalNG . A LogixNG is comprised of one or more ConditionalNGs. Although Logix does not have the "tree" concept, there is a similarity: In LogixNG, a ConditionalNG serves the same purpose as a Conditional in Logix. An expression in LogixNG is similar to a conditional variable in Logix, and an action in LogixNG is similar to a conditional action in Logix.
In LogixNG, an action or expression may have other actions and/or expressions as children, which allows the user to build a complex structure with simple building blocks.
For example, one common root of the tree is the If Then Else action. It has one child expression and two child actions. It evaluates the expression and if the expression is true, the then child action is executed. If the expression is false, the else child action is executed.
The LogixNG Module is essentially a ConditionalNG, but there are different types with specific capabilities. This makes it possible to combine common expressions and actions. Modules can accept parameters and return results. When combined with references and tables, modules make it possible to create templates/subroutines/etc., that can be called from ConditionalNGs with the appropriate variables.
since 5.9.2Normally, LogixNG Modules are called from a LogixNG or another module. It is also possible to call a module from another JMRI class or a Jython script. The module must be a Digital Action Module. For an example Jython script see Call Module Script.
LogixNG adds the LogixNG Tables concept to JMRI. A LogixNG Table is similar to Memory but has one or two dimensions. Each row and each column in the table may be given a name, which means that a single cell in the table can be referred to with the row name and the column name. Tables are in particular intended to be used together with references, to make it easy to setup complex configurations. A table can be created in spreadsheet software like Microsoft Excel or LibreOffice Calc and then exported as a CSV file and imported to JMRI.
Like the Logix indirect memory reference using @memoryname, LogixNG has references. A reference is an indirect pointer to an item on the layout. For example, if the memory IM1 has the value "IT1", the reference {IM1} points to the turnout IT1. This means that if an action has the command "set turnout {IM1} to thrown", it means that LogixNG reads the memory IM1, which in this example has the value IT1, and then sets the turnout IT1 to thrown.
LogixNG provides error handling and debugging tools to help you in creating sophisticated layout automation logic. This includes the ability to stop or abort individual LogixNGs, log errors, and "throw" an exception for further analysis. See Error Handling
The LogixNG tool has three main components. They are accessed via the main PanelPro Tools ⇒ Tables ⇒ LogixNG menu path like other JMRI table items. The three LogixNG tables and related content will be loaded and stored along with all of the other tables and panels. Note: The only content not stored are the CSV files used for tables.
The links in the following section, along with the links in the sidebar, are the task specific help pages that are also referenced using JMRI Help ⇒ Window Help.
The LogixNGs menu item displays a list of LogixNGs. When a LogixNG item is selected, the ConditionalNG list is displayed. Clicking on the Edit button will open the ConditionalNG editor. This window contains a tree of the items that have been added to the conditional. The primary items are the expressions which act like if statements and actions to be performed. For details, see the following pages:
The LogixNG Modules menu item displays a list of modules. A module is similar to a ConditionalNG in that it also uses the tree based editor. The major difference is that information can be passed to a module and it can return results. For details, see the following pages:
The LogixNG Tables menu item displays a list of tables. The table feature was described in the introduction. For details, see the following pages:
LogixNG has settings the can be set in JMRI Preferences ⇒ LogixNG.

If checked, the enabled LogixNG definitions will be active after the completion of the PanelPro xml data file loading. If not checked, the LogixNGs will be inactive until Tools ⇒ LogixNG ⇒ Start LogixNG is selected. The default setting is checked.
LogixNG has a built in debugger. This option needs to be enabled during start up for the debugger to work. See LogixNG Debugger for information about the debugger.
The debugger is extended to display the LogixNG statement that is about to be executed. The statement is displayed on the JMRI system console. See LogixNG Debugger for information about debugger logging.
The debugger is extended to display the LogixNG statement after it has been executed. For expressions, the true/false result is included. The statement is displayed on the JMRI system console. See LogixNG Debugger for information about debugger logging.
The LogixNG expressions and actions have names. These names are used internally by LogixNG. In certain developer situations, making the names visible can be helpful. The default is unchecked.
When this option is enabled, the currently selected row will be highlighted. This can provide visual feedback, such as when the popup menu is open.
since 5.1.5The arrow keys can be used to move between rows and shortcut keys are available to perform menu items without opening the context menu.
For macOS, use Cmd instead of Ctrl.
Strict variable typing can be selected for global and/or local variables. The default is that strict variable typing is not enabled for either.
When strict typing is enabled, variables that are are assigned the Boolean, String, Integer or Floating number type cannot be set to a value of another type. LogixNG will try to convert the new value to the desired type, for example a local variable of type floating number will be assigned the value 12.0 if it's assigned 12 and it will be assigned the value 32.5 if it's assigned the string "32.5".
Local and global variables that are assigned any of the other variable types are not affected.
When this option is enabled, the system name of the LogixNG item will be included in the exception dialog. This will help with finding the LogixNG and ConditionalNG that created the error. A related change to the LogixNG browser is the option to include the system name on the browser report.
LogixNG has robust error handling. The combo box selection provides the default setting. Individual expressions and actions can override the default setting. For details, see Error Handling
LogixNG has six system level tools at Tools ⇒ LogixNG.
Start LogixNG and Stop LogixNG are used to control the processing of LogixNG ConditionalNG definitions. When LogixNG is active , then the enabled LogixNGs will run its ConditionalNGs. Note: The execution of currently running ConditionalNGs doesn't stop immediately when "Stop LogixNG" is selected. The ConditionalNGs will continue to run until they are finished, but they will not be restarted after "Stop LogixNG" is selected.
The LogixNGs included in the LogixNG initialization table are run before the rest of the LogixNGs. This is the similar to the Logix RTXINITIALIZER.
Logix definitions can be be imported into LogixNG using Import Logix.
The Inline LogixNG tool displays the LogixNG definitions that have been attached to panel items. For details, see Inline LogixNG.
The Where Used tool displays the LogixNG definitions that have references to JMRI table items. For details, see LogixNG Where used.
The Export LogixNG tool is used to export LogixNG items while changing the the system name. This makes it possible to import LogixNG definitions. For details, see Export LogixNG. Note: This not in the tools menu.
This document is an introduction and overview of LogixNG. The sidebar contains links to the task specific help files used by JMRI. The detailed documentation is in the reference.
The reference has two sections. The Standard Features section covers the LogixNG components that are similar to Logix. The Advance Features section covers new features that did not exist in Logix or were incomplete.
In addition to the preference settings and the LogixNG tools, it is possible to disable LogixNG during PanelPro startup. This can be necessary if there is a bad logic that locks up PanelPro immediately after file loading.
When the PanelPro startup splash dialog is displayed, press F8 or F9.

If F8 is selected and a layout data xml file is being loaded using a start up action, the LogixNG table entries will be disabled. The F8 key has no impact when a file is loaded using File ⇒ Load table content and panels... . In this case, use Tools ⇒ LogixNG ⇒ Stop LogixNG before loading the file.
If F9 is selected, LogixNG will not start after layout data file loading is done, whether as a start up action or manually. The LogixNG table entries will be enabled/disabled based on their state in the xml file. When the problem has been resolved then Tools ⇒ LogixNG ⇒ Start LogixNG can be used to activate LogixNG processing.
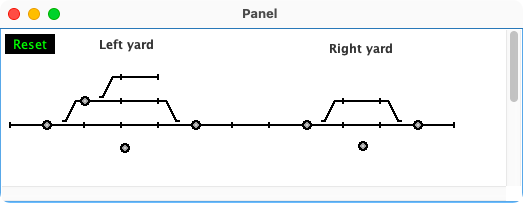
This is a sample layout with LogixNG controlling the turnouts. The turnout sensors toggle the turnout state when clicked, unless the lock sensors are active
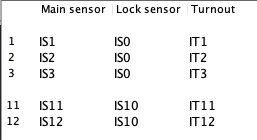
The logic uses a table to identify the turnouts, the toggle sensors and the lock sensors.
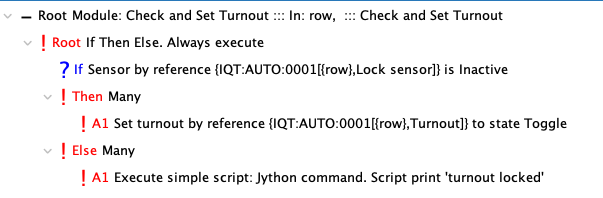
Each turnout has a ConditionalNG that is triggered when the toggle sensor changes state. If the sensor goes Active, a module is called to check the lock state and toggle the turnout. A variable is passed to the module that has the row number.

The module checks the lock sensor based on the row number and if ok, toggles the turnout state.
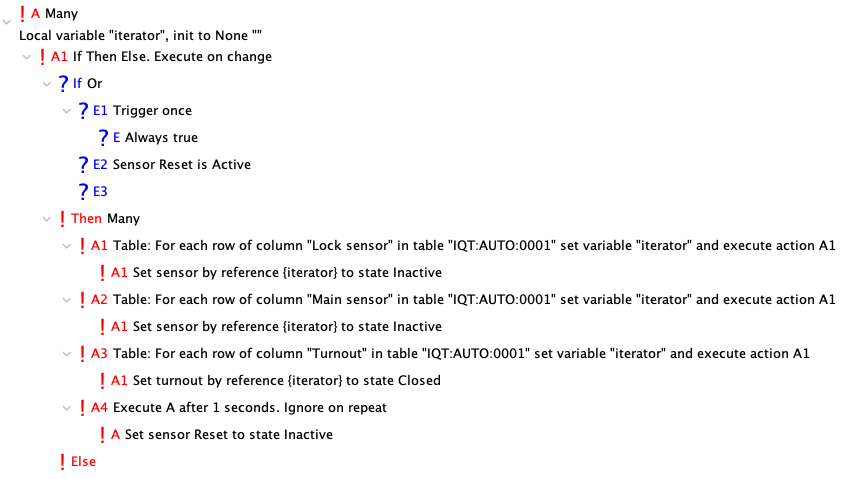
An initialization LogixNG is used to set the initial sensor and turnout states. This LogixNG is also triggered by the Reset sensor.