The Monitor Tags Panel is opened from the RFID menu for the reader. This menu item is present for each RFID reader in your JMRI profile. You may open one, or several for each reader. The panel will only show tags read by the reader to which it is attached. The title contains the system prefix for that reader.
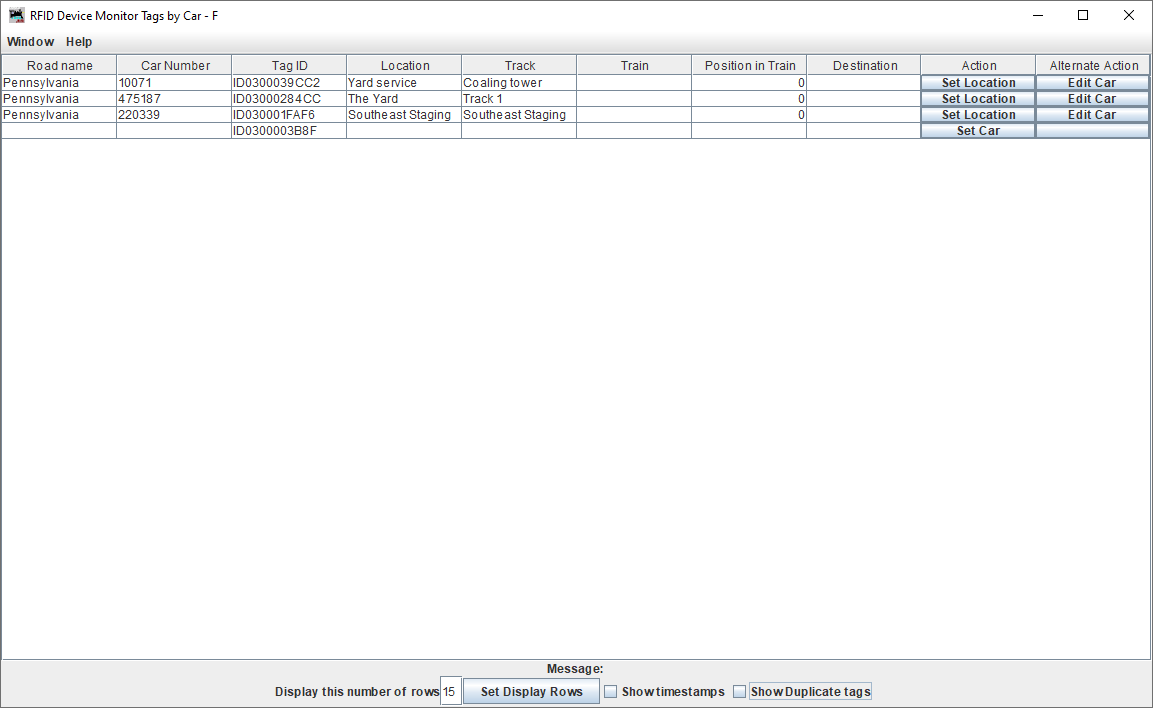
The default page shows one row per tag. If tag is read several times in succession (this often happens if the car is parked over the reader and the reader times out and fires again), the successive reads are suppresed. If you want to see all the reads, check the "Show duplicate tags" checkbox. After this, there will be one line for each read. Previous duplicate reads will not be shown, only duplicates following the selection of the checkbox. The timestamps are available if you check the "Show Timestamps" checkbox. The time shown is the time when the monitor page received the tag - not necessarily the time when the actual read occured. If duplicates are suppressed, the time will be updated to that of the last duplicate.
The Road name and Car number columns will contain data if the car is known to Operations Pro and the associated tag is set in Car entry. Engines are not shown (only Cars). If the tag is not known to Operations Pro, those columns will be empty (as it is in the fourth row in the image above). The "Action" column in that row shows a "Set Car" button. Click on that button to open a window that will allow you to associate a known car with that tag. The Car must first be created in an Operations Pro "Add Car" window, before you will be able to associate with the Car.
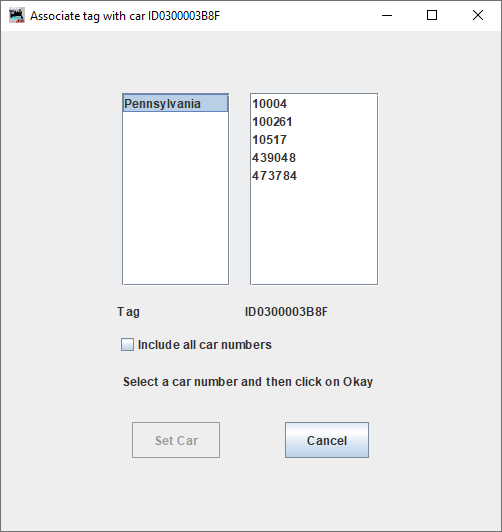
The set car window has a list of known Roads on the left. When you select a road (automatically if there is only one road), the list on right contains car numbers available for association. By default (as long as the "Include all car numbers" box is not checked), only Cars which do not have associated RFID tag will be shown. Once you select the car number on the right, the "Set Car" button will be enabled. Click on that button to set the association in the Car record. If you do not wish to assoicate the tag, click on the Cancel button (or press the Escape key).
The Edit Car button on the rows with Cars associated will take you to the Operations Pro Car edit page. For more details, see the OperationsPro Cars page.
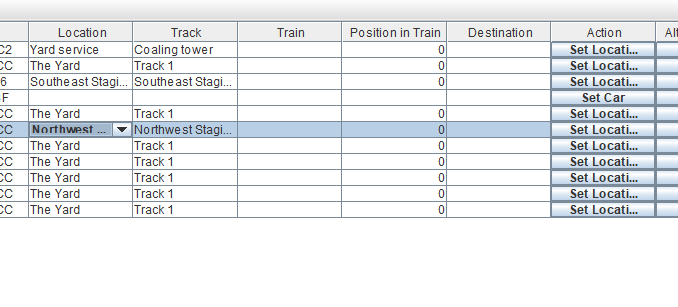
The Location and Track columns will be empty if OperationsPro does not have a location for the car. These columns are editable. To start, click within the Location column: a list will drop down showing all available Locations. Select a Location and the Track column will contain a list of Tracks at that location. If there is only one track at that Location, it will be automatically selected. Once you have selected both a Location and a Track, you can click the "Set Location" to place the car in that location. The Locations and Tracks must already have been defined in the OperationsPro Locations page.
The number of rows shown is determined by the number in the box at the bottom of the page. You may set this number to any positive number from 1 to 99. Once that number of rows is shown, the next tag read will be shown at the bottom and the top row will roll off. You cannot scroll back to previous rows. If duplicate rows are enabled, the duplicates will count to the row total. The rows will always be in the order of time received from top to bottom.