The LogixNG tables table contains a list of the defined LogixNG tables.
The LogixNG table lists all of the currently defined LogixNG tables. Each row has a standard set of columns.
The dropdown combo box has 3 actions that can be applied to the current LogixNG tables row.

To create a new LogixNG Table, click on the Add... button. The LogixNG Table Table window will be displayed.
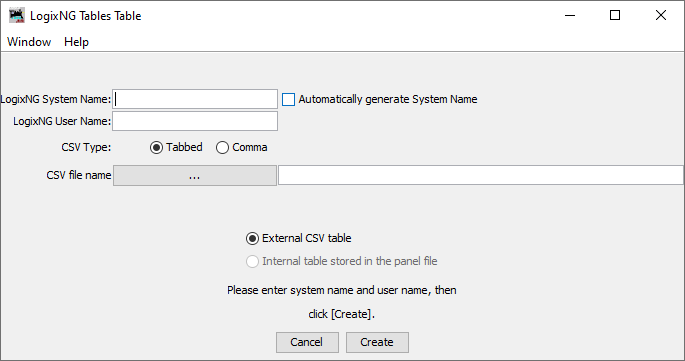
The system name is required. The system name for a LogixNG Table always begins with the letters IQT. If the entered name does not start with IQT, it will be automatically added. The typical suffix is a number. If Automatically generate System Name is checked, the system name format will be IQT:AUTO:nnnn. Any other format requires adding a $ (dollar) character between IQT and the suffix.
The user name is optional but recommended. A user name may be any useful text, provided the new user name was not previously assigned to another LogixNG Table. Once a LogixNG Table is created, its system name cannot be changed. Its user name may be changed in the LogixNG Tables Table. The user name is usually used to provide a more descriptive name, for example, "Signal 5 Table".
Select the field delimiter that was used for the CSV file. The options are Tabbed (the default), Comma or Semicolon.
Use the file selector button to find and load a CSV file. A CSV type file (comma separated) may be created by saving a spreadsheet using the "Save As" function. You may also create a comma separated file by using a standard text editor and separating each column entry with a comma. A Tab separated file may be created by using a spreadsheet and using the "Export" function and selecting "Tab" as the separater. You may create a Tab separated file with a text editor, but some text editors might automatically change tabs to spaces (and that will not load correctly). In that case, change the preferences of the editor, or use a different editor. The default location will be the user files location.
CSV exports from Excel normally use the comma. If the locale uses the comma as a decimal character, the export will use the semicolon as the CSV field delimiter.
The ability to create an internal table is not implemented yet.
After clicking Create, the LogixNG Table will be created and the Table Editor window will appear.