JMRI: LogixNG Table
The LogixNG table contains a list of the defined LogixNGs.
Table Content
The LogixNG table lists all of the currently defined LogixNGs. Each row has a standard set
of columns.
- System Name
-
The system name for the LogixNG. LogixNG system names have an IQ prefix
normally followed by numbers. For details about the LogixNG system name, see Add a LogixNG. The system name cannot be changed.
- User Name
- The user name for the LogixNG. This is a free form field that contains a meaningful
name.
- Enabled
- A LogixNG can be enabled or disabled. When it is disabled, the related ConditionalNGs
will not be active.
- Comment
- A free form comment field for the LogixNG
- Menu
-
The Select combo box is used to select actions for the selected LogixNG.
See Select Actions
- Startupsince 5.7.3
- The Startup checkboxes provide a summary of the Startup selections for the ConditionalNGs
within each LogixNG. A solid check indicates all of the ConditionalNGs have Startup enabled.
An empty checkbox indicates no ConditionalNGs are enabled and a partal check means there is
a mixture. Clicking on a checkbox will enable or disable the Startup setting for all of the
ConditionalNGs within that LogixNG.
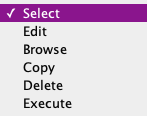
Select Actions
The dropdown combo box has five actions that can be applied to the current LogixNG row.
- Edit
-
When Edit is selected, the LogixNG editor will open. This window will
contain the ConditionalNGs that have been defined for this LogixNG. See LogixNG Editor for details.
- Browse
-
The Browse option opens a text window with a representation of the
definitions within the LogixNG. See LogixNG
Browser for details about the browser.
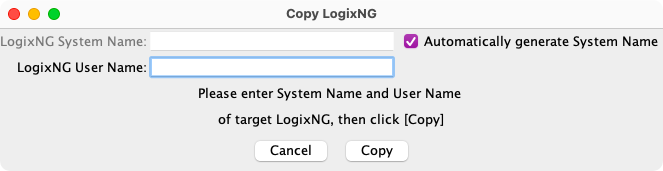
- Copysince 4.99.4
- The Copy action is used to create a duplicate of the current LogixNG.
Enter the user name for the new LogixNG and click on Copy. The
ConditionalNG user names will have a Copy of prefix.
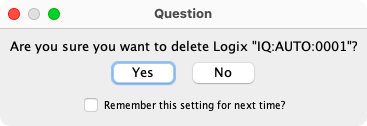
- Delete
-
The Delete action deletes the current LogixNG, all of its ConditionalNGs
and the ConditionalNG content. A confirmation dialog will be displayed.
- Executesince 5.1.7
-
The Execute action can be used to test a LogixNG and its ConditionalNGs
while the LogixNG is enabled or disabled.
- Options
- The options menu has two items: Enable All LogixNGs and
Disable All LogixNGs. Selecting one of these will perform the action on
all the LogixNGs in the table.
- Tools
- The tools menu has two items: Open clipboard and Open PickList
Tables. See
LogixNG Reference - Chapter 2 for details on the using the clipboard. The PickList was
designed for dragging names, such as sensor names, to a text field. Most LogixNG name fields
use drop down combo boxes, but this could be used when building Formulas.
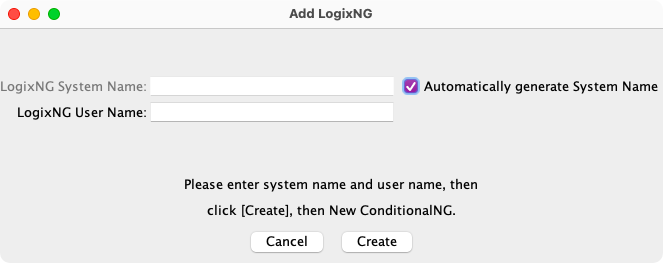
Add a LogixNG
To create a new LogixNG, click on the Add... button. The Add
LogixNG window will be displayed.
The system name is required. The system name for a LogixNG always begins with the letters
IQ. If the entered name does not start with IQ, it will be
automatically added. The typical suffix is a number. If Automatically generate System
Name is checked, the system name format will be IQ:AUTO:nnnn. Any
other format requires adding a $ (dollar) character between
IQ and the suffix.
The user name is optional but recommended. A user name may be any useful text, provided
the new user name was not previously assigned to another LogixNG. Once a LogixNG is created,
its system name cannot be changed. Its user name may be changed in either the LogixNG Table
or the Edit LogixNG window. The user name is usually used to provide a more descriptive name,
for example, "Signal 5 Control".
After clicking Create, the LogixNG will be created and the Edit LogixNG window will appear.