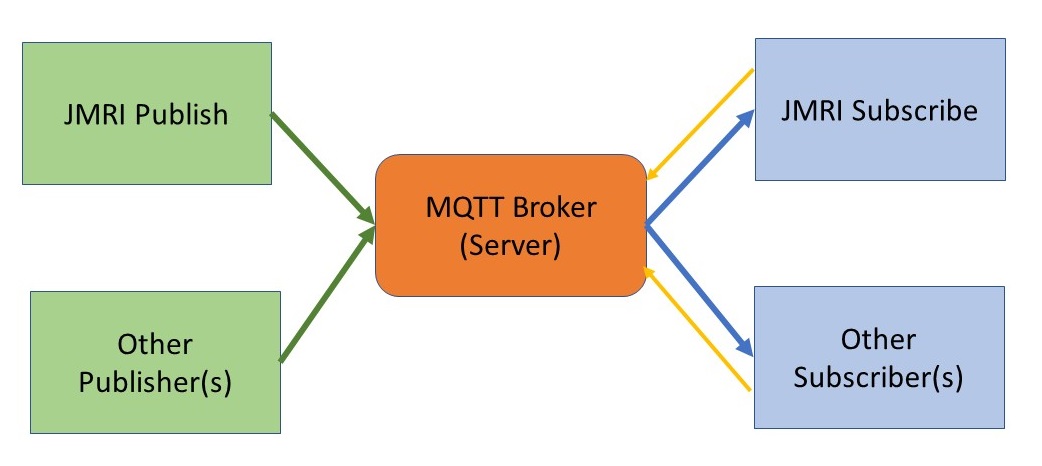
MQTT is a "client-server publish-subscribe" protocol, meaning that JMRI connects to an MQTT server (called a "message broker") and subscribes to receive messages on certain "topics." JMRI also publishes messages to the MQTT message broker and any device (on or off the layout) subscribed to the published topic will receive a copy. This approach allows JMRI users to use MQTT communication in developing any number of layout control and automation scenarios. For example, you can use JMRI's MQTT capability to communicate with IOT devices as well as arduinos and other microcontrollers.
MQTT messages consist of two parts: topic and contents. JMRI provides three mechanisms for creating and processing MQTT messages, the specifics of each are provided in sections below:
Contents:
This document is up-to-date as of JMRI Release 5.5.7.
The first step in using MQTT communication with JMRI is to create a connection to an MQTT message broker. This is done via the Connections pane in the Preferences window. (Edit⇒ Preferences⇒Connections)
You can establish an MQTT Connection in JMRI in addition to having other connection types.
Many parameters related to MQTT communication can be seen and changed by selecting "Additional Connection Settings" on the MQTT Connection page under Preferences, as shown in the picture below.
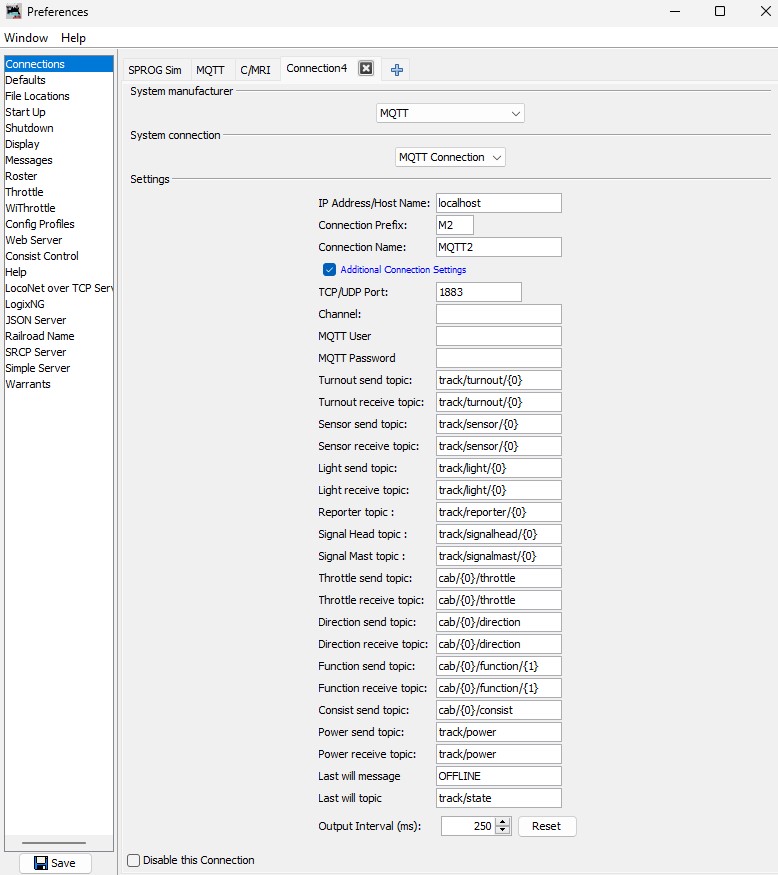
Two other parameters that control the way the MQTT Message Broker interacts with JMRI can be changed via script. See Changing Default MQTT Parameters: QoS and Retained Messages.
Be sure to save the JMRI Preferences if you have changed anything (hit the "Save" button on the Preferences pane) and restart JMRI to put the changes into effect.
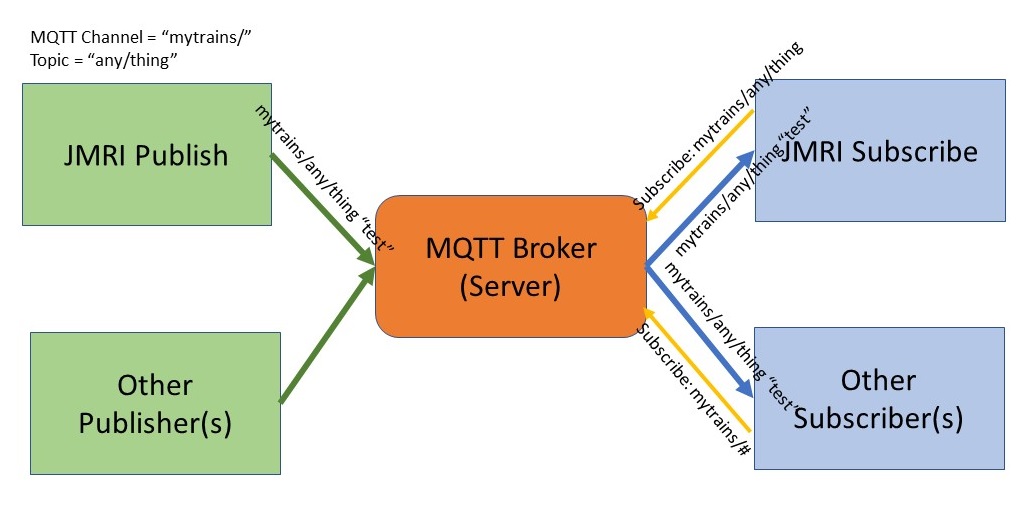
JMRI publishes and receives MQTT messages on specific "topics." An MQTT topic is the label or headline for published messages. It is the label that other processes subscribe to to receive messages. MQTT treats a topic as a single string, although topics are typically organized with slashes to create multiple levels. JMRI, however, forms an MQTT topic by concatenating two or three strings, each with or without slashes as desired, as is described under the sections for each type of use (MQTT-connected objects, LogixNG, scripts). MQTT Channel (see above in Preferences) is always the first (prefix) part of the topic sent to the MQTT Broker (but may be blank, as of JMRI relesae 5.1.2).
Topics used in Subscribe messages can optionally have a wild card character. The plus sign ("+") mateches any string only in the level (between slashes) where it appears. The hash sign ("#") must appear at the end of a topic string and will match to any string and any number of levels. See this mosquitto.org page for more information.
Since 5.1.2Setting the MQTT Channel to blank means that the user has complete control over topic strings both for publish and subscribe. This provides great flexibility, especially in communicating with devices that do not have much flexibility to set their topic strings, such as some home automation devices.
Any message topic, defined or custom, can be subscribed to and processed by a LogixNG or a custom script. These messages can further be used to trigger Logix, populate Memories and then display them on panels, or for whatever purposes you find useful.
For MQTT-connected objects, MQTT message contents to be published are prescribed and automatically created (see following). For both LogixNG and scripts, MQTT message contents can be any arbitrary string you create. How that message contents is interpreted is up to the processes that subscribe to the topic of the message. See the following sections for more details.
MQTT Quality of Service indicates to the MQTT message broker how to handle message delivery and receipt. Allowable values are 0, 1, and 2. JMRI publishes messages using QOS level 2, the most stringent level, to ensure that messages are received by the broker (this can be changed by script). QoS is between the publisher and the broker. While JMRI sets a QoS level 2, whoever is publishing messages you want JMRI to receive (via subscription) needs to set its own level (which can be the same or different than the level JMRI sets).
The Retained Messages parameter indicates to the MQTT message broker whether to retain the current message to be automatically published whenever a new subscriber to that topic appears. JMRI publishes messages with the retain option on (this can be changed by script). Since JMRI subscribes to the receive topics for the individual objects you have set up in JMRI, subscriptions are made when you load a panel. Any retained messages will be received at that time. For example, JMRI subscribes to messages from MQTT sensors (that is, devices managing sensors and publishing MQTT messages). The publisher of those messages decides whether values are retained by the broker so JMRI will receive them when a panel is loaded or a new sensor created. Turnouts and lights commands are generally published by JMRI so JMRI will not receive anything on startup as it would not be subscribing to its own messages.
JMRI's MQTT capabilities continue to evolve. Older versions of JMRI (4.12 and earlier) directly support Turnouts only. Other objects have been added in later releases as indicated below. Direct support for Signal Heads is not yet available. Any JMRI object can be updated via an MQTT messages using scripts.
Message "contents" for JMRI standard objects are typically single words that represent the state of the object. Specifics are discussed following. Advanced Usage: It is also possible to replace the standard message contents by using a custom version of the message parser (including using JSON messages).
All other messages on these defined topics are ignored by the standard JMRI processing.
As with all objects within JMRI, MQTT-connected layout objects (turnouts, sensors, lights, and signal masts) have a "system name" and may optionally have a "user name."
If you create objects by "adding" them to their respective tables, first select "MQTT" from the pulldown. Enter a string in the "Hardware address" field. As opposed to certain other JMRI connection types, this string does not have to follow any particular model and can be any alphanumeric characters. For example, MQTT-connected Turnouts can be specified with JMRI hardware addresses such as "abcd" or "123" or ".X$42". JMRI will prefix that string with the MQTT Connection Prefix and Object Type, creating System Names in this example of "MTabcd", "MT123", or "MT.X$42".
For MQTT-connected objects, JMRI creates a topic string composed of three parts for communicating with those objects:
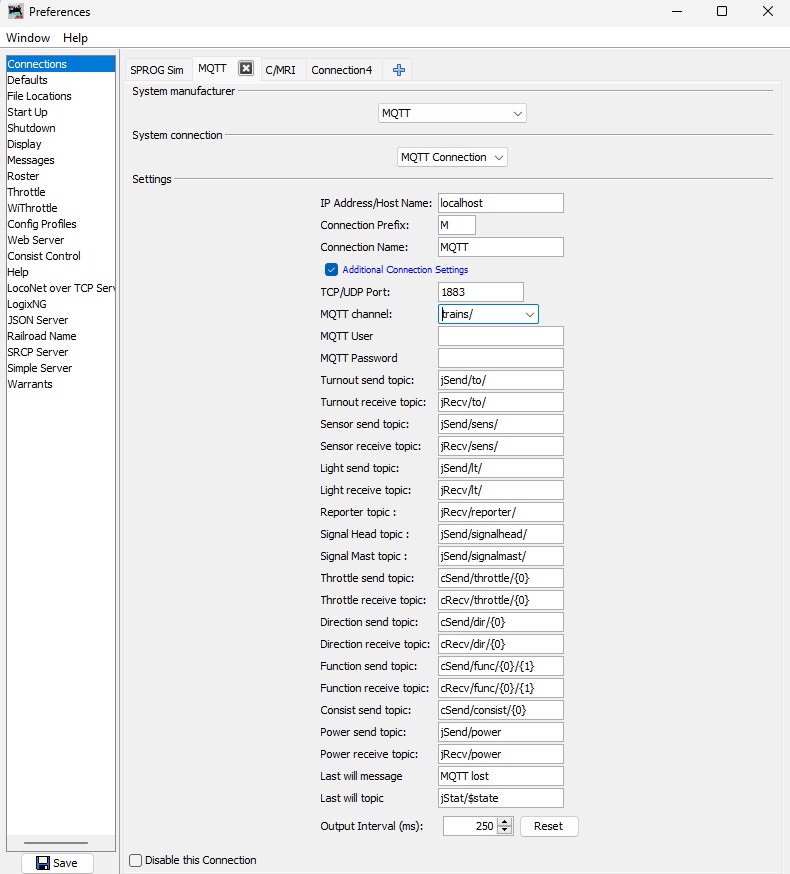
An example of MQTT-connected objects: Using the example entries in the JMRI Preferences Connection pane shown in the picture below, JMRI would construct the MQTT topic to publish the status of a Turnout with system name "MTabcd1" by concatenating:
yielding the complete MQTT message topic: "mytrains/Jsend/to/abcd1".
Advanced Usage: If you want the object's system name suffix to be in the topic string at some place other than at the end, you can use a placeholder of "{0}" within the string to put the object's system name suffix at that place. This allows you to set up topics like "Jsend/to/{0}/state" so JMRI will generate "mytrains/Jsend/to/abcd1/state" for turnout "MTabcd1".
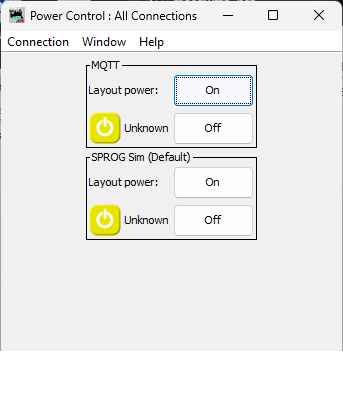
It is now possible to subscribe to and receive MQTT messages to turn track power on or off and to control engine throttles.
Since JMRI 5.5.4 JMRI publishes Track Power ON/OFF commands on the "Power send topic" and receives the track power status on the "Power receive topic". These messages will always be sent if you set power via the JMRI Power Control Window.
If you select an MQTT connection as the default for Power Control, MQTT messages will be published when selecting Power ON or OFF from the Power Control Window, the WiThrottle Server window, or any throttle connected via the WiThrottle Server, or any scripts that use "powermanager.setPower(jmri.PpwerManager)". [If multiple command stations types are connecte to JMRI, it is always possible to turn their track power on or off via the Power Control Window.]
Since 5.5.4 JMRI supports controlling locomotives over MQTT. Throttles attached to the specified MQTT connection (either by default or by using Tools⇒Throttles⇒Throttles for connections⇒[select from pulldown]) will publish MQTT messages on the indicated topics. The protocol is controller agnostic, however the internal design of JMRI imposes some compliance with DCC standards.
Throttles will generate and process MQTT messages as follows:
In the topics listed above, the placeholder "{0}" in the topic name is replaced with the loco or consist address that the throttle is controlling. When the throttle is Released, all of the above topics are removed from MQTT. If a throttle is Dispatched, the topics are retained on MQTT - this allows for locos to be controlled from a script but be able to be taken over and manually controlled as required (ie for shunting operations).
If you select an MQTT connection as the default for Throttle Control (by selecting the "Throttle" button on Edit⇒ Preferences⇒Defaults), any Throttle opened with Tools⇒Throttle⇒New Throttle from the main Panel window or using smartphone applications such as WiThrottle and EngineDriver will generate MQTT messages. You can always select a throttle for any installed connection using Tools⇒Throttles⇒Throttles for connections⇒[select from pulldown].
Since 4.99.7 LogixNG provides a significant upgrade to creating Logix procedures to perform a wide variety of functions with JMRI. One of its features is to publish and subscribe to arbitrary MQTT topics and then perform any of the other functions allowed in a LogixNG Conditional.
See Chapter 5 of the LogixNG Reference for information on entering Publish and Subscribe expressions into LogixNG Conditionals.
In a LogixNG conditional, any string defined by you as the "topic" is concatenated to the MQTT Channel to form the MQTT topic that will be published or subscribed. If you specify "mytrains/someobject" as the topic, JMRI will publish and subscribe on "[MQTT Channel]mytrains/someobject" using the MQTT Channel specified in the MQTT Connection Preferences. Slashes can be inserted for convenience. JMRI does not automatically insert any slashes.
An example of a simple LogixNG conditional that will publish an MQTT message whenever a sensor (Trigger2) is
changed is shown in 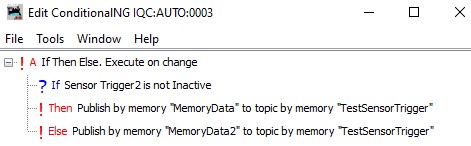 the picture to the right..
Using this LogixNG you can publish the sensor state
change using any text message of your choosing (in this example, the contents of JMRI memories MemoryData and
MemoryData2), for example, to a display or a sub-panel controlled via MQTT messages.
Furthermore, you could do that with any type of sensor, including internal and those that are connected to the
layout via other communication methods. [If the sensor Trigger2 is an MQTT-connected sensor, JMRI will have
already subscribed to state change messages from the layout. In that case, this LogixNG would additionally
publish whatever message you choose on the topic you specify.]
the picture to the right..
Using this LogixNG you can publish the sensor state
change using any text message of your choosing (in this example, the contents of JMRI memories MemoryData and
MemoryData2), for example, to a display or a sub-panel controlled via MQTT messages.
Furthermore, you could do that with any type of sensor, including internal and those that are connected to the
layout via other communication methods. [If the sensor Trigger2 is an MQTT-connected sensor, JMRI will have
already subscribed to state change messages from the layout. In that case, this LogixNG would additionally
publish whatever message you choose on the topic you specify.]
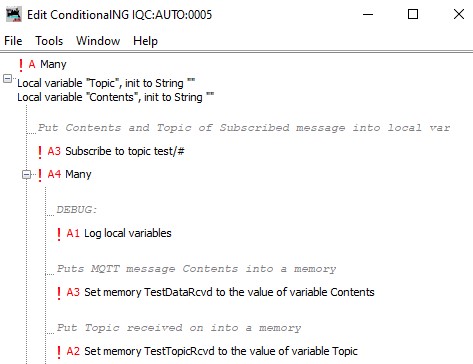
In the picture below, you can set up LogixNG conditionals to subscribe to any messages coming from any devices on the layout (in this case with topic "test/" followed by anything else; "#" is the wild card character). Note that for Subscribe, LogixNG requires you to specify the topic directly in the conditional expression (it cannot be, for example, in a memory as in the case of Publish). JMRI will put the topic and contents of the message into LogixNG local variables (Topic and Contents) and you can then use them or, as in this example, move them into JMRI memories (TestDataRcvd and TextTopicRcvd) for further use.
The JMRI MQTT capability is very general and scripts can be used to send and receive arbitrary messages from any MQTT-aware device on or off the layout. In addition, scripts can be used to change standard message processing and default parameters.
In a script, any string defined by you as the "topic" in a reference to an MQTT Adapter object is concatenated to the MQTT Channel to form the MQTT topic that will be published or subscribed. If you define "mytrains/someobject" as the topic, JMRI will publish and subscribe on "[MQTT Channel]mytrains/someobject" using the MQTT Channel specified in the MQTT Connection Preferences. Slashes can be inserted for convenience. JMRI does not automatically insert any slashes.
All the scripts discussed here can be found in the JMRI distribution jython directory under "MQTT." More information about scripting with JMRI is provided under Scripting in the JMRI Help and website. Custom scripts for MQTT will typically use the MQTT Adapter object and methods.
The SendMqttMessage.py is an example of how to send any message on any topic (automatically prefixed with the JMRI MQTT channel) for processing by other devices.
This script provides an example of using JMRI's MQTT "publish" method to publish signal head appearance changes
You can use the ReceiveMqttMessage.py script to subscribe to any topic on the JMRI MQTT channel (both for JMRI objects and custom) to receive message for further processing. Standard MQTT wildcards (# and +) can be used (as of release 4.21.3).
Advanced Usage: You can use a script to install a new MqttContentParser object to code and decode the content of messages. You might want to use JSON format, or need to adapt to specific messages from some already-existing device; you can create a custom parser to do any of that. See the SetMqttParser.py sample script. For a Java example, see the inner class implementation in MqttTurnout.
Note that you can call setParser(...) on the jmri.jmrix.mqtt.MqttTurnoutManager
or on an individual jmri.jmrix.mqtt.MqttTurnout
object. If you call it on the MqttTurnoutManager, all later created
MqttTurnout objects will use the new parser; earlier-created ones will not be changed. This
means you should execute a script to change the parser before loading any panel files if you
want all MqttTurnouts to be modified.
The sample script SetMqttPrefix.py shows how to set MQTT-connected object type specific topic components at JMRI startup. Note that any changes should be made at startup time before creating any such objects, i.e. the script must be run before any panel files are loaded. Changing the prefix only affects objects that are created after the change.
MQTT parameters Quality of Service and Retained Message used by JMRI can be reset via scripting. Example script SetMqttOptions.py shows how both of these parameters can be changed .

If you want to test using JMRI with the MQTT connection type, you can use a publicly available (non-JMRI) test server or install and run a copy of an MQTT Message Broker locally.
A popular message broker is provided by the mosquito.org foundation. Enter "test.mosquitto.org" as the Host Name on the Preferences Connections page to connect to this message broker (for more information, type test.mosquitto.org into a browser).
You can also install the mosquitto broker and tools on your own machine. After downloading the tools, enter one of the following command lines from the directory where they now reside:
mosquitto -v
If you are using version 2.0 of mosquitto or later, you will need to provide a "configuration file":
mosquitto -c "[location of your config file]/mosquitto.conf"
Include at least the following lines in mosquitto.conf:
    log_type all                 #Equivalent to setting -v (verbose mode)
    listener 1883                #To ensure listening on the appropriate port
    allow_anonymous true         #Allows JMRI to subscribe without an ID or password
Now enter "localhost" as the Host Name on the MQTT JMRI Connection Preferences page. You are now connected!
To subscribe and print all JMRI messages as they are published to JMRI's MQTT Channel "/trains/", enter this from the directory where you have the mosquitto tools:
mosquitto_sub -h test.mosquitto.org -v -t '/trains/#'
To publish messages for JMRI to subscribe to:
    mosquitto_pub -h test.mosquitto.org -t /trains/track/turnout/123 -r -m "CLOSED"
    mosquitto_pub -h test.mosquitto.org -t /trains/track/turnout/123 -r -m "THROWN"
These commands can be run on the same machine as JMRI, or from a separate machine.
See the mosquitto documentation for more information.
There are also MQTT tools available for iOS devices and Android devices that can be useful for monitoring, testing and operating your layout.