JMRI supports RFID readers in several different ways:
For a general introduction on how to get started with RFID in JMRI, see Getting Started with RFID.
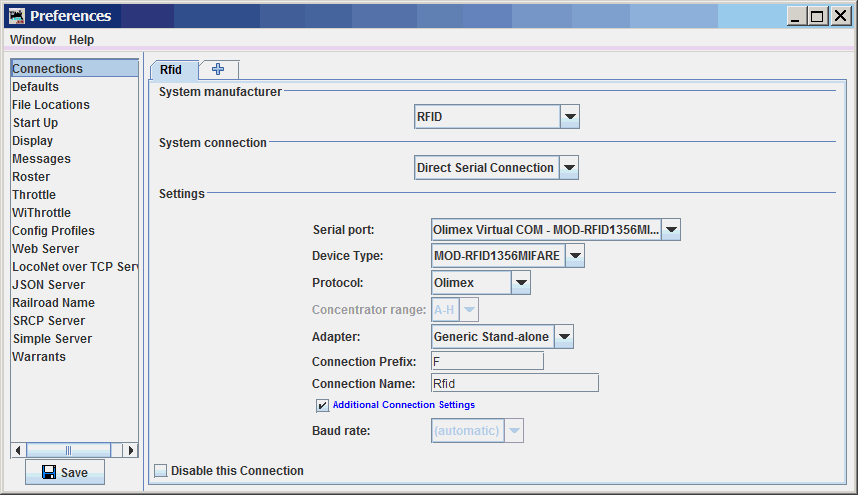
RFID hardware can be connected using Preferences Connections and selecting "RFID" as the "System Manufacturer".
Choose the appropriate Protocol when setting the Preferences.
JMRI also supports up to 8 individual readers connected via a Concentrator. Right now, the
only supported Concentrator is that from MERG, and
then only for readers using the CORE-ID protocol. [Note: arduinos
can also be programmed to emulate the MERG concentrator.]
Select "MERG Concentrator" for the "Adapter" on the Connections tab in the JMRI
Preferences. Note: The MERG starter kit as supplied should be
configured using the 'Generic Stand-alone' protocol - only when extending the kit with the
additional concentrator components should the 'MERG Concentrator' protocol be used.
You configure JMRI's connection to your RFID hardware in JMRI's Preferences.
It appears as "RFID" in the System Manufacturer drop-down list.
The "Baud rate" advanced connection setting is typically not critical for USB-connected RFID connections so it may be "greyed out" to indicate that it is not selectable.
Olimex MOD-RFID125 and MOD-RFID1356MIFARE readers must be operating in "CDC" mode. This mode is typically configured using a pushbutton on the reader.
Open an RFID Command Monitor window to see the RFID tags as they are received.
Open a window to see the tags and the Road name Car number (if the tag is associated to a Car in OperationsPro. see Monitor RFID Tags by Car for details.
The system letter for RFID connections defined on JMRI Preferences is "F". Details of RFID event and object names are described below.
JMRI associates RFID events with individual JMRI objects (Sensors, Reporters, etc.) via
System Names. A System Name like "FSA" defines a Sensor that follows the "A"
reader, whereas a System Name like "FRB" defines a Reporter that follows the "B"
reader. [Note that readers using MQTT will begin with "M" and readers controlled by scripts will
typically begin with "I" (for internal).
RFID readings coming from defined RFID connections can be accessed via JMRI Sensor objects. The Sensor's System Name determines which RFID Reader it corresponds to.
A Sensor is defined by two events: The one that sets it ACTIVE, and the one that sets it INACTIVE. When an RFID Tag is within the proximity of an RFID Reader, the associated sensor is ACTIVE; outside of these times it is INACTIVE. You create Sensors using the Add... button on the Sensor Table.
RFID readings coming into JMRI applications can also be accessed via JMRI Reporter objects. The Reporter's system name determines which RFID Reader it corresponds to.
A Reporter can contain arbitrary information, unlike a Sensor which is only ACTIVE or INACTIVE. Each Reporter is associated with some specific source of information on the layout, and makes that devices information available to the rest of JMRI.
When an RFID Reader reports that a specific tag has been seen, the corresponding Reporter will contain details of the specific IdTag seen. This then enables other JMRI tools to react to this information.
The Reporter Table
provides easy access to the contents of all Reporters that JMRI knows about. JMRI
automatically creates Reporter objects for devices discovered on the layout.
There's also an "Add..." button for
manually creating your own internal Reporters.
A Reporter's value can be displayed on panels in various ways. See Linking PanelPro tables to display RFID Tag names on panels for instructions.