A timetable describes the timing of trains running on a railroad. This information is used by train crews and dispatchers to prevent collisions. This also applies to model railroads, especially those using timetable and train order dispatching.
This tool provides the ability to collect the required data and generate a timetable graph that can be used to optimize train timing, such scheduling meets.The data for a Timetable is represented in a tree structure.
The window is divided into 3 sections.
| Item | Level | ||||
|---|---|---|---|---|---|
| Layout | 1 | New Layout | Duplicate Layout | Delete Layout | |
| Train Types | 2 | Add Train Type | |||
| Train Type | 3 | Duplicate Train Type | Delete Train Type | ||
| Segments | 2 | Add Segment | |||
| Segment | 3 | Add Station | Duplicate Segment | Delete Segment | Graph: Display | Print |
| Station | 4 | Duplicate Station | Delete Station | ||
| Schedules | 2 | Add Schedule | |||
| Schedule | 3 | Add Train | Duplicate Schedule | Delete Schedule | |
| Train | 4 | Add Stop | Duplicate Train | Copy Stops | Delete Train |
| Stop | 5 | Duplicate Stop | Delete Stop | Up | Down |
When the Timetable tool is selected from the PanelPro Tools menu, the timetable data is loaded from the TimeTableData.xml file. The file is located in the timetable directory in the user files location. If the file does not exist, a Sample timetable is copied from the JMRI install location.
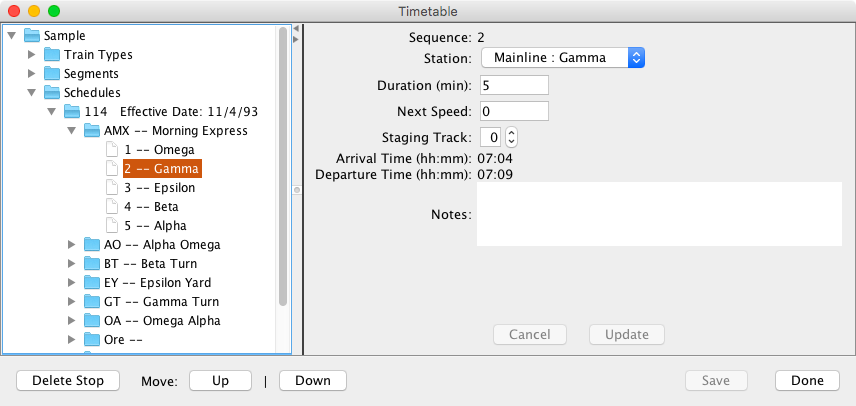
When a new node is added, it is created with default values, and the new node is automatically selected. The default name should be changed and the other default values should be reviewed.
When a tree node is selected, the detail section shows the current detail information. The field labels include tooltips. When a field is clicked on or changed, the Cancel and Update buttons become active and the Action buttons become inactive. When edit mode is enabled, selecting a different tree node is disabled until Cancel or Update is selected. A dialog will be displayed as a reminder.

If the Save button is active, there are changes that have not been saved. Select the button to save the changes. Four backup files are retained in the timetable directory.
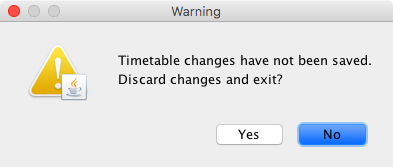
Select the Done button to close the Timetable window. If there are pending changes to be saved, a dialog will be displayed.
The Layout item contains global information.
The scale is combined with the fast clock speed and the metric indication to calculate the scale mile or scale kilometer. The resulting "smile/skm" is displayed at the bottom.
The train type contains a color that will be used for the train graph.
The colors help differentiate types or classes of trains.
Each layout requires at least one segment. Large layouts may have sub-divisions with each sub-division using its own segment.
When a segment is selected, the Graph Display and Print action buttons are added. Select the Display or Print button to display the train graph. If more than one schedule is defined, a dialog will request the schedule name.
A "station" occurs any place a train can stop or an arrival/departure time is desired. The first station in a segment will have a distance of zero. The remaining stations will have the cumulative distance. The distance is measured in feet or meters depending on the layout metric setting. When multiple segments are being used, the first station of a secondary segment will have the SAME station name as the mainline station.
The double track, sidings and staging fields provide documentation that may be useful.
The schedule defines time frame for the timetable.
if the duration is less than 24 hours, then trains will be restricted to running within the specified time frame.
The train item provides required information for the timetable and optional descriptive data.
The calculated duration for the train is also displayed as hh:mm.
since 4.99.4When a new train is added and before any stops have been added, the Copy Stops action button can be used to copy the stops from another train.
A stop occurs whenever a train has to perform some action or the timetable needs to display the time a train passes a location.
The series of stops define the route for the train. The assigned sequence number and the calculated arrival and departure times are displayed.
After the stops have been added for a train, the order of the stops can be changed by selecting a stop and using the Up or Down action buttons.
The route for a train can include station stops in more than one segment. For example, segment Mainline has stations A, B, C, D and E, and segment Branch has stations C, X, Y, Z. Station C is the junction point. A train running from A to Z would be assigned Mainline stops A, B and C. The Branch stops would be X, Y and Z. The rule for segment changes is that the first station on the next segment is not a Stop. Z to A would be Branch Z, Y, X and C and Mainline would be B and A.
The graph provides a graphical view of the data for a Timetable segment and schedule.
Select which Segment you want to graph from the Segments list.

The window is divided into 4 sections.
If the schedule duration is 24 hours, a train can wrap around the end of the day as long as the wrap occurs during a station stop duration period. If it occurs while the train is "running", the train diagram gets really goofy.
For trains that span segments, only the activity in the active segment is displayed.
The CSV Import menu item can be used to create and extend the data for a timetable by using additional data from other sources. The input file has the following format.
CSV Record Types. The first field is the record type keyword (not I18N). Most fields are optional.
Except for Stops, each record can have one of three actions:
Minimal file using defaults except for station names and distances:
  "Layout"
  "Segment"
  "Station", "Station 1", 0.0
  "Station", "Station 2", 25.0
  "Schedule"
  "Train"
  "Stop", 1
  "Stop", 2
The import applies the changes to the data in memory. At the end of the import a dialog is displayed with the option to save the changes to the timetable data file.
OperationsPro has the ability to export a CSV file that can be imported into the Timetable tool. The Import from OperationsPro... menu item combines the export and import steps.
Due to the differences in data between the two systems, the resulting data will need to be reviewed and changed as necessary.
The CSV Export menu item is used to create a CSV file that can imported into a spreadsheet program. The timetable data will be for the selected layout, segment and schedule. The train names will be sorted by name and grouped by direction of travel. The stations will be in order based on distance.
While turns are supported by the graphing process, they don't work for a timetable since they have both up and down directions. For these cases use two trains, one for going out and a second one for returning. In the sample below, BT and GT are turns that highlight this issue.
CSV Content:
Sample spreadsheet using the CSV export file:

The following diagram shows the data relationships.
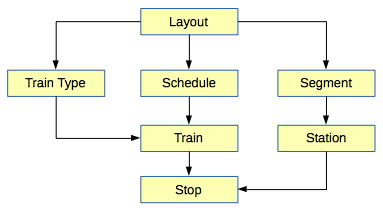
Each record (Java class) has a primary key. This is assigned by the timetable data manager. Foreign keys create the data structure.
The Timetable data is stored in a fixed xml file located at preference:timetable/TimeTableData.xml. The first time the tool is used, the directory is created and a sample data file is copied from program:xml/demoTimeTable/TimeTableData.xml.
Access to the data is handled by the TimeTableDataManager. The data manager is obtained by calling TimeTableDataManager.getDataManager(). This is a static method that returns the current manager or creates a new one. If a new data manager is created, the data is loaded from the data file. The can only be one occurance, and therefore data, at the same time.
The data manager provides data access methods for the TimeTable application as well as any other JMRI components, such as Jython. The data manager and the data classes perform extensive integrity checking. The IllegalArgumentException will the thrown for any errors. The exception includes a keyword describing the problem. Some exceptions have additional supporting data.
A sample Jython program, TimeTable.py, is included in the JMRI distribution. The program shows how to establish the data manager connection and navigate the timetable data structure.