This page introduces Signaling, lists the JMRI Signaling Tools and points to more advanced methods.
Modeling railroad signaling on a layout can be done in many different ways, ranging from simple "stoplights" to a complete emulation of a particular prototype's signaling rules. JMRI provides a combination of tools to implement Signaling. JMRI supports prototypical signaling based on signal Aspects and Appearances along with CTC dispatching and interlocking, without requiring the user to write any script or Java code.

Different railroads have different Rules to operate rail traffic, using different terms.
In their respective Rule Books, they use different Aspects for rules of the same name. And
some will have different Appearances to make up those Aspects (e.g. semaphore vs. single
lamps vs. color-position signals vs. position light signals vs. cab signals vs ...)
Picture on the right: a CSX Searchlight Signal Mast with 2 Signal Heads, showing a "red over
red" Aspect, meaning the "Stop" Indication.
Across the world railroads have developed a wide range of signaling hardware such as Flags (not supported in JMRI), Semaphores, Position Light Signals and Color Light Signals. Different physical signals may show the same "Indication" using different combinations of lights, semaphore positions, and/or placards; these patterns of lights are called "Aspects". For example, the "Stop" Aspect will be a single red light on a signal mast with only one lamp, red over red lamps for a signal mast with two lamps, etc. To learn the rules of the railroad you model is part of the hobby but JMRI helps by providing more than 20 prototypical signaling systems from different countries to choose from. Still, it's up to the engineer to interpret the Signal Aspects displayed and adjust the throttle...
Much of basic Automatic Block Signaling (ABS) can be boiled down to "a Signal goes Red when a train can't safely enter the block it protects; it goes Yellow when the block following the protected block can't be entered". Although that's a simplification, it can serve as a good starting point for understanding signaling logic. More modern signaling systems are Absolute Permissive Block (APB) signaling used by many western US railroads and Centralized Traffic Control (CTC) remotely operated from large switchboards.
Example #1: Signals at a controlled switch with single track approaching from the left to
two tracks moving to right - 2R (facing point), 2L (main route), 2LA (diverging route). 2LA
would be shown as 2L on the panel to correspond with Signal Lever 2. Cardinal directions
might also be used (N, S, E, W) at a diamond for the opposing route. Switches are N (normal)
or R (reverse).
Example #2: Dennis Drury's CTC signals get even numbers with a directional modifier such as E
50 W or E 52 W. The intermediate block signals may be numbered based on milepost locations
such as 322.2 and 322.3.
Thanks to Jim Duncan, who adds: There are always exceptions! Any labeling must be consistent, easy to understand, and have absolutely no possibility of being confused with any other signal, switch or lever.
There are a lot of excellent sources of information on prototype signaling, including:
It is really straight forward to use Aspect Signaling, especially if suitable signal
hardware is already configured in JMRI or you want to use Signal Masts with more than one
Signal Head. Aspect Signaling in JMRI uses of a series of Aspect definition files that come
with JMRI since version 2.9. In addition to tapping into one of the more than 20 prototypical
Signaling Systems that come with JMRI, you can
tweak one to suit your hardware and operations or define your own and share it as part of a
next version of JMRI.
JMRI provides the following core Signaling Tools, available from the Tools >
Tables > Signals > menu:
1. Signal Head objects represent the individual lights of a signal and can be created, changed, deleted and set to specific Appearances (colors) in the Signal Head Table. One or more Signal Heads usually are part of a Signal Mast. For signaling decoders that directly support multiple Aspects, it may not be necessary to create individual Signal Heads before creating Signal Mast objects.
2. Signal Mast objects represent an
entire signal with one or more Signal Heads. Using Signal Mast objects allows you to display
prototypical Aspects on signals. You specify what kind of Signaling System is to be used, the specific Signal Mast
type e.g. "double searchlight" or "single head dwarf" and which Signal Heads or aspect aware
signal hardware this Signal Mast is going to drive. When the Aspect of
a Signal Mast is set to e.g. "Approach medium", JMRI handles the layout communication needed
to make the signal on the layout display the right colors.
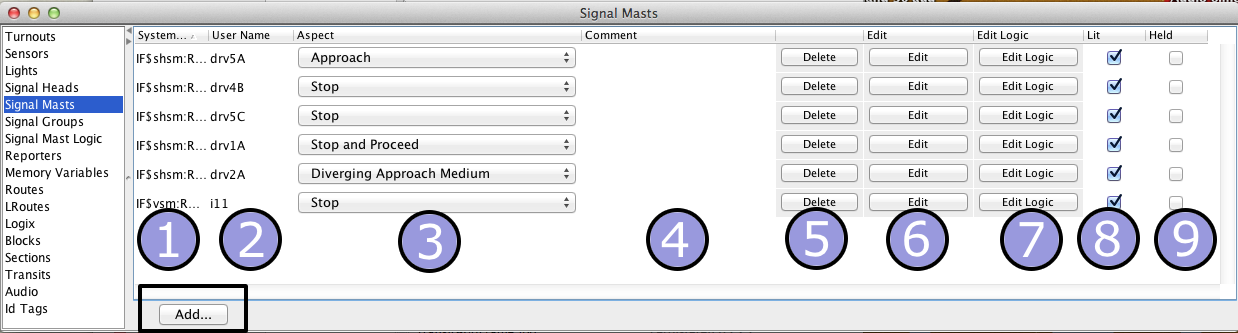 Signal Masts are configured through the
Signal Mast Table.
From the Signal Mast Table, you can create and edit Signal Masts and set individual Signal
Masts to any Aspect that they're able to display by clicking in the "Aspect" column.
Signal Masts are configured through the
Signal Mast Table.
From the Signal Mast Table, you can create and edit Signal Masts and set individual Signal
Masts to any Aspect that they're able to display by clicking in the "Aspect" column.
You can add a Signal Mast icon in the Panel Editor in the usual way. The Signal Mast icon
will display the images from the Appearance definition for that particular Signal Mast type
and Signal System.
3. Signal Groups are used to define a
number of Signal Heads, where only one Signal Head can be illuminated at any given time,
depending upon the Appearance (Status) of the associated Signal Mast and a set of
conditions.
Signal Groups would be used where additional indicators are installed to support the main
Signal Mast, such as Junction, Route or Speed displays. These indicators provide additional
information to the driver (US: engineer) that is not given by the main Signal Mast. Such
indicators are frequently seen in European and UK signalling.
4. The Signal Mast Logic tool allows
the Signaling Logic to be built up as pairs of conditionals between Signal Masts on the
layout. Each Signal Mast Logic will use the states of Blocks, Turnouts, Sensors and other
Signal Masts to determine what Aspect a particular Signal Mast should be displaying.
If the layout has been drawn up using the Layout Editor and Signal Masts have been placed on
the panel using the various tools, then it is possible for all the Signal Mast Logic to be
dynamically built, with little user intervention. For panels created with Control Panel
Editor some of this information is to be entered manually.
5. The Signal Mast Repeater tool allows one signal mast to follow another signal mast's aspect, or for two signal masts to follow each other (i.e. the most-recent aspect change is reflected by the other mast). This can be convenient for providing a duplicate of a signal's aspect via different hardware, and may also be useful when creating "Signal Mast Logic" for complicated track arrangements.
All the information in the Tables is saved with the configuration in an XML file, along with control panel setup, Logix, Routes, and similar stuff. For more information on creating and displaying panels, including how to show signals on your panels, please see the Panels help page.
What's next?
A JMRI Logix provides logic and control capabilities for JMRI objects, including Signal Heads and Masts. Logix can be used to configure custom signaling logic by filling out forms, without writing any code. A user defines "Conditional" logic and the "Actions" that take place depending on the state of the logic. The following sub-sections show how Logix can examine and control Signals.
State variables related to Signal Heads and Masts currently available for use in Logix Conditionals are listed below, along with information on each. State variables must always evaluate to either True or False. The condition resulting in True is given for each. If the condition is not met, the state variable evaluates to False. When a Logix is active, the states of entities (Sensor, Turnout, Signal Mast, etc.) specified in state variables in its Conditionals are monitored. A calculation of all Conditionals in the Logix is triggered when any monitored state changes as noted below. Note: Not all Logix conditionals are listed here.
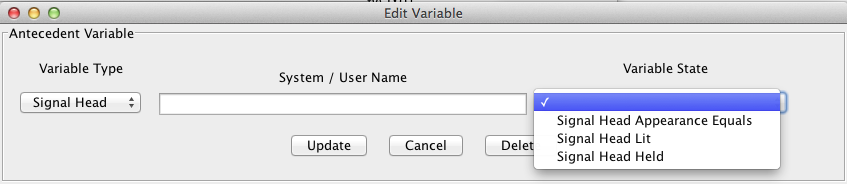
Conditionals for Variable Type "Signal Head":
Conditionals for Variable Type "Signal Mast":
Actions related to Signals Heads and Masts currently available for use in Logix Conditionals are listed below along with information on each. Note: Not all Logix actions are included here.
For more information see the Logix help pages.
Just like other objects in JMRI you can set and read Signal Heads, Signal Masts and Signal
Mast Logic via Scripts. Instead of defining our own language to accomplish this, JMRI Scripting uses the "Python" language that's commonly used
in web development.
Several methods from the jmri_default.py file can be used to work with signaling. Methods
that may be used in a Python script to interact with Signal Masts include: getAspect(),
getSignalSystem(), getValidAspects() and setAspect(Stop). See these Examples.
To script a Signal Head the 'getSignalHead' method can be used. Then, 'setAppearance' is a
method of the returned SignalHead object. Example:
signals.getSignalHead("IH1").setAppearance(YELLOW)
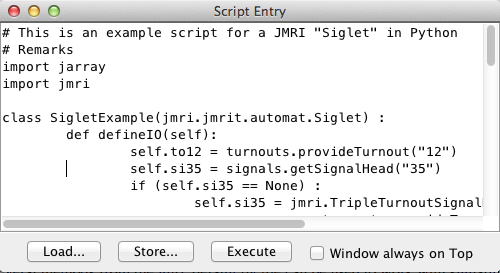
SigletExample.py
An example script for a JMRI "Siglet" in Python. It listens for changes to two Sensors and a
Turnout, and then recalculates a Signal Head Appearance based on the values.
Although Automation Classes require writing code instead of just filling out a GUI form, JMRI handles all of the details of reading status changes from the layout, writing desired aspect changes back to the layout, and even the details of "which outputs do I have to set to get signal Apple Siding East to show Yellow?". You can concentrate on just the signal logic in the code you write.