The Speed Control pane looks very complicated, but it can be one of the most significant in improving the performance of your locomotive fleet. Remember if you use Speed Table TAB this TAB is not used.
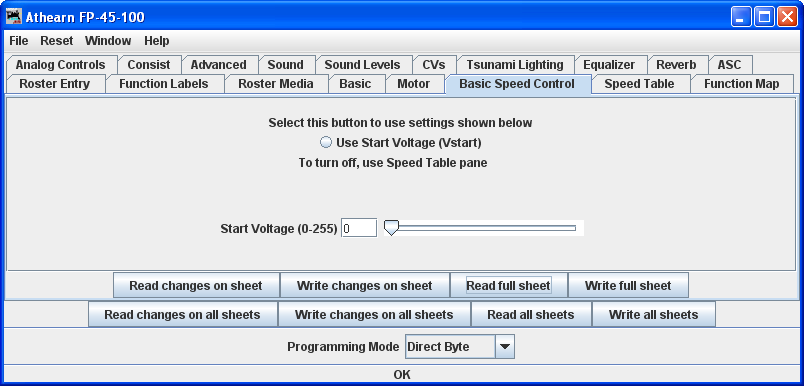
Let's look first at the top of the pane: You now have the option of using Basic Speed Control (this pane) or Speed Table to control your locomotive's speed. Use the tabs at the top of the screen to select the method you wish to use and then click the button in the top center for the page to select that method of speed control. Whichever one you select last with the button will be the method used for speed control.
Now back to Basic Speed Control Pane. We see the Start Voltage(0-255) slider to set the start voltage. What appears in the body of this panel is dependent on what is available from your decoder manufacturer. Most have something similar to what is shown, but the Soundtraxx Tsunami series is very limited. We'll show you a way around this limitation when we get to the Speed Table screen.
Three important CVs are programmed in this pane Vstart, Vmid and Vhigh. They work together to make a very basic three point speed table. On some decoders these settings may be labeled differently and all three may not be available. DecoderPro will show the correct options for your selected decoder.
Possible setting that can appear on this TAB.
Vstart(Start Voltage) is the voltage at the first speed step. If your locomotive didn't start moving until there were three volts on the track with analog power, this lets you set up the decoder to give it 2.99 volts right away, so it will start moving when you advance your DCC throttle.
Vhigh(Top Voltage, Max Voltage, Maximum Voltage) is the maximum amount of power the locomotive will get from the decoder. If your locomotive looks like Chuck Yeager's X-1 at full throttle, then you can trim the top speed down to a more reasonable scale level. A similar looking limit can be set on the Roster Entry screen, but it only apples to JMRI Throttles.
Vmid(Mid Voltage, Midpoint Voltage) lets you configure the slope between Vstart and Vhigh a bit, so that if your locomotive reaches full speed at 5 volts, you can stretch out the lower end of the curve to get more fine control in a useful speed range.
If you are having problems with unpredictable speeds with your locomotives, check these settings. Sometimes, one or more of these settings have been changed accidentally (usually due to an error in programming CV's with a throttle), leading to very odd speed performance. In particular, if the Vmid is lower than Vstart or higher than Vhigh, results can be highly unpredictable. DecoderPro will not let you make this mistake.
Forward Trim and Reverse Trim allow you to compensate for differences in the forward speed and reverse speed of the locomotive. Most model locomotives do not run at exactly the same speed forward and backward due to the motor mechanics and the gear train to the wheels.
The settings for these controls are not as intuitive as you might think. A setting of 0 in these CVs turns them off. However, a setting of 128 in either of them will have no visible effect! To make the forward and reverse trim effective, raise the value above 128 to increase speed, and lower it below 128 to decrease speed in this pane. The Forward and Reverse Trim does not work the same for all decoders, with variations between manufacturers.
Unless you want to get into some precision speed matching, you probably won't need to use the Speed Tables you'll see on the Speed Table pane- you'll be able to accomplish much of what you want using just Kick start (previous pane), and Start Volts, Mid Volts, and Max Volts if they are available in this pane... but how to do this?
Start with the Kick start value, and Programming on the main rather than the programming track. Set the locomotive to be programmed on throttle step 1. If it moves at all, don't change the Kick start value. If it doesn't move, slowly step up the throttle until it does. Then, turn the throttle down. If the locomotive stops at the same setting it started, you won't need to set the Kick start value. However, if it continues to run at a slower speed than it would start, then increase the Kick start value until it will start and run at its slowest possible speed.
Now, if the locomotive isn't running at throttle step 1, increase the Start Volts value (and write it) without changing the throttle until the locomotive barely crawls... you can usually get this down to a speed of a tie a minute or so if you like! Remember, you are doing this in "ops mode", so you can make these changes while the locomotive is actually running. Don't forget to write the value changes to the decoder - they won't take effect unless you do.
Now, set the top speed of the locomotive. Run the throttle up to full, and lower the Max Volts value (and write it) until the locomotive runs at the maximum speed you want it to reach, but don't forget that adding a train will slow it down!
Finally, set the Mid Volts value about half-way between Start Volts and Max Volts. Setting it above or below the median of the Start Volts and Max Volts values will give you a crude, three point speed table.
There are no hard and fast rules for the exact numbers to use. Even identical locomotives with identical decoders will need different numbers, due to variances in motors and drive trains. Experiment with the settings - DecoderPro makes it easy!
Note: Not all decoders will have Start, Mid and Max Volts, but will have some version of this which will be displayed by DecoderPro for the specific decoder.
If you select Speed Table all of
the settings in this pane are ignored.