One of the first things you will notice about the expanded Basic Pane in the Comprehensive Programmer is that there are a lot more options than you found in the Basic Programmer. Now use the Read full sheet button to read the values that the locomotive is programmed to. Now you can determine if you want to change any values.
Select 2 or 4 digit addressing radio button to select which mode of addressing you wish to be active
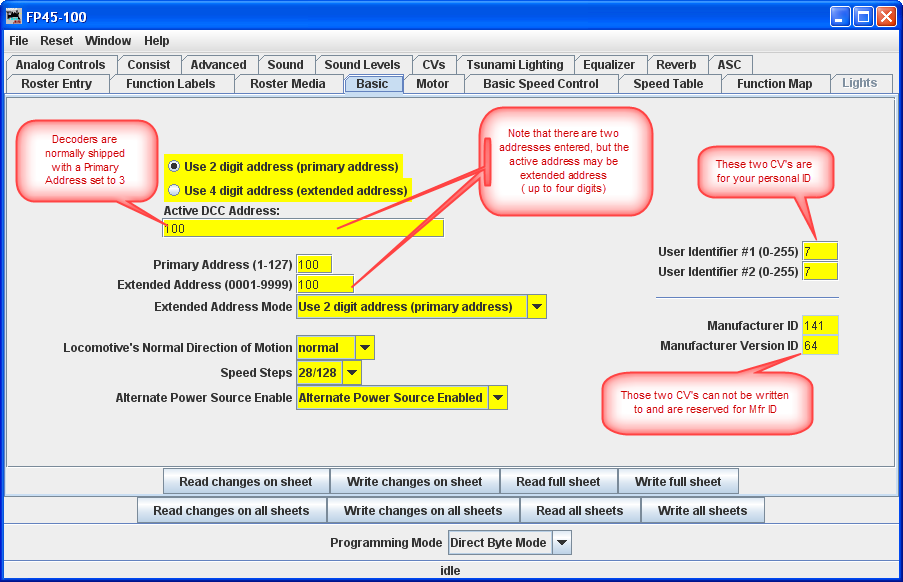
You can enter locomotive addresses in both the Primary address and/or the Extended address. The address of a decoder is the prefix for the code it responds to. This is how you are able to run multiple locomotives on a single line and keep all their speeds and functions independent. Decoders originally could have only a two digit address... after all, who could possibly need more than 100 locomotives? Some lower-end command stations and decoders still use only two digit addressing. Newer decoders can have up to a four digit address. The "Addressing Mode" option lets you choose between two and four digit addresses. The addresses themselves are input into the appropriate text boxes. The "Extended Addressing" check box turns on and off the 4 digit address mode. This allows you to have two different addresses stored in a decoder, and toggle between the two.
Normal direction of motion: Set the Locomotive direction: normal or reverse from the drop-down list. The option for Normal direction of movement is important for people who model railroads like the NS, who ran diesel locomotives long hood forward, or for the person who occasionally makes a mistake and hooks the decoder up in reverse. It lets you change the direction defined in the decoder as "forward" (no disassembling and rewiring).
Speed Steps: Unless your command station or decoder can only handle 14 speed steps,choose the 28/128 setting. If your decoder offers 128 speed step operation, you'll find you get much finer control of your locomotives by using the 128 speed steps setting. You choose between 128 or 28 with your throttle, when the locomotive is ready to roll on the track.
Analog operation (enables the decoder to run under regular DC
voltage/analog
control) Enable Analog Operation with caution, as some decoders will jump to full speed
resulting in a "Runaway locomotive" if they are enabled for Analog Operation and encounter
power spikes on a DCC digital signal. They seem to get confused, and revert to Analog
operation and use the full track voltage DCC power to take off and GO! There is no stopping
them without removing layout power. Very disturbing to your operating mates, but better than
running into them at full tilt.
To enable Analog (old style DC, some vendors refer to this as dual mode) Operation select the appropriate entry from the drop-down list.
User ID #1" and User ID #2 (off to the right} there are two CVs that have nothing to do with any function of the decoder. They simply provide you with a method of electronically marking your equipment. Use these CVs, even though you may have custom-painted equipment for your own freelanced railroad - it provides one more way to identify your decoders if they are removed from the loco.
At the bottom of all the programmer panes you will find three rows of buttons, as shown :

The top row operates ONLY on the currently visible pane. These buttons are:
The second row of buttons performs essentially the same functions, but on the entire range of CVs for the decoder. This allows you to read all CVs, for example, or to make a series of changes across several panes, and when done then write them all to the decoder. Again, you have the option of reading/writing only the changed data, or all data.
Below the two rows of buttons is a text line that shows what the current programming mode setting, and a Set... button that allows you to change it without exiting the programmer. click here for further information on Programming Modes.
Finally, the bottom line of the pane is a status bar that tells you exactly what the system is doing. It shows idle in these screen shots because the system was not actively programming decoders when they were made.
Later on, you might want to search for a specific options. Ctrl-F or Cmd-F will open a small find bar at the bottom of the pane where you can enter a search string. Hitting Return will find the first occurrence. There are right and left arrows to find the next occurrence forward and backwards respectively. Ctrl-G or Cmd-G will also find the next forward occurance. The "Done" button will dismiss the bar, but you can leave it up without it interferring.
Now Lets go to the Motor Tab.