CV16 is the ID of a particular decoder; if you have more than one decoder in a locomotive, they should have different values in CV16.
CV15 is used to unlock one decoder (and lock the others), so it can be written.
Only decoders that have the value in CV15 equal to the value in CV16 will respond to reads and writes. Since you're supposed to originally set up the two decoders with different CV16 values, this means you can use CV15 to select which decoder you want to talk to.
If a DecoderPro user did a write-all-sheets and changed either of those, future programming operations would be problematic.
Hence, people writing decoder definitions are strongly encouraged not to include CV15 and CV16 (when they are used for decoder lock) in their definitions, or to include them only as "constant" CVs so the program will not write them. The user can then program those CVs using the "Single CV Programmer".
 When this feature was first coming into use,
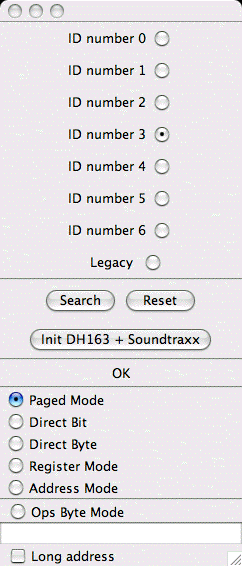
a "Multi-Decoder Tool" was written for JMRI (see image to right).
When this feature was first coming into use,
a "Multi-Decoder Tool" was written for JMRI (see image to right).
It has several parts.
At the top are 8 buttons that you can click to unlock a particular decoder in the locomotive. E.g. if you click "3", the decoder configured with "3" in CV16 will be unlocked. If possible, the program tries to verify that the decoder is present and communicating; the status is shown in the middle of the window ("OK" in the illustration).
If you click the "Legacy" button, all decoders with the lock feature will be locked out. This is so you can write to an additional decoder without the lock feature. E.g. if you have one decoder with, say "2", and one without the lock feature, you can still configure them by:
In the center are some buttons for automated operations you might find useful:
Finally, the bottom part of the page allows you to control the programming mode in use.
Although it's possible to use this tool in "Ops mode" (programming on the main), in that case it's not able to confirm operations, so one can't be 100% sure that the right decoder is selected.
DCC users sometimes want to install more than one decoder in a single locomotive. One common case is using separate decoders for motor control and sound. Because these decoders often need to have their CVs configured separately, a mechanism is needed to communicate with only one at a time.
This mechanism must be able to:
  0: Reset value, as shipped

  1: Motor decoder

  2: Sound decoder

  3: Function-only decoder (e.g. for additional lights)
CV15 is used to select the decoder that will respond. When the values in CV15 and CV16 are equal, all CVs in the decoder can be read or written. When the values in CV15 and CV16 are not equal, only CV15 can be written.
Some manufacturers may want to provide a bit in a CV to enable/disable this feature. If so, that should be in a CV reserved for the manufacturers use, as no NMRA CV has been reserved for this purpose.
Note that a command to reset the decoder to default CV values must not be acted upon unless the CV15 and CV16 values are equal. This prevents the user from accidentally resetting multiple decoders at the same time, and losing the ability to separately address them.
To configure decoders at installation:
Before installing each decoder in the locomotive:
Note that if the user is installing only one decoder, there is no need to modify the default values of zero in CV15 and CV16.
To access a decoder after installation:
Because the ID values are low, a successful read is quite fast. An unsuccessful read, i.e. when the decoder is not present, will take some time on many existing command stations, but eventually give an answer. This can be made faster in the future by having command stations attempt to read just the expected value, instead of 0 to 255, in the absense of an acknowledge.