JMRI was used to create the dispatcher control panel for Nick Kulp's Cornwall RR. This page briefly describes how it was done.
Note this was all done from 2004 starting with JMRI version 1.1.13.
However the approach still works with recent JMRI versions.
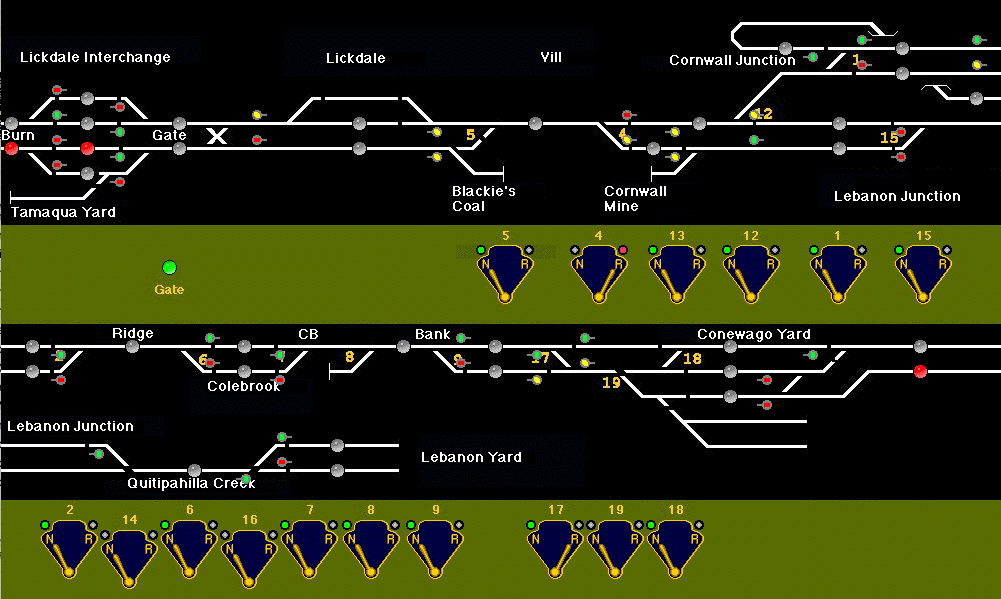
The layout has 45 signal heads controlled by the C/MRI system. Most have red, yellow and green aspects; there are a couple that also indicate diverging routes with flashing yellow. The signals respond to occupancy to provide an automatic interlocking system.
Originally, the dispatcher worked via applications on two computers. One ran the C/MRI system that showed block occupancy and drove the signals, while another application on a different laptop was used to throw turnouts.
The most recent version of Nick's program is included as an example in each JMRI download. You can install and run it yourself if you'd like to see what it really looks like and play with the signals, etc. For more information, see the page on Running Nick Kulp's Cornwall RR Program.
The first step was to draw the background of the panel into a GIF file.
In this case, the track schematic was drawn as 3-pixel white lines on a
black background, with connecting lines for turnouts drawn at a 45 degree angle.
You can do this with any paint program you happen to have, but this picture
was drawn with "GraphicConvertor" on a Macintosh.
To save screen space, the schematic was split into "over" and "under" parts. This is not very prototypical, but certainly works well. Since the GIF file only uses three colors, it was made much smaller by storing it in 4-color mode.
To turn this picture into a control panel, you have JMRI display it, and
then place "icons" in front of it that are redisplayed as the layout status
changes. For example, there are icons for lit
 and unlit
 red LED indicators. By having a "SensorIcon" display a red LED when
a particular block is occupied (sensor active), and a gray one when the
block is unoccupied (sensor inactive), you get an occupancy indication on the
panel.
red LED indicators. By having a "SensorIcon" display a red LED when
a particular block is occupied (sensor active), and a gray one when the
block is unoccupied (sensor inactive), you get an occupancy indication on the
panel.
To actually do this:
If you have lots of icons to place, this can become unwieldy. The panel definition is stored in a human-readable form in an XML file, which you can directly edit. Each icon on the screen in one line on the screen, with some extra stuff at the top and bottom of the file. The format is almost self-explanatory. x="12", for example, means draw the icon at an x coordinate of 12 pixels; the top left corner is 0,0 (x, y), with y growing down the screen. (Details...) You can duplicate and edit lines with your favorite tools. For example, if you want to have to icons line up on a horizontal line, you might find it easier to position the first item perfectly by hand, and then edit the rest of the lines to have the same y= coordinates.
A similar technique is used for the turnouts on the schematic. The indicators
on the schematic are meant to show the actual positions of the turnouts, not
just the last status sent by the DCC system, so they respond to the C/MRI sensors
using two icons:
 and
and
 .
These are positioned over the turnouts on the track schematic background.
They cover (with the little back blob) a bit of track on either the normal
or diverging route, so that the screen displays only one line as complete.
In this case, these icons were made by clipping a few pixels from the
background drawing.
(Details...)
There are "left" and "right" sets for the two basic types
of turnouts used; they can be rotated via the popup menu to work with the various
turnout orientations on the schematic.
.
These are positioned over the turnouts on the track schematic background.
They cover (with the little back blob) a bit of track on either the normal
or diverging route, so that the screen displays only one line as complete.
In this case, these icons were made by clipping a few pixels from the
background drawing.
(Details...)
There are "left" and "right" sets for the two basic types
of turnouts used; they can be rotated via the popup menu to work with the various
turnout orientations on the schematic.
Next, we start adding the turnout controls. These are attached to DCC turnouts,
not C/MRI sensors, so that they will send a DCC message when clicked. The
show two different images depending on whether the turnout has been commanded
to be "Closed/Normal"
 or "Thrown/Reversed"
 .
.
 Nick also wanted the turnout controls to look like they had small indicator
lamps over each side to show the actual status of the turnout. This was done
by adding two sensor icons there. The one on the left would show
Nick also wanted the turnout controls to look like they had small indicator
lamps over each side to show the actual status of the turnout. This was done
by adding two sensor icons there. The one on the left would show
 if the turnout was closed, and
 if it was thrown. The icon on the right
would do the reverse, showing
if the turnout was closed, and
if it was thrown. The icon on the right
would do the reverse, showing
if the turnout was closed, and
 if it was thrown.
Finally, the turnout number over the switch plate was added as part of the background picture, and the control panel was ready to go.
All of the above can be done using just the JmriDemo program that's part of the normal distribution. Nick wanted a couple more things, though:
Like input sensors and turnouts, JMRI can display signal icons on the screen
that follow the aspect of a signal head. The Cornwall panel was setup to
use small graphics for this to avoid making it too busy:
red  ,
yellow
,
yellow  ,
flashing yellow
,
flashing yellow  ,
green
,
green  .
.
To actually drive the signal aspects from the turnout and occupancy status,
Java code was written based on JMRI's
automation classes. (Today, we would almost certainly do this using
the JMRI scripting support, but the Cornwall program was written before that
was available)
Each of the 45 signals is driven by its own code snippet.
Since Nick already had a QBASIC program to use as an example,
the CrrSection class was created that would let the Java signal logic
code look very similar. For example, this is the logic for
signal 13B:
    int value = GREEN;
    if ( !tu7 || bo15 || tu8 )
        value = RED;
    else if (!tu9 && bo22)
        value = RED;
    else if (tu9 && bo23)
        value = RED;

    if (value == GREEN && !tu9 && si87)
        value = YELLOW;
    else if (value == GREEN && tu9 && si90)
        value = YELLOW;
Note that although prototype signals use logic that "starts with red, and see if you can find a reason to turn it green", the existing Cornwall logic was written the other way around. Rather than change that, we wanted to get that same logic into the new program with as little change as possible.
JMRI makes it very easy to debug this logic, as the program doesn't have to be connected to the layout to let you test it. You can change the state of an occupancy detector or turnout sensor on the display (though clearly not on the layout itself!) by clicking on it, and then see whether the signals respond appropriately. Even complicated interlocking logic can be checked out quickly using this.