The JMRI Manual
Download
Installing JMRI
Getting Started
Using DecoderPro®
DecoderPro® Programming Modes
The Basic Programmer
The Comprehensive Programmer
The Advanced Programmer
DecoderPro® Main Window
JMRI® Operations Program
Creating a Decoder Definition
Error Messages

Using JMRI® to Operate Trains

Operations Settings Window


Menus

ops setting window

Tools

  • Options
  • Opens the OptionsWindow
  • Print Options
  • Opens the Print OptionsWindow
  • Backup
  • Opens the system Savedialog
  • Restore
  • Opens the system Opendialog
  • Load Demo Files
  • Opens the Demo load successful dialog box

    Demo load

  • Reset Databases
  • Opens the Reset Databases dialog box

    reset database

Operations

Windows

JMRI normal window menu

Help

JMRI normal help menu

.

ops set

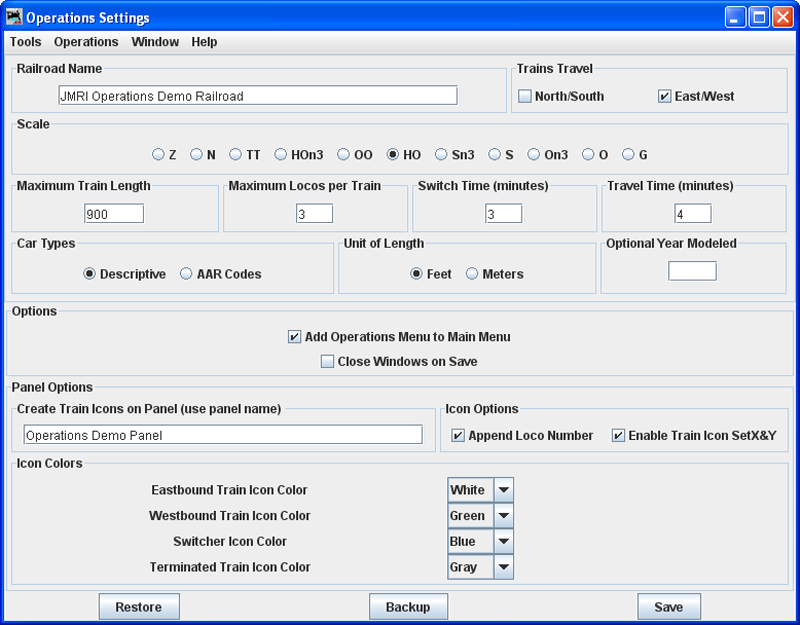
Railroad Name
Enter the name of your railroad. This name will show up on your manifests You may use a different name for every train in your roster. See Train Options for details.

Trains Travel North/South
East/West
If your railroad depicts trains traveling north and south select the "North/South" box, if your trains travel east and west select the "East/West" box. You must select at least one direction, and can if desired select both.

Scale
Select the radio button for the scale of your railroad. This will be used in calculating scale feet when you enter actual inches. Select the scale you are modeling. This is useful when you enter the length of cars and tracks. You can enter the number of actual inches and the program will convert to scale feet. Append a double quote to the length when entering actual inches. The program will also automatically assign the proper NMRA weight for a car based on scale and length.

Maximum Train Length(ft)
This field provides the maximum default train length between cities. Later you can override this length if you wish a shorter train between any two locations. A 1000 foot train can carry approximately 20 cars, and is of course dependent on the car lengths assigned to the train.

Maximum Locos per Train

Now set the maximum number of locomotives that you want the program to assign to a train. If you don't want the program assigning engines, set this value to 0.

Switch Time (minutes)

Travel Time (minutes)
The program when generating switch lists for the various locations on your railroad, will estimate the arrival times for your trains based on the train's departure time and the switch and travel times. Enter the average number of minutes it takes to drop or pickup a car on your railroad. Then enter the average amount of time in minutes it takes to travel from one location to the another. Later when you create a route
you will be able to increase or decrease the train's travel time betwee any two locations.

Car Types

Descriptive AAR Codes
The program has two sets of car types for you to use. Descriptive provides type names like Boxcar and Tankcar, and AAR provides type names like XM and T for boxcars and tank cars respectively. Select the one that you prefer.

Unit of Length Feet Meters

Optional Year Modeled
You can optionally enter the year you want printed on your train manifess.

Options


Add Operations Menu to Main Menu
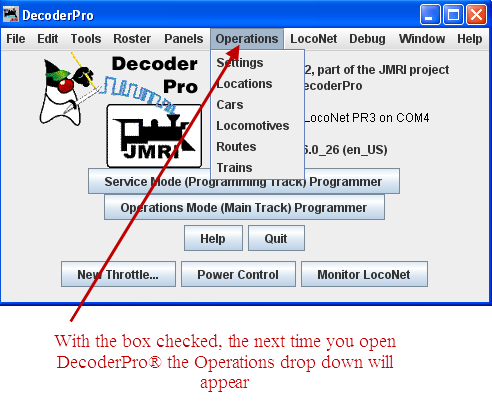
When selected, and saved, the operations menu will be added to the main menu bar the next time you start JMRI.. To remove it go through the same procedure… in the Settings window uncheck the box, “Save” the change and restart DecoderPro®.

Close Windows on Save

operation menu

Panel options will not be covered in this manual at this time. Panels are normally created as a part of PanelPro®

Icon Colors Not covered here and normally used with PanelPro®


When you're finished with the settings window, press the save button to store the setting in a file called Operations.xml. You can find this file in your JMRI directory in a folder called operations. The program will also create a backup file each time you press the

will store a copy of the operation files in a new directory in operations called backups, and then stores the operation files in a directory that is based on the day you created the backup. For example, if today was November 21, 2008, the program will create a backup directory named 2008_11_21.

will prompt you to select which set of backup files you wish to use to recover your operation files. You must quit and restart DecoderPro® to complete the restoration of the operation files.


Options Window

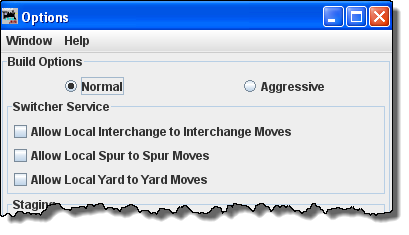
The Options window allows you to set several options that can be modified.

options

Normal Aggressive
There are two build train options, normal and aggressive. Normal is recommended when you are beginning, as Normal builds guarantee that when a car is delivered(set out) by a train that there will be track space available for the car.

Aggressive builds makes the car's track space available as soon as a car is scheduled for a pickup.

Note that once you've built a train, the build option can not be changed until all trains are terminated or reset.

Switcher Service
This set of options controls the local car movements. Normally, it is better not to allow a car to move from one spur directly to another spur in the same location. This type of move is very unrealistic.If you need these types of moves, select the appropriate checkbox.
options

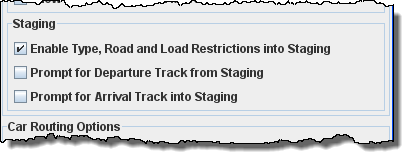
Staging

Enable Type, Road and Load Restrictions into Staging
This opton restricts trains to staging tracks that only accept the train's rolling stock type, road and load names. This is useful when you want trains delivered to staging tracks based on the train's rolling stock restrictions. However, if you want certan car types, car loads, or road name to be transported by a train, but not delivered to staging, deselect this feature

Prompt for Departure Track from Staging
If you would like the program to ask you which track a train should depart from staging during the train build, select this option. Normally, during the train build the program would select the least recently used track when determining the track to depart from. Note that the program will only prompt you if there are two or more trains availabe in staging that meet the train's requirements.
Prompt for Arrival Track from Stagiing
If you would like the program to ask you which track a train should Arrive to staging during the train build, select this option. Normally, during the train build the program would select the least recently used track when determining the track to arrive on. Note that the program will only prompt you if there are two or more trains availabe in staging that meet the train's requirements.
option

Car Routing Options

Enable Car Routing
When car routing is enabled, the program will use multiple trains to deliver a car to its final destination. It is recommended that you leave the option enabled. With car routing enabled, you can use a Schedule to deliver a car to a specific location. The car routing algorithm will search for the most efficient rout for the car to travel. The algorithm will try to find a route using a maximum of five trains to complete the car move. Note that the program never gives up trying to route a car. If a car has been assigned a "Final Destination" the program will try and route the car after every move.

options

Logging Options

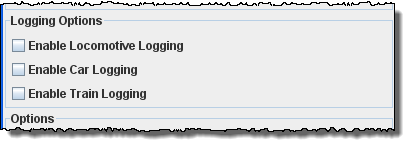
If you want the operations program to log your locomotive, car, or train movements to file, select the appropriate checkboxes. The program will create a new directory called logger in the operations directory. For each day's session the program will create a new file(.csv) using the day's date.

ops settings
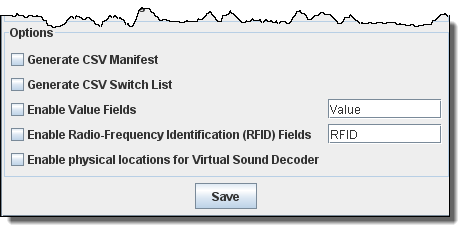
To create your own custom manifest using a comma separated value (.csv) file, select this option. You can use a program like Excel to create a manifest to your liking. The manifest is located in the operations directory in a directory called csvManifests. Each line of the file starts with a two or three letter code, followed by the code's description, and then any parameters associated with the code.

Enable Radio-Frequency Identification (RFID) Fields - This option allows the RFID to be renamed to anything you like and set the values that you want.

Enable physical locations for Virtual Sound Decoder -


Code Desription Parameters
AH

Add Helpers

 
AT Arrival Time Time
CC Change Locos and Caboose  
CL Change Locos  
DT Departure Time Time
DTR Departure Time Route Time
LC Location Comment Comment
LN Location Name Name
NW No Work  
PC Pick up car See below
PL Pick up loco See below
RC Route Comment Comment
RH Remove Helpers  
RN Railroad Name Name
SC Set out car See below
SL Set out loco See below
TC Train Comment Comment
TD Train Departs Name
TL Train Length Length
TM Train Manifest Description Description
TN Train Name Name
TW Train Weight Weight
TT Train Terminates Name
VT Valid Month/Day, Year Time
Time uses the format HourMinute

The car parameters for pick up car (PC) and set out car (SC) are road, number, type, length, load, color, location name, track name, destination name, destination track name, owner name, kernel name, car comment, pick up comment, set out comment, C, F, H, RFID. Where C = Caboose, F = FRED, and H = Hazardous.

The loco parameters for pick up (PL) and set out loco (SL) are road, number, model, length, type, hp, location name, track name, destination name, destination track name, owner name, consist name, car comment, RFID.

Examples of custom manifests (requires that you have Yahoo ID and Password to JMRI Groups)