Prior to using the programmer you need to have completed the previous section (Getting Started), have your computer connected to your command station/booster with the required interface device for your DCC system, you are now ready to actually program a decoder that has been installed in your locomotive.
On opening DecoderPro, the main page will be displayed:
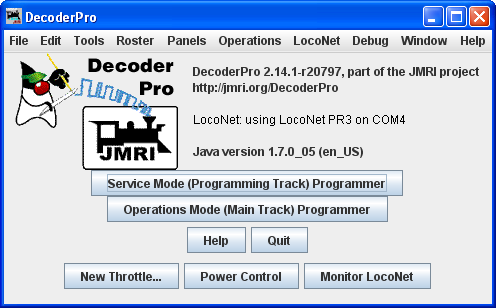
There are four buttons near the bottom, the first two of which are:
Reading your Decoder On the programming track:
To obtain information from the decoder on the programming track we rely on the ability of the decoder to respond to a query, what is known as Readback. Most decoders cannot talk to send information back to the command station. They just respond to instructions, so special instructions were developed which allow the Command Station to determine the contents of the decoder's memories
Basically the decoder is asked a whole series of questions and when the answer is “yes” it turns on the motor for only a very brief time. The command station notices the current being drawn and stops asking questions, since it got the yes answer to the last question. This can take a bit of time since the command station must ask all possible values waiting for the yes response. You can observe the process by looking down at the bottom line of all the panes (the status bar) where the word idle is normally shown when the programmer is inactive. When DecoderPro is working it will show you what events are being performed. Sometimes you can see the loco jump a bit as the decoder pulses the motor for “yes”. The computer folks call this an ack (for acknowledgement). When the Command Station sends the decoder data that is in agreement with what is in the CV of the decoder, the decoder will send an ack. If the ack is never received the Command Station tells DecoderPro that the Decoder did not respond.
Writing to Decoder on the programming track:
The CV data is written to ANY and ALL decoders on the programming track. When the write has been successful the decoder will acknowledge (ack) to the Digital Command Station (DCS.) If the ack is not seen by the DCS it says the decoder did not respond. (error code 308 in JMRI)
Some command stations will only "broadcast" programming commands, which can mean every locomotive on the layout gets the same programming! The same is true if you try to program a loco with address zero (or forget to enter an address when you start). If in doubt, check your documentation.
Reading from your Decoder on the main:
With a few exceptions it is not possible to read from a CV on the Main. If reading fails it usually reports as a 306 error (Timeout Talking to Command Station.)
Writing to your decoder on the main:
Program on the Main writes are often called a "blind write" because there is no response from the decoder that the write was successful. POM is very useful for tuning loco performance while it is operating and the ack is the change in performance.
The decoder is first addressed by the Command Station, then the CV is addressed and then the data that is to be written into that CV of that decoder is sent. An exception is if address zero is used,(or you forget to enter an address when you start). Then ALL decoders on the main will write that data into the appropriate CV which usually is an “unintended consequence”.
The other two buttons are:
Click on Service Mode (programming track) Programmer and the Service Mode Programmer (Programming Track) Setup window opens
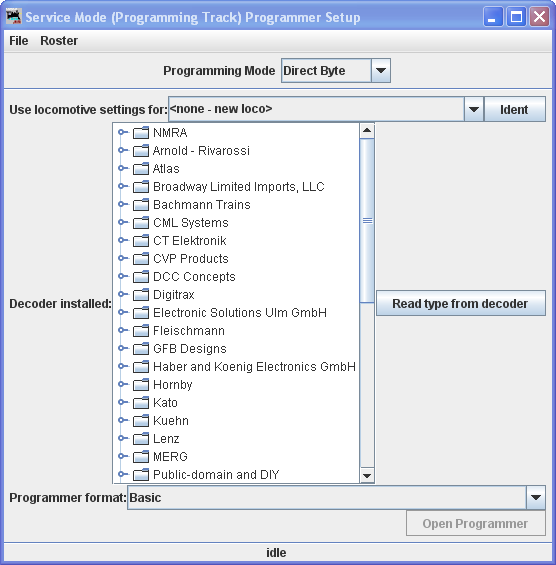
The first item at the top of the service mode programmer pane is a selection for the mode used to program your decoders. This is a legacy to the olden times and rather technical, but fortunately DecoderPro has matured to the point that it is quite good at selecting the best mode for you. It uses the selection of command station from your Preferences selections, combined with the decoder manufacturer and type selections (which we'll get to real soon now). Just accept what's there as a good start. And, fear not, for each pane in the programmer has a button which can be used to change programming mode if you have a problem. For further details on programming mode click here.
Now let's determine the type of decoder that's installed in the locomotive that you would like to program.
The decoder identification is entered by using the selections in the middle of the page.
Since we want to know what type of decoder is in the locomotive, we can either look up what was listed when it was entered in the roster stored in this computer, or we can ask it what it's manufacturer and firmware version are. The first is method is IDENT, and the other is READ TYPE. You can use one or the other, but they are mutually exclusive.
IDENT is used to identify a locomotive that is already stored in your computer's roster file. You can use the drop down arrow to display a listing of locomotives in your roster, and then select the desired locomotive from the list. An alternative is to be lazy and click the IDENT button. The program will then query the locomotive to get it's address which is linked to the roster entry. The DecoderPro roster entry includes the decoder type used when it programmed the locomotive. If it gets a valid address, but there is no roster entry with that address, then you will get an error message.
READ TYPE is the other method located in the center of the page. If you click on Read Type From Decoder button, the system will query the decoder to get the manufacturer and firmware version number. From this information it will highlight all the decoders which are known to match. There may be several, usually with differences in the physical shape and size to fit in a particular locomotive's shell, or a few more “bells and whistles”. When confronted with a large selection, you can either remove the shell to try to read information printed on the decoder itself, or just select one of the ones with the fewest letters in the model number. (Letters are often used to separate the shape differences which have no bearing on the electronic functions of the decoder.) Just be aware that some functions that DecoderPro allows you to program may not be fully operable.
As noted above, these methods will work only with command stations which are capable of reading back the contents of CV's, and the process does take some time. Many lower end and/or older systems and decoders do not provide readback capability. If the command station cannot read CV's from the programming track, you will have to select the decoder manually by using the large selection box in the middle of the page. With it you can select the manufacturer, family and specific model of the decoder. This manual method may be the best and fastest way if you know for sure “What's in there”.
If you have a decoder that doesn't appear in the listing, you may want to check to be sure that you are using the most up to date version of DecoderPro, because manufacturers are adding models almost faster than the team can enter the new decoder definitions into the files. You can choose a manufacturer's version which is as close as you can find, or if you're only interested in basic programming functions, use the NMRA© decoder which is a generic file of the CV's contained in their standards.
The last item on this pane is the Programmer Format entry. It is preset by your Preferences entry, but you can select other programmers using the drop down arrow. For now use the Basic programmer, because you won't be able to do much damage if you make mistakes. We'll get into the other programmers later on.
Once you have selected a decoder, or DecoderPro has done it for you, the Open Programmer button will become activated and you'll be able to move on with Service Mode Programming.
When you are on the Setup Pane and click on the Open Programmer button, the selected Programmer window will open. All programmers, Basic and Comprehensive, open to the Roster Entry pane, which will be similar to that shown below.
But before we do that let's cover the other type of programming, namely Operations Mode programming (Ops Mode) or Program on the Main(POM). All the discussion above had to do with working on a physically separate piece of track away from the layout. In Ops Mode we program directly on the main line while the locomotive is in operation. Great for getting those speeds and sounds just right. Most all of the programming panes we will discuss will work just as well when you are programming on the main, and you get instant feedback to your changes. How cool is that?
If you click on Operations Mode (Main Track) Programmer the Operations Mode (Main Track) Programmer setup window will open.
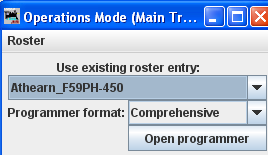
In this window you select the locomotive in which you wish to change CV values, and what programmer you want to use. Once they are selected you click Open Programmer button just as we were about to do in the Service Mode programmer.
Getting back to the Service Mode Programmer, which is now completely set-up with a decoder and the Basic programmer selected, let's move on to Basic Programming. Click on the Open Programmer button to open the programmer panes.
The first action in programming a locomotive with DecoderPro is to fill out the roster entry screen.
A roster is a database of all locomotives that your installation of DecoderPro has programmed. It includes the information seen in the screen below:
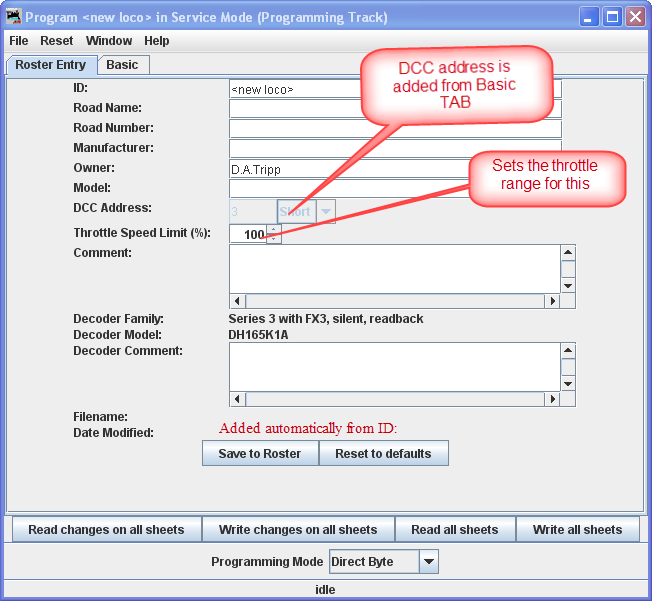
Most of these fields are self-explanatory. However, note that the first field (ID) becomes the file name in the Roster for the locomotive you are programming. Set up a schema to identify your locomotive to its decoder program. i.e. Mfr, Loco Type, and Address (Kato_SD40-2_5645). Spaces in the ID field will be changed to underscores (_) when the file is written. In a club environment, often the ID begins with the owner's name, or member number. This way the Roster (which is sorted alphabetically) will keep all of an owner's locomotives listed together.
The Throttle Speed Limit(%) entry will set the top speed of a locomotive as a percentage of its normal maximum. Good for grandkids, but only works with JMRI throttles, not system throttles (i.e. NCE or Digitrax).
The Comment field is a good place to add the date you purchased the locomotive, price, or any other information you might feel is important to record.
The Save button stores the current decoder information to your computer hard drive and folder where your roster file is located. The default storage is the same directory where the program is installed.
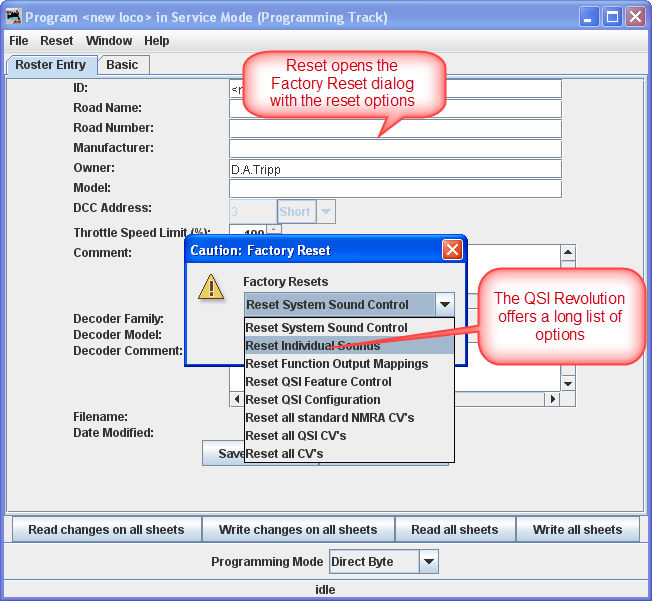
The Reset to Defaults button can be used to return the Roster file to the condition of a new file for the type and version of the decoder listed in the roster entry. It does NOT change the values in the roster file on your hard disk, unless you specifically save it after using this reset button. It also is not written to the decoder until you specifically select a write operation. It was included in DecoderPro so that if you get hopelessly confused in proceeding screen to screen entering variables, you can return to the manufacturers baseline default set and start again.
Most decoders will activate the Reset Menu (next to the File menu at the top
of the page). This will reset the decoder to the manufacturers default settings for all the
CVs, or just some of them if the manufacturer has several reset routines. It does this by
writing directly to a CV in the decoder, if the decoder has that feature, CV8 in the case of
Digitrax. All decoders may not support reset and how they work is manufacturer and decoder
dependent.
One decoder with a lengthy list of reset routines is the QSI Revolution decoder, which
enables a drop-down list of options for resetting the decoder as shown below:
You will note that the decoder address is shown but grayed out (or blank if this is a new locomotive in the roster). This field is automatically filled in by the program and is determined from the address entered using the Basic tab which we will get to shortly. This address is used with the Ident function on the start page if you wish to recall a locomotive that is already in your roster.
id="ProgramModes">The Programming mode can be changed by clicking on the Set... button at the bottom of the window. To the left of the Set... button is the current programming mode that is selected. When you click on the Set.. button, the Set programming mode dialog box displays.
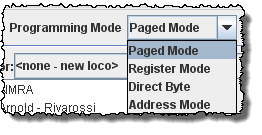
There are radio buttons for several programming modes. JMRI now selects the best mode for you. It determines this from the command station type you are using and the decoder model you are attempting to program. Usually this will be OK. If you find that you are having a problem with programming you may try a different mode.
For most newer decoders, stay with Paged mode or whichever Direct mode your Command Station supports. Your decoder documentation should let you know if programming in some other mode is necessary... but if you are having problems, experiment. If a mode is not supported for the selected decoder and system, that option will be grayed out.
When you make your selection, the programming mode should now display to the left of the Set button.
Now that we have the Roster information all in order, we can continue with programming the decoder.
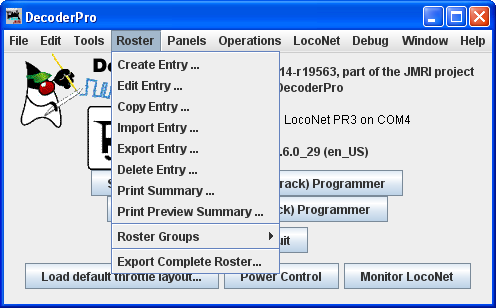
But, first a let's talk a bit about Roster management. The Set-up screen (the one where we selected the decoder) and the initial DecoderPro “Splash” screen have a top tab called Roster. When you click on it you get opportunities to modify, print and move your roster files. Particularly interesting are Export/Import and Copy. Let's say you and a friend have two identical Berkshires, and you desire to have yours to be set up just like your friends. Now, you could put his loco on your track and read all the CVs out and then put them in yours, but if he lives on the other coast that's not practical. So, have him use DecoderPro to export his loco file and e-mail it to you. You import it into DecoderPro, change the address if you wish and then use that roster entry to program your loco. Similarly you can Copy a roster entry to duplicate one of your own locomotives into a second roster entry with it's own address.
Let's move on to the Basic Programmer.
You may have noticed that at the top of the window are Three tabs: Roster Entry, Function Labels and Basic. We have completed the Roster Entry pane of the Program window, and at this time we will not be concerned with the Function Labels tab. Now, click on the Basic tab to change panes to continue with programming your decoder. The Basic pane will be displayed and look similar to the following illustration: Many panes in the programmer contain decoder dependent features, as a result what you see may not exactly agree with what you see here. Only those variables that your decoder can implement will be shown.
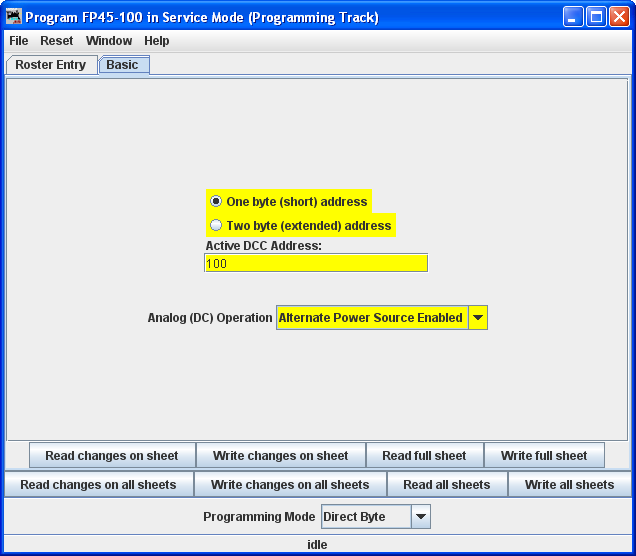
You will see three options you can change, highlighted in yellow:
The yellow highlighting indicates these options are "probable" settings and have not been
confirmed from the decoder. Settings that have been changed by the user and have not
been written back to the decoder appear in a darker yellow color. You will see examples
of
this throughout the manual.
Be patient, especially with older computers. At the very bottom of the pane (where it says "idle") you will see a running account of exactly what DecoderPro is doing, for example, the specific CV being read.
Again, the Read sheet and Read all functions are dependent on your command station. If your system does not have the capability to read CVs, then these buttons will not be available.
If you wish to change the address of the locomotive, type in the new address. To turn on or off 4 digit addressing, select the desired radio button. . Be sure that the address type agrees with the number of characters in the address.
To enable Analog (old style DC) Operation select the appropriate entry from the drop-down list.
When you are finished, click on Write sheet to write the new values in the decoder. It's that easy!
Writing usually takes much less time than reading, because the value can be sent directly. As the write operation proceeds, the data will change from yellow to white. If there is difficulty writing to the decoder, the data will change to red. The software will automatically keep trying until the write operation is successful. In some instances the system will “time-out” after a certain number of tries without an acknowledgement from the decoder. This does not necessarily mean that the values have not been written, just that the program has not received an acknowledgement. This can be due to the locomotive moving and getting on dirty track so that it can't pulse back, or possibly because the command station or decoder cannot read back. Try moving the loco and try again. If it is a command station or decoder read-back issue, try the loco on the mainline and see if the programming was successful.
To finish this "basic" programming of a decoder, click once more on the Roster Entry tab, You will see that the address field has now been filled in, so you can now click on the Save button. Your new decoder settings have now been written not only to the decoder, but also saved to a computer file where they may be recalled in the future. .
But you say..."I want to change more than what's shown on the Basic decoder pane." Well… there are other programmers that are available. But… first we need to study a bit on the various options. In fact there are so many options the programmers had to use a slider to get them all to show. Here are the option windows. Don't panic…. Most are of no use to the average user.
Comprehensive is the only other programmer Normal Users will ever need, because it is, well…Comprehensive. So why all the others?
First of all eliminate the Manufacturer specific programmers (unless of course you have a Zimo or ESU system).
We can also eliminate the Tutorial and Custom programmers. They were put in to show folks that want to write their own programmer (not you right?) all the possible ways to gather input and to have a common starting point in the roster pane. Now if you wish to pursue writing a custom programmer go to this site.
If you have need for a special situation programmer you might want to look at Sample Club or TrainShowBasic to see what panes can be taken out of Comprehensive to make an intermediate complexity, special purpose programmer. Again, how to do this is a subject for another manual.
And that leaves us with the Registers programmer. If you have an old or bargain basement decoder that only programs using registers, then of course you'll be interested in “Registers”.
Now that we've narrowed our “real” choices down to the Basic and Comprehensive, let's explore the Comprehensive Programmer!