For more information on JUnit, see the JUnit home page. We now use JUnit version 5 (JUnit5), although a lot of JMRI code originally had tests written in the previous versions, JUnit3 and Junit4.
All of the JMRI classes should have JUnit tests available. It's good to add JUnit tests as you make changes to classes (they test your new functionality to make sure that it is working, and keeps working as other people change it later), when you have to figure out what somebody's code does (the test documents exactly what should happen!), and when you track down a bug (make sure it doesn't come back).
Alongside the JUnit tests, we also perform static analysis and other types of testing on the code. See JMRI: Continuous Integration for more details.
ant alltestThis will compile the test code, which lives in the "test" subdirectory of the "java" directory in our usual code distributions, and then run the tests under a GUI. (To make sure you've recompiled everything, you may want to do
ant clean first)ant tests ./runtest.csh jmri.jmrit.powerpanel.PowerPanelTestThe first line compiles all the test code, and the second runs a specific test or test suite.
-t option
to put the menu on the main-screen menu bar, which makes JMRI apps look more like a
Mac application. This will interfere with
Jemmy based tests of the GUI.
You can also call the ant task directly with :
ant test-single -Dtest.includes=jmri.jmrit.powerpanel.PowerPanelTest
or for all tests in the powerpanel class :
ant test-single -Dtest.includes=jmri.jmrit.powerpanel.*
To run the tests and generate a code coverage report ( presuming all tests pass ) :
ant single-test-coveragereport -Dtest.includes=jmri.jmrit.beantable.*In your main JMRI directory, check the coveragereport folder for the index.html file.
There is also a PowerShell (Core) script available to help running tests with maven,
./java/runtests.ps1. Its main features are:
Find detailed usage by issuing
powershell -File .\java\runtests.ps1 -?in a console. If your console is a PowerShell console, you can issue
Get-Help .\java\runtests.ps1 -detailed
to get detailed help and instructions.
There are a number of run-time optional checks that can be turned on by setting properties. We periodically run them to check on how the overall test system is working, but they're too time intensive to leave on all the time.
jmri.jmrit.audio.NullAudioFactory will recreate the audio environment on the
CI machines, which have no audio hardware available.scripts/run_flagged_tests_separately file runs these test classes
separately.To avoid false failures, the Ant and Maven build control files set the locale to en_US before running tests. This covers continuous integration running, and running locally using e.g. "ant headlesstest" or "ant alltest".
The ./runtest.csh mechanism does not automatically set the locale. To do that, the easiest approach is to set the JMRI_OPTIONS environment variable via one of:
   setenv JMRI_OPTIONS "-Duser.language=en -Duser.region=US"
   export JMRI_OPTIONS="-Duser.language=en -Duser.region=US"
depending on what kind of OS and shell you're using. For more on how this works, see the page on startup scripts.
The continuous integration environment senses changes in the code repository, rebuilds the code, performs a variety of checks. If no fatal issues are found, the continuous integration process executes the "alltest" ant target against the build to run the tests against the successful build of the code base.
JMRI uses the JUnit Platform Launcher to discover and execute tests. Some launchers ( e.g. for Architecture and Cucumber tests ) are excluded from some ant test runs.
Tests will generally return exit code 0 for successful executions, exit code 1 for test failures and exit code 2 for no tests executed.
If a test fails during the continuous integration execution of "alltest", an e-mail is sent to the developers who have checked in code which was included in the build.
You can monitor the "dashboard" at the continuous integration website.
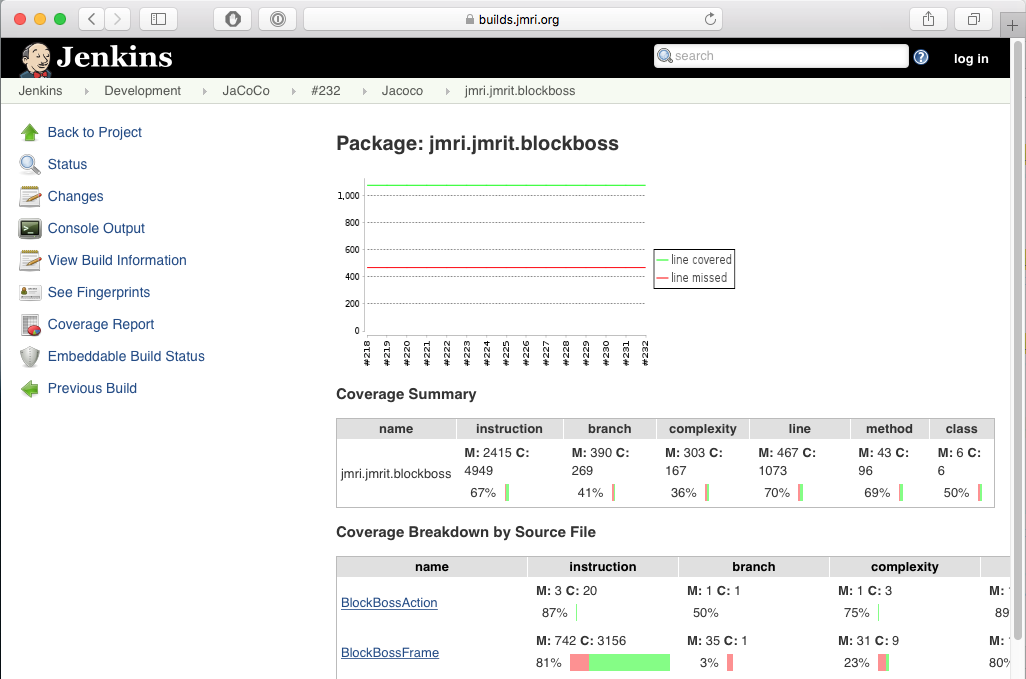
View the archives of the e-mail list and see past logs.As part of running the tests, Jenkins accumulates information on how much of the code was executed, called the "code coverage". We use the JaCoCo tool to do the accounting. It provides detailed reports at multiple levels:
You can navigate using the bar along the top of the page:
By convention, we have a "test" class shadowing (almost) every real class. The "test" directory contains a tree of package directories parallel to the "src" tree. Each test class has the same name as the class to be tested, except with "Test" appended, and will appear in the "test" source tree. For example, the "jmri.Version" class's source code is in "src/jmri/Version.java", and its test class is "jmri.VersionTest" found in "test/jmri/VersionTest.java".
To write additional tests for a class with existing tests, first locate the test class. (If one doesn't exist, see the section below about writing tests for a new class)
The JUnit conventions require that the test be preceded by the "@Test"
annotation:
    @Test
    public void testSomething() {
        ...
    }
In general, test methods should be small, testing just one piece of the classes operation. That's why they're called "unit" tests.
To write a test for a new class, you need to create a file that shadows your new class.
For our example, consider creating a test for a new class that appears in
"src/jmri/jmrix/foo/Foo.java". The new test would be created in a file named
"test/jmri/jmrix/foo/FooTest.java".
Assuming that the Foo class has a default constructor named foo(), Then the
following would be minimal contents for the test/jmri/jmrix/foo/FooTest.java
file:
    package jmri.jmrix.foo;

    import jmri.util.JUnitUtil;
    import org.junit.jupiter.api.*;

    /**
     * Tests for the Foo Class
     * @author  Your Name   Copyright (C) 2026
     */
    public class FooTest {

        @Test
        public void testCtor() {
            Assertions.assertNotNull( new foo(), "Foo Constructor Return");
        }

        @BeforeEach
        public void setUp() {
            JUnitUtil.setUp();
        }

        @AfterEach
        public void tearDown() {
            JUnitUtil.tearDown();
        }
    }
Note that you should be invoking jmri.util.JUnitUtil.setUp() and
jmri.util.JUnitUtil.tearDown() as above.
In addition, the tearDown() method should set all member variable references to null. This
is because JUnit keeps the test class objects around until all the tests are
complete, so any memory you allocate in one class can't be garbage collected until all the
tests are done. Setting the references to null allows the objects to be collected. (If the
allocated objects have a dispose() method or similar, you should call that too).
You should
not reset the InstanceManager or other managers in the
tearDown method; any necessary manager resets will be done automatically, and duplicating
those wastes test time.
You may also choose to copy an existing test file and make modifications to suite the needs of your new class.
JUnit 5 Assertions can be used to ensure that code outputs as expected.
    @Test
    public void testExceptionThrowing() throws Exception {

        Exception ex = Assertions.assertThrows( NullPointerException.class, () -> {
            runCodeThatThrowsException();
        } );
        Assertions.assertNotNull(ex);
        Assertions.assertEquals("Expected NullPointer Exception Message Text", ex.getMessage());
    }
Assertions can be loaded as a static class, eg.
import static org.junit.jupiter.api.Assertions.*;
Many tests still use the JUnit4 Assertions from
import org.junit.Assert;
Logging in the test classes themselves has two aspects:
On the other hand, you might want to deliberately provoke errors in the code being tested to make sure that the conditions are being handled properly. This will often produce log.error(...) or log.warn(...) messages, which must be intercepted and checked.
To allow this, JMRI runs it's using tests with a special log4j appender, which stores messages so that the JUnit tests can look at them before they are forwarded to the log. There are two aspects to making this work:
    @BeforeEach
    public void setUp() {
        JUnitUtil.setUp();
    }
    @AfterEach
    public void tearDown() {
        JUnitUtil.tearDown();
    }
log.warn("Provoked message");
the invoking test case should follow the under-test calls that provoke that with the
line:
jmri.util.JUnitAppender.assertWarnMessage("Provoked message");
It will be a JUnit error if a log.warn(...) or log.error(...) message is produced that isn't matched to a JUnitAppender.assertWarnMessage(...) call.
LoggingUtil.warnOnce(..)
requires some special handling in tests.
We want each test to be independent, so we reset the "want only
once" logic early in the JUnitUtil.setUp() that's routinely invoked
@BeforeEach the tests. This means that the first invocation, and only the
first invocation, for each message will be logged.
LoggingUtil.deprecationWarning
call when a method is deprecated.
This will log a message the first time it's invoked. We want to
warn that deprecated code is being invoked during normal operation, so this is normally
becomes a LoggingUtil.warnOnce(..) call. When you see those warnings messages,
you should remove them by completing the migration away from the deprecated method.
The one exception is during unit and CI testing of the actual deprecated method.
We want to keep those tests around until the deprecated method is finally removed.
That ensures it keeps working until it's deliberately removed,
and not inadvertently broken in the meantime.
In this case, you should turn off the
Log4JUtil.deprecationWarning in just that test method using
Log4JUtil.setDeprecatedLogging(false) before invoking the deprecated method.
(You can also do an JUnitAppender.assertWarn for all the messages emitted,
but it's easier to just turn them off.)
Note: Our CI test executables are configured to fail if any FATAL or ERROR messages are emitted instead of being handled. This means that although you can run your tests successfully on your own computer if they're emitting ERROR messages, but you won't be able to merge your code into the common repository until those are handled. It's currently OK to emit WARN-level messages during CI testing, but that will also be restricted (cause the test to fail) during the 5.* development series, so please suppress or handle those messages too.
Depending on what managers your code needs, your setUp() implementation could
start with:
    JUnitUtil.setUp();
    JUnitUtil.resetInstanceManager();
    JUnitUtil.resetProfileManager();
    JUnitUtil.initConfigureManager();

    JUnitUtil.initDebugCommandStation();

    JUnitUtil.initInternalTurnoutManager();
    JUnitUtil.initInternalLightManager();
    JUnitUtil.initInternalSensorManager();
    JUnitUtil.initReporterManager();
(You can omit the initialization managers not needed for your tests) See the jmri.util.JUnitUtil
class for the full list of available ones, and please add more if you need ones that are not in
JUnitUtil yet.
Your tearDown() should end with:
JUnitUtil.tearDown();
@AfterEach processing. You should remove
(and check for correctness) any items that were queued as shutdown items.JUnitUtil.clearShutDownManager() method was added. This clears the
ShutDownManager without issuing warnings, but also without doing any checks. You should
only use this temporarily, hence it's marked as deprecated to flag that.InstanceManager.getDefault(..) for a ShutDownManager will get a mock one for
testing. A request via InstanceManager.getNullableDefault(..) will get a null.
If you want InstanceManager.getNullableDefault(..) to return a manager, you
must call JUnitUtil.initShutDownManager() in the @BeforeEach
routine to create the mock manager before the getNullableDefault(..)
request.
    Timebase clock = InstanceManager.getDefault(jmri.Timebase.class);
    clock.setRun(false);
    clock.setTime(java.time.Instant.EPOCH);  // just a specific time
After this, when you code picks up a Timebase instance, it'll get this properly prepared one.
If you want to wait for some specific condition to be true, e.g. receiving a reply object, you can use a waitFor method call which looks like:
JUnitUtil.waitFor(()->{reply!=null}, "reply didn't arrive");
The first argument is a lambda closure, a small piece of code that'll be evaluated repeatedly
until true. The String second argument is the text of the assertion (error message) you'll get if
the condition doesn't come true in a reasonable length of time.
Waiting for a specific result is fastest and most reliable. If you can't do that for some reason, you can do a short time-based wait:
JUnitUtil.releaseThread(this);
This uses a nominal delay. But you might want to consider the structure of either your code
(that you're testing) or the test itself: If you can't tell whether it succeeded, what's the
purpose of the operation?
Note that this should not be used to synchronize with Swing threads. See the Testing Swing Code section for that.
In general, you should not have calls to sleep(), wait() or
yield() in your code. Use the JUnitUtil and Jemmy support for those instead.
Some tests will need to start threads, for example to test signal controls or aspects of layout I/O.
General principles your tests must obey for reliable operation:
If you're doing multiple tests with threads, you should wait for thread to actually
stop before moving on to the next operation. You can do that with a
JUnitUtil.waitFor(..) call that waits on some flag in the thread.
code() that need to happen before
you test its operation, you also have to wait for those to complete.For example, if creating a thread based on AbstractAutomat, you can check the start with:
    AbsractAutomat p = new MyThreadClass();
    p.start();
    JUnitUtil.waitFor(()->{return p.isRunning();}, "logic running");
and ensure termination with
    p.stop();
    JUnitUtil.waitFor(()->{return !p.isRunning();}, "logic stopped");
Please make sure your unit tests clean up after themselves! They should not leave any threads running. Any threads they start should have either terminated normally by the end of the test (don't let them just time out and crash later during some other test!) or you should add code to terminate them.
You can check whether you've left any threads running by setting the
jmri.util.JUnitUtil.checkRemnantThreads environment variable to true, with
i.e.
setenv JMRI_OPTIONS -Djmri.util.JUnitUtil.checkRemnantThreads=trueor the equivalent for your computer type. This tells the
JUnitUtil.tearDown()
method to check for any (new) threads that are still running at the end of each test. This check is
a bit time-intensive, so we don't leave it on all the time.
Tools like heap dumps, thread dumps, and the jvisualvm browser can help you see what's
being left over by your tests. But they must be used while the JVM is still running, and it
usually terminates right after the tests. To prolong the JVM life, add an instance of
jmri.util.TestWaitsForever at the end of your PackageList list of
tests. TestWaitsForever does what it says on the tin: waits forever, allowing
you to look at the state of the JVM. When you're done, you have to kill the test job
manually.
If you need a temporary file or directory, you can use the JUnit5 TempDir extension to create a file or directory.
The @TempDir annotation can be applied to test class fields of type
File or Path.
    import org.junit.jupiter.api.io.TempDir;
    ...
    @TempDir
    protected File folder;
Or as dependency injected values on methods
    import org.junit.jupiter.api.io.TempDir;
    ...
    @Test
    public void testFoo(@TempDir File folder){
       ...
    }
You then reference "folder" in your test code:
        // create a temporary file
        File randomNameFile = folder.newFile();
        // create a temporary directory
        File randomNameDir = folder.newFolder();
JUnit will make sure the file or folder is removed afterwards regardless of whether the test
succeeds or fails. For more information on this, see the Javadoc for
TemporaryDir.
@org.junit.jupiter.api.io.Tempdir
which is used to create temporary folders and files as described previously
@org.junit.jupiter.api.Timeout
which is used to set a timeout. the @Timeout annotation takes a time as a
parameter and can optionally takes units for the given time. The default time unit is
seconds, so @Timeout (2) creates a 2 second timeout. The
@Timeout annotation may be used on the class or on individual test methods
within the class. When applied to the class, the effect is applying the timeout to all
@Test annotated methods within the class. described previously
@Disabled, @DisabledIfHeadless and @DisabledIfSystemProperty are discussed below.@DisabledIfSystemProperty to conditionally ignore a test.
For example, to skip many of the Jython Script tests,@DisabledIfSystemProperty(named = "jmri.skipjythontests", matches = "true")jmri.skipjythontests system property is set true.
        @org.junit.jupiter.api.Disabled("not done yet")
        @jmri.util.junit.annotations.ToDo("Need to create some mock Framistat Objects")
        @Test
        public void notDoneYet() {
            // some code that compiles but doesn't run
        }
You should provide the reason for ignoring this test in the @Disabled
argument. @Disabled without an argument will compile, but Jenkins will mark it as an
error.
Also note the @jmri.util.junit.annotations.ToDo
annotation which indicates that this needs work and provides some more information
about what needs to be done.
In general, we'd rather have working tests rather than ignored ones, so we track the number that have been ignored in a Jenkins job, see the image to the right.
On the other hand, sometimes a test super class (i.e. some abstract base) requires
implementation of a test method that's not applicable to this particular concrete test
class. It might, for example, test a feature or message that's not applicable for a
specific system's hardware. In that case, you provide a null body to do nothing, and mark
the test as not applicable with the @jmri.util.junit.annotations.NotApplicable
annotation like this:
        @Override
        @jmri.util.junit.annotations.NotApplicable("System X doesn't use Framistat Objects")
        @Test
        public void testFramistatUsage() {}
The Jenkins Ignored Tests page shows the trend line for disabled tests. Click on the image to get details.
@Disabled,
@DisabledIfHeadless ( and the system is Headless ) or
@NotApplicable, the setUp and tearDown methods
for that Test will not be called, speeding up test runs.The lore for early Java versions was that it was
OK to create and manipulate a Swing object off the Swing/AWT thread, e.g. on the
JUnit thread, until the enclosing frame was displayed via
show() or setVisible(true). Starting with Java
23, this lore is explicitly not true. As that will someday (not today) be
a supported version for JMRI, as you write new tests please move your Swing
object manipulations to the Swing/AWT thread. The most straight-forward
way to do that is to use the
ThreadingUtil class.
Because we run tests in "headless" mode during the continuous integration builds, it's important that test methods or classes needing access to the screen are annotated with:
@jmri.util.junit.annotations.DisabledIfHeadlessGUI tests should close windows when they're done, and in general clean up after themselves. If you want to keep windows around so you can manipulate them, e.g. for manual testing or debugging, you can use the jmri.demo system parameter to control that:
        if (!System.getProperty("jmri.demo", "false").equals("false")) {
            myFrame.setVisible(false);
            myFrame.dispose();
        }
For many tests, you'll both make testing reliable and improve the structure of your code by separating the GUI (Swing) code from the JMRI logic and communications. This lets you check the logic code separately, but invoking those methods and checking the state them update.
For more complicated GUI testing, the AssertJ and Jemmy tools are preferred.
For more information on Jemmy, please see the Jemmy Javadoc.
Jemmy must be able to find the objects on the screen. Jemmy Operators are generally used to both locate and manipulate items on the screen.
Here are a few tips for locating items with Jemmy:
caption.contains(match). If
ce is true, then the equals(..) method is used. The
ccs option controls case sensitivity.ComboBoxOperator selectItem(String) can only reliably set the
value of JComboBox<String>, (i.e. its unreliable with
JComboBox<NamedBean>), so that method needs to be replaced with
setSelectedItem(Object)clearText() and typeText(String) methods can't handle
JTextComponents with complex borders (such as used by
SystemNameValidator and NamedBeanComboBox); those methods need to
be replaced with setText(String). Please note that setText just
sets the text value in the text entry box while typeText types in every single
character. If you are testing a text entry field with a keyListener attached, the
keyListener never executes with setText.
        Thread t = new Thread(() -> {
            // constructor for d will wait until the dialog is visible
            JDialogOperator d = new JDialogOperator("Foo Warning");
            JButtonOperator bo = new JButtonOperator(d,"OK");
            jmri.util.ThreadingUtil.runOnGUI(() -> {bo.push();});
        });
        t.setName("My Foo Warning Dialog Close Thread");
        t.start();
        showTheDialog();
        JUnitUtil.waitFor(() -> !t.isAlive(), "Thread did not complete "+t.getName());
The thread is started before your code runs and starts Jemmy looking for the Dialog box.
Once it appears, Jemmy will push the "OK" button.
You can't put the Jemmy calls in advance: They'll wait forever for the dialog to appear,
and never proceed to your code to show the dialog.
You can't put them after the call, because your call won't exist until somebody presses "OK".
We can be certain that the dialog OK button has been found and pushed by waiting for
the Thread to complete.
org.netbeans.jemmy.TimeoutExpiredException
with some included diagnostic test. Please don't catch this exception: the problem here is
not the exception, it's that Jemmy wasn't able to do what you asked. That's the thing that
needs to be debugged.
If you want to change one of Jemmy's timeouts, do
myMenuOperator.getTimeouts().setTimeout("JMenuOperator.WaitBeforePopupTimeout", 30L);
where "myMenuOperator" is a reference to a Jemmy operator object, 30L is the new
value (a long) in milliseconds, and the particular timeout name comes from the
Javadoc. Sometimes, setting the "WaitBeforePopupTimeout" from its default of zero to a few
milliseconds can improve the reliability of tests. Also, setting
"JMenuOperator.WaitPopupTimeout" and
"ComponentOperator.WaitComponentTimeout" to a lower value from their defaults of
60000L (a minute) can speed work when you're trying to debug the cause of a timeout.
If you change a timeout, you must set it back to the original value (which
you had earlier saved) in your @AfterEach routine. If you leave it changed,
you're likely to cause problems for other test routines.
Actions like operator.click() work like clicking on a real screen: if the
click target isn't the foremost component when the click happens, the click will go to some
other component. This is particularly annoying when you're running a long series of tests on
your own computer will doing other work, as pushing test windows to the background will
likely cause (false-negative) failures.
If your test thread invokes a method that causes a lot of Swing/AWT activity, that might
not all be complete when the method returns. For example, if you create a JFrame and either
explicitly or implicitly call pack(), that starts the Swing thread working on
that frame; that can proceed in parallel to the return to the test thread. If the test thread
will continue to do more Swing operations, like create and pack another frame, you'll have
problems unless you either:
Assert operations need to be done on the test thread, so if you want
to intermix Swing and test operations you can synchronize the threads by calling
new org.netbeans.jemmy.QueueTool().waitEmpty();
on the test thread.
In some rare cases, you need to wait for the Swing queue to stay empty for a non-zero
interval. In that case, use waitEmpty(20). where the argument (in this
example 20) is how many milliseconds the queue has to remain empty before proceeding.
We're not sure what the best value is; see JMRI Issue #5321 and NetBeans bug tracker 36665 for
some background discussion. Briefly, since things like flashing cursors fire Swing
events, the queue doesn't stay idle forever once the primary work is done. A long
wait-for-empty value may never occur.
jython/test are automatically invoked by
java/test/jmri/jmrit/jython/SampleScriptTest.java.
See the jmri_bindings_Test.py
sample for syntax, including examples of how to signal test failures.
In the future, this could be extended to pick up files automatically, to support xUnit testing, etc.
Ideally ( unless there is an actual issue with the code being tested ), all of the Tests will have a 100% success rate. In the real world, tests can become flaky due to unknwon reasons and may not pass on every single execution.
@Test method annotation can be replaced with @RepeatedTest(1000)
to run the test multiple ( in this case 1000 ) times.
Check that no remnanat threads are left over after tests, see jmri.util.JUnitUtil.failRemnantThreads
in Optional Checks.
Ideally, run whole-package Tests in case other Tests being run around the same time are
leaving Threads that interfere with the flaky test.
Is the Test inheriting objects from other tests? It may be worth running the tests with a completely fresh JMRI User Profile in a Temporary Directory.
If GUI elements are unreliable, are they being packed and set visible from the swing thread?
For tracking down the cause of a flaky test, it may be worth temporarily adding a delay ( e.g. JUnitUtil.waitFor(500); ) to the test. This can often help to catch timing issues which may be present within the test.
Mocking Frameworks can create a more controlled environment for the class under test by simulating external dependencies. JMRI uses Mockito, org.mockito.Mockito.
Spotbugs Static Analysis reports can be generated for the Test classes. tests-spotbugs.html is created witin the root JMRI directory following a call to
ant tests-spotbugs
Compile source & tests with CI ECJ warnings on ( this is run as routine CI )
ant tests-warnings-check
As a test only, you can try setting the "-noloading" option in the
main of whichever test class you're having trouble with:
    static public void main(String[] args) {
            String[] testCaseName = {"-noloading", LogixTableActionTest.class.getName()};
            junit.swingui.TestRunner.main(testCaseName);
    }
Please don't leave "-noloading" in place, as it prevents people from rerunning the test
dynamically. Instead, the right long-term fix is to have all classes with JUnit loader issues
included in the test/junit/runner/excluded.properties file. JUnit uses those
properties to decide how to handle loading and reloading of classes.