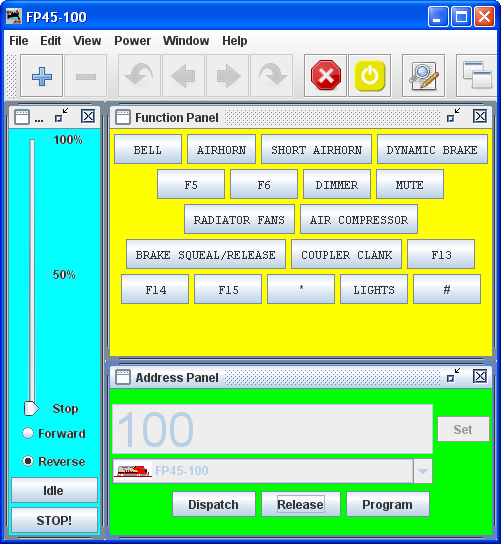
The DecoderPro® Throttle may be used on your computer screen to replace the vendor throttle that is furnished with your DCC system. One or several throttles may be in use at one time. The Throttle opens as a floating window that may be positioned anywhere on your desktop. Note the Title Bar contains the locomotive roster name or address information.
|
(color shading added to show functional areas of throttle panels) The Throttle Window contains Menu Bar, Toolbar and three panels which may be enabled or disabled via check box in the View menu. Each panel has a title bar with windows controls to minimize, maximize and exit: Warning!!! Be careful with the left hand (minimize) buttons. In Windows, if the little guy is clicked it will minimize the panel, which means it is no longer visible but the restore button is lost behind the rest of the panels. The way to easily get it back, is to go into the view menu, uncheck it there, then go back again and re-check it. You may also drag the panels out of the way to uncover the Maximize icon for a minimized panel. Address Panel (green shading) facilitates setting the address of the locomotive you wish to control with the throttle. Control Panel (blue shading) contains the controls for applying power to the locomotive that is addressed and controlling speed Function Panel(yellow shading) contains all the function buttons used to control the addressed locomotives functions. If function names are assigned to the functions and stored in the roster, they will be displayed. |

Opens another copy of the throttle.
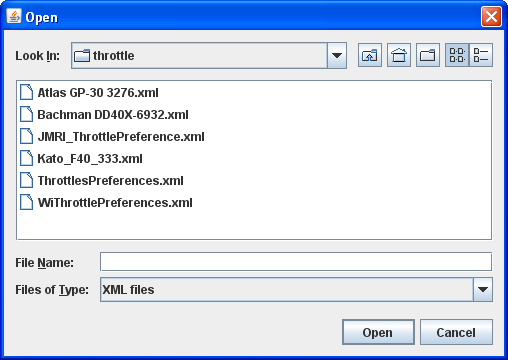
Opens the Open dialog box displaying your saved throttle XML files.
Opens the Open dialog to allow you to select the desired Throttle XML file
Save the displayed throttle to its designated file name
Opens the Save dialog to allow you to save the Throttle XML file in the location you select and using the name you specify
Opens the Edit Throttle Frame dialog and allows you to edit the current throttle window title and selected Frame properties.
Allows you to select which of the three panels of the throttle are being shown. Place a check mark in each of the panels that your want to display.
You may ask yourself, “Why would I want to turn off any of these panels?” As only one example, let's say we have an observation car at the rear of a passenger train. We could equip this car with a function only decoder to control:
- Interior lights,
- Rear marker lights, and
- A rear Drum light.
We have no need for the speed control pane and only need three function buttons for this “Throttle”.
With a whole passenger train equipped like this, lots of screen space can be conserved by using the throttle set-up files to optimize the Throttle windows. Then you could turn off the lights in the kitchen and lower the lights in the dining area so the passengers can enjoy the sunset as they transit the Rockies enjoying the beautiful sunset sipping Cognac…. but I digress. You get the idea.
Resets all the Function buttons to the default settings, , , etc.
Returns all the throttle panels to the throttle frame.

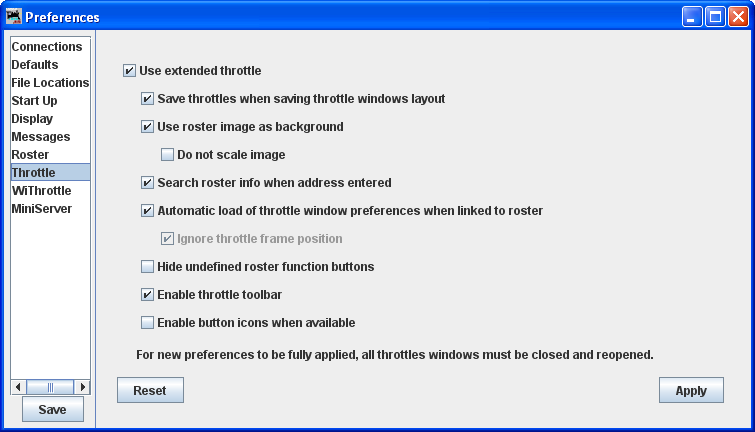
The Throttle toolbar is enabled from the Throttles Preferences Pane
Use Throttles preferences window to set the desired preferences.
When it is enabled, a Throttle Window can host a set of Throttles. You can browse through these throttles: Add a new Throttle in that Throttle Window. Once the number of Throttles in a Throttle Window is greater than one, Next and Previous Icons are enabled.
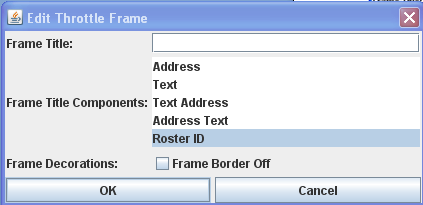
Frame Title:Type the title of your choice for the Throttle frame. This is referred to below as”text”.
Frame Title Components: Select the text component desired. There are two components which can be in the title bar of the throttle “Text” and “Address” The selections allow either or both to be in the title (in the order they appear in the selection), or one can opt for the description in the locomotive Roster Entry
Address --Automatically display the address of whatever locomotive is selected. (default)
Text -- Display the text that you enter in the field as the title at the top of this window
Text Address -- Display the text you entered, followed by the selected address
Address Text -- Display the selected address, followed by the text you entered
Roster ID -- Display the selected roster ID
(Note that if you enter text, it will not be visible unless one of the middle three modes is selected)
Frame Decorations:
This will remove the individual control bars for the separate panes of the throttle. This is advised for Windows users, as clicking the minimize buttons causes the restore button to be lost behind the rest of the panels. Recovery entails using the view menus to remove and then restore the panel in question.
adds the edits
aborts the operation
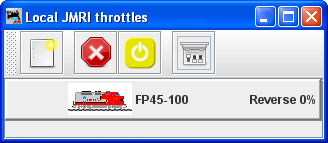
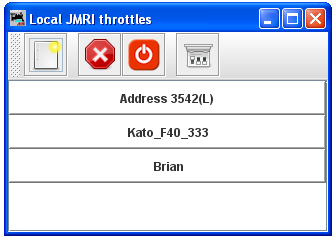
Opens the Local JMRI throttles Window,
|
|
Opens a new Thottle |
|
|
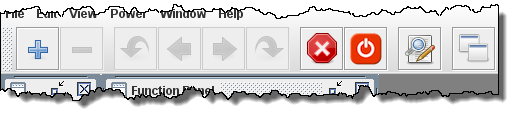
Emergency stop for all Throttles under JMRI control | |
|
|
Track power control | |
|
|
Opens the Throttles preferences window |
|
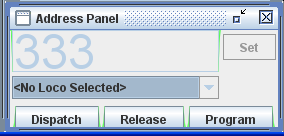
Primary use is to identify the decoders address, and to dispatch or release the identified address. Locomotive address may be entered by one of two methods: typed into text box or use drop-down list to select locomotive from your roster. . If you have added Function labels, to your Roster, the label text from the Roster will be displayed on the throttle function buttons. Click on the to send the address to your system to make this throttle active. is used to dispatch the locomotive which releases the throttle for that address so that it can be aquired by another throttle is used to release the address from your system. opens the Programmer for the locomotive selected in ops-mode (Programming on the Main) Only active when roster entry is used to select the address for the throttle. Any of the buttons may be grayed out depending on the status of your system. |
|
|
|
|
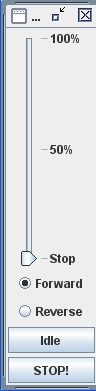
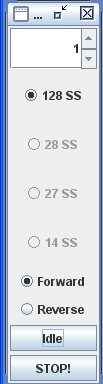
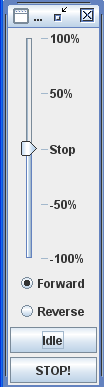
After you have established an address for the throttle, you should be able to run the train on your layout. The Control panel is used to control the speed and direction on your locomotive when the throttle is used to operate on a layout. The throttle slider controls the speed and indicates the percentage of power from Stop to 100%. Use mouse to drag the slider to the desired speed Alternately, the slider may be set to STOP in the middle and move to + 100% or to -100% to control locomotive speed. In the Step mode the up and down arrows control the speed one step at a time, or you may enter a number into the text box area between 0 and the max step indicated. Forward and Reverse set the locomotives direction. executes an emergency stop, locomotive stops immediately overriding any BEMF or momentum programmed into the decoder. stops the locomotive smoothly using any momentum setting programmed into the decoder.. |
|
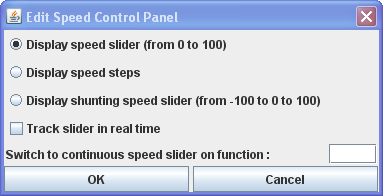
Control Panel Properties may be set by right clicking on the Throttle Control
Panel(Speed), the Edit Speed Control Panel dialog is displayed. This
allows you to select either of the two slider or step speed control
Display Speed Slider(from 0 to 100)-- displays the Throttle Control shown at the left Display Speed Steps -- displays the Throttle Control shown in the middle Display shunting speed slider(from 100 to 0 to 100) -- displays the Throttle control shown on the right Track sider in real time Switch to continuous speed slider on function: Enter the function from the Function Panel that you want to use. Sets the selections Cancels any settings |
||
|
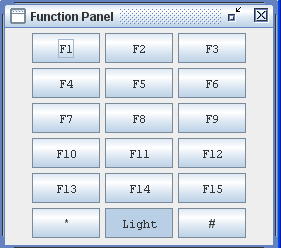
The Throttle Function Panel allows you to select the decoder functions from F0 through F15 on first overlay and F16 through F28 on second overlay. Many new Sound decoders use up to 28 functions.. use the to toggle between the two overlays If youhave entered Function labels, using the Advanced Programmer, the label text will appear on the throttle Function buttons. Another way to change the labels on the function buttons, is to right click on the button that you want to edit, the word Properties.. is displayed and when clicked on, an Edit Function Button dialog box will be displayed. |
|
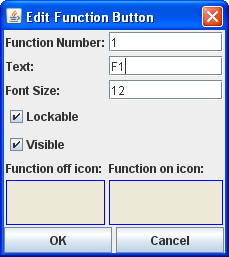
Edit Function Button allows you to edit the text displayed on the button and the function assigned. Function Number: text box to set the function assigned to the button. Warning!!! Make sure you do not assign the same function number to more than one button, otherwise, undesirable results may occur Text: the text you want displayed on the button. Font Size: Select the font size in points. Lockable - locks the function when button is clicked. eg makes the button a push on / push off button. Visible - makes the button visible. When unchecked the button will not show in the panel. To restore use the View menu and select Show All Function Buttons option. Function off icon: Drag and drop icon of your choice into the box. To remove icon right click and click on Remove. Function on icon: Drag and drop icon of your choice into the box. To remove icon right click and click on Remove. sets all the values edited. exits dialog without change. You can use the Save button on the Address Panel to save the edited functions to your locomotives Roster entry. |
The descriptions shown above are only a small part of what the Throttle Window can do. The author(s) of the Throttle Window have created an extensive set of Help files to help you customize Throttle Windows to your way of operating. To access Help, just open a New Throttle. Then, click on Help and select Window Help from the dropdown box. There's lots of good stuff in there.