JMRI displays panels via a web browser at the /panel relative URL.
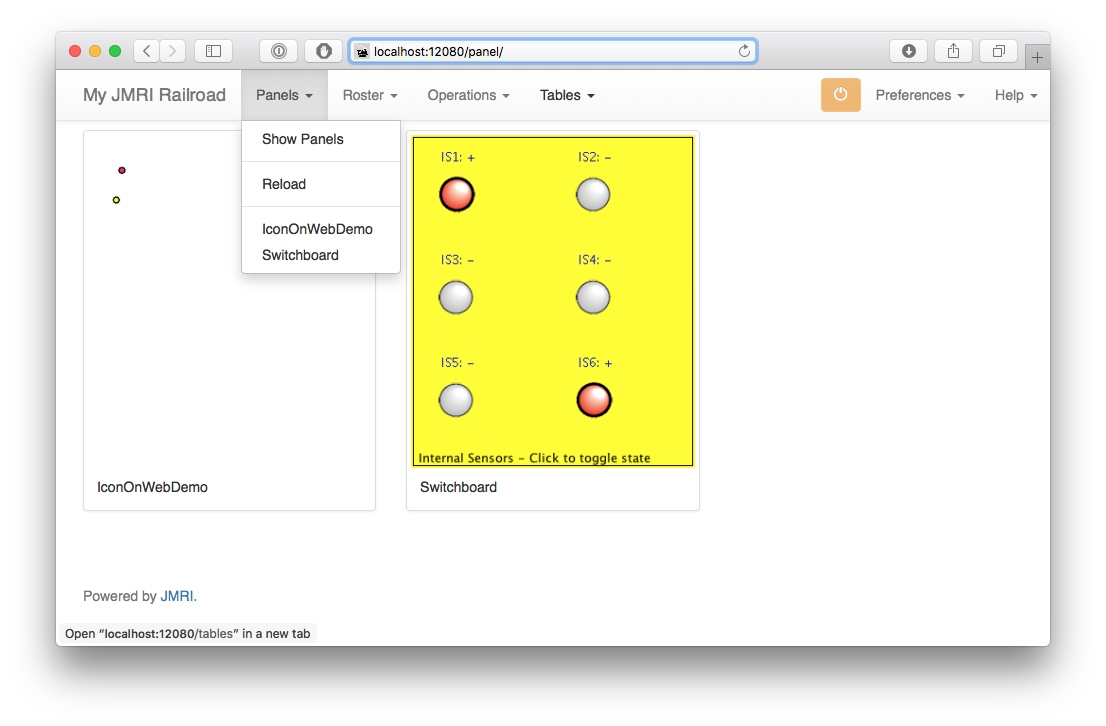
Remote Panel URLs are:
Panel display requires a modern browser with HTML5 support including WebSocket. The JMRI web server's About page includes a test for this.
")
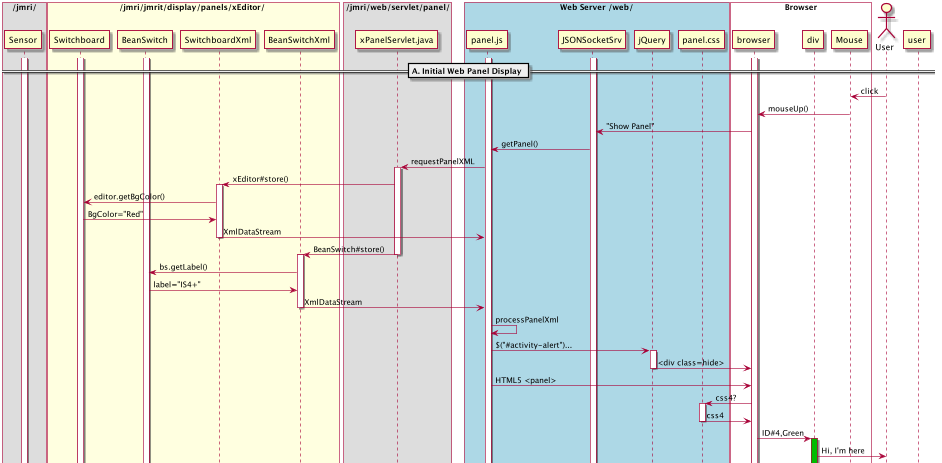
This chapter shows an overview of how JMRI Web Server operates between the JMRI application and the Web Browser to demonstrate what code is involved, using Panels as an example.
In part A we show at how a panel initially shows up in the browser of a (remote) user logged on to JMRI Web Server.
Part B focuses on the opposing flow of information. You will discover how user action in the browser is picked up all the way back to JMRI and even to the layout.
Some definitions
/web/js/Panel.js,
plus supporting "Servlets" to connect to JMRI, as documented in the Web Server
Javadoc. (Note: The code is run from /web/js/, but the real
source code is stored in /web/ts/ to allow the use of
compiled TypeScript)
We assume JMRI and Web Server are running and the user has a browser pointing to
http://localhost:12080 as set in JMRI Web Server preferences.
Configuration and current state of panel items is handled by the
jmri/jmrit/display/xPanelEditor.java code. This means that creating a panel and
items like Turnouts connected to the layout, and listening for changes has been completed
first in the JMRI application. A graphical control panel needs to be loaded in JMRI for it to
show up in the JMRI web browser drop down (it is OK if a panel is hidden in JMRI UI).
/panel/"name" URL./web/js/panel.js JavaScript code.panel.js is $(document).ready(function() {
(around line 2000).requestPanelXML(panelName); method:
          141 var requestPanelXML = function(panelName) {

          142    $.ajax({

          143    type: "GET",

          144    url: "/panel/" + panelName + "?format=xml", [...]

          145    success: function(data, textStatus, jqXHR) {

          146    processPanelXML(data, textStatus, jqXHR);

          147    setTitle($gPanel["name"]); } [...]
GET XMLHttpRequestcode> for the panel
to be retrieved by its name to the JMRI PanelServlet.
JMRI/java/src/jmri/web/servlet/, pieces of Java
code interacting with the web server. The extended HttpServlet
jmri/web/servlet/panel/AbstractPanelServlet.java links the web server requests
to the information kept in Java. The doGet() HttpServer message calls in
panel.js to answer the request./jmri/web/servlet/panel/SwitchboardServlet.java contains methods such as:
String getPanelType()
String getXmlPanel(String name)
          40 protected String getXmlPanel(String name) {

          41    SwitchboardEditor editor = (SwitchboardEditor) getEditor(name);

          42     Element panel = new Element("panel");

          43     panel.setAttribute("shape", editor.getSwitchShape());

          44     Element color = new Element("backgroundColor");

          45     color.setAttribute("red",
          Integer.toString(editor.getBackgroundColor().getRed()));

          46     [...] 47
              panel.addContent(color);
panel.js call e.g.,979 $("#panel-area").css({"background-color": "rgb(" + $widget.red + "," +
$widget.green + "," + $widget.blue + ")"});
store(object) method in
jmri/jmrit/display/switchboardEditor/configurexml/SwitchboardEditorXml.java:
            41 public Element store(Object o) {

            42  SwitchboardEditor p = (SwitchboardEditor) o;

            43  Element panel = new Element("switchboardeditor");

            44  JFrame frame = p.getTargetFrame();

            45  panel.setAttribute("name", "" + frame.getTitle());

            46  panel.setAttribute("class",
            "jmri.jmrit.display.switchboardEditor.configurexml.SwitchboardEditorXml");

            [...]
            for (BeanSwitch sub : _switches) {

              try {

                Element e = ConfigXmlManager.elementFromObject(sub);

                e.setAttribute("label",
            sub.getNameString());
jmri/jmrit/display/switchboardEditor/configurexml/BeanSwitchXml.java:
            public Element store(Object o) {

              BeanSwitch bs = (BeanSwitch) o;

              Element element = new Element("beanswitch");

              element.setAttribute("label", bs.getNameString());

              [...]

            }
out.outputString(doc) in reply to the web server
request.
requestPanelXML command, the
JavaScript code in /web/js/panel.js contains the functionprocessPanelXML($returnedData, $success, $xhr) (around line 160)$xml an object-based web panel html, ready
to forward to the browser and display client-side using CSS and HTML5.panel
attribute:
$("#panel-area").css({backgroundColor: $gPanel.backgroundcolor});
$() invokes jQuery as a selector (a function that returns a set of
elements found in the DOM of the web page).$widget arrays:
        236 $panel.contents().each(

        237   function() {

        238     var $widget = new Array();
244 $(this.attributes).each(function() {

        245   $widget[this.name] = this.value;

        246 });
$widget array if enriched by extra fields, either using
attributes shared on the panel, like666 var $cr = $gPanel.turnoutcirclesize * SIZE;1039 $widget['text8'] =
$(this).find('inconsistentText').attr('text');
        case "beanswitch" :

$widget['name'] = $widget.label;label item.
        $("#panel-area").append("<div id=" + $widget.id + "r class='" +

        $widget.classes + "' " + $hoverText + "></div>");
panel.js starts up a process to send and listens for changes to each
panel element (called "nodes" in xml speak).$widget variable in
/web/js/panel.js, to interact with the browser document object model (DOM)
HTML5+ entities via jdom (Java-based document object model for XML), jQuery and JavaScript
Object Notation (JSON).<div/>s that the server will feed to the user's browser and using jQuery
can be contacted by their unique ID.panel.js follows interaction in
java.src.jmrit.display.xPanelEditor and the separate PositionableItems like
LayoutTurnout, CPE SensorIcon and Switchboard Beanswitch.$(document).ready(function() main method is running, it will
listen for changes, and depending on the type (object) will start updateWidgets(name,
state, data), which in turn calls setWidgetState(widgetId, state, data)
to update the shape displayed on screen, e.g., when a sensor on the layout changes
state.What to Code:
store(panel) methodfor-each element loop in the same method$widgets for your items in the
processPanelXML() function.Where to Code:
/jmri/jmrit/display/xEditor/configureXml/xEditorXml.java + similar
files for any special classes your panel type relies on./web/js/panel.js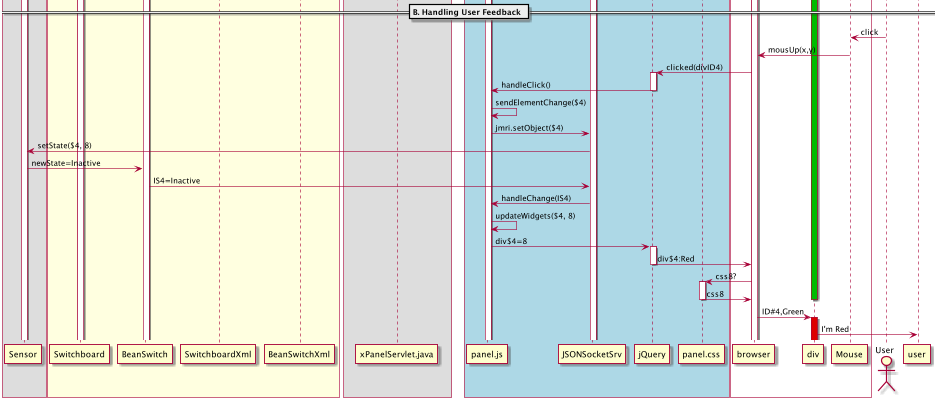
Note: Web click events are only enabled if a panel is configured (in JMRI xPanelEditor) to allow control.
mouseup() function is hooked up to
widgets in /web/js/panel.js (around line 1120):
$('.clickable:not(.momentary)').bind(UPEVENT, $handleClick);
mousedown, and inactive on
mouseupUserClicked(object)
and GET/POST HTTP messages.mouseClickEvent is heard, the $handleClick(e)
function in panel.js calls sendElementChange($widget.jsonType,
$widget.systemName, $newState), resulting in jmri.setObject(type, name,
state) forwarding to the JMRI system.$handleClick(e) function in panel.js (around line 1160)
updates the widgets involved:
int value for Inactive and Thrown):var $reDrawIcon = function($widget) {
$('div#' + $id).css($widget['css' + $newState]);
web/css/panel.css
file by he user's browser.
sendElementChange (around line 1750) a call is made to
jmri.setObject(type, name, state);, where jmri represents the
JMRI WebSocket on this serversetObject() in /web/js/jquery.jmri.js jQuery JavaScript Library instructs JMRI to set for example a
Light to "On" via a Post message:
          jmri.setLight = function (name, state) {

            jmri.socket.send("light", { name: name, state: state }, 'post');

          }
What to Code: Specify the response to user action by adding an
if(...) block to the $setWidgetState(id, newState, data) function
(near line 1570).
Where to Code: $handleClick() function in
jmri/web/js/panel.js
We hope the above example will help new developers understand which parts are required to
create and maintain web display for a panel type, and how each part is connected to display
stuff from JMRI in the web browser, and back.
As always, start small and check often!