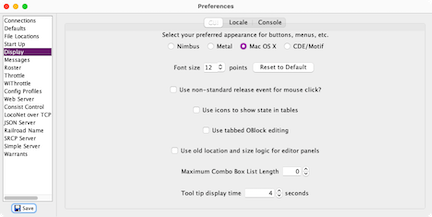
The Preferences pane is where you configure the basic operation of your JMRI application.
The screen is split into two sections: on the left hand side is a list of the Preference groups that can be set. Clicking on each item will then populate the right hand side with the various options that can be configured for that Tab.
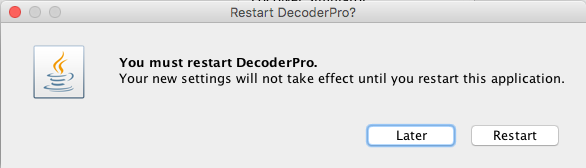
Perhaps the most important control is at the bottom of this section: The Save button!
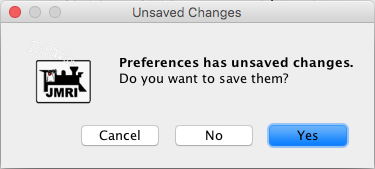
Be sure to click Save before leaving this window. Your changes to the Preferences don't take effect until the program is stopped and restarted, so the program will prompt you to do that after saving the Preferences.
Some preferences take effect when changed but will later display a reminder prompt to save the changes before quitting.
You can select any of the various JMRI layout Connections here.
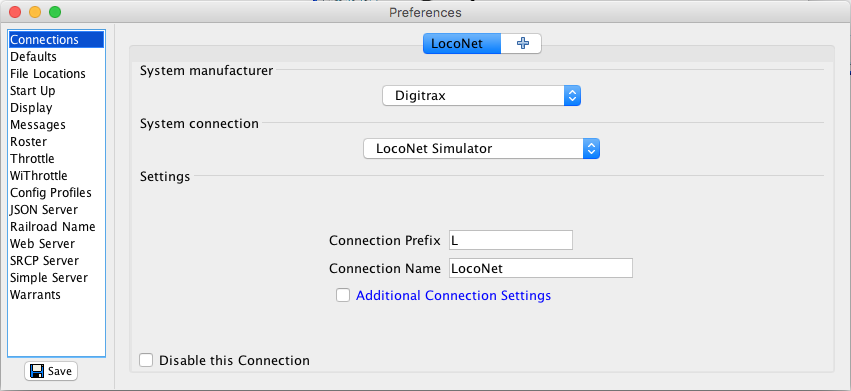 Each connection has its own unique
tab. To get started, first select your DCC System Manufacturer, followed by the type of
Connection that you are using. You will then be presented with a series of most commonly
required settings that need to be set. If you need to change some of the more advanced
settings for this connection, check the "Additional Connection Settings" box (where
available).
Each connection has its own unique
tab. To get started, first select your DCC System Manufacturer, followed by the type of
Connection that you are using. You will then be presented with a series of most commonly
required settings that need to be set. If you need to change some of the more advanced
settings for this connection, check the "Additional Connection Settings" box (where
available).
To add an new layout Connection, in the Connections pane click on the tab with a "+", this will then present you with a fresh connection tab. To remove a Connection, in the System Manufacturer drop down list, select (none selected) to just clear your present choices and enter new ones, or click on the small "x" in the Tab name to delete the Connection.
For more information on how to configure this for your particular hardware, see the Hardware Help pages.
Remember to press Save!
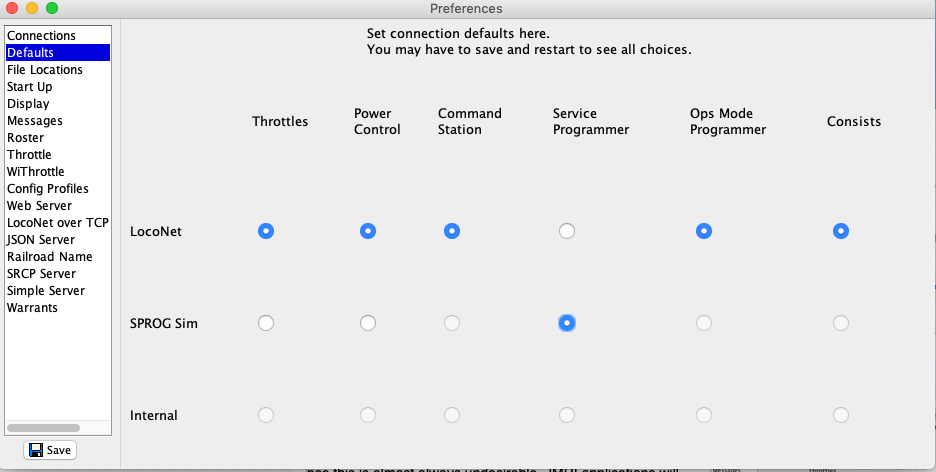
If you are using multiple connections, e.g. a LocoNet Connection and a SPROG Connection, the Defaults pane lets you select which connection you want to use for a particular purpose. For example, you can select one connection (LocoNet in the figure) for train throttles and consists, while using a different one (SPROG in the figure) for the service mode programming track.
For most Layout objects there is no default connection. Every time you create a Turnout, Signal or Sensor, you can choose which system ( eg. LocoNet or MERG ) it belongs to.
The Internal connection can be selected as a default. To avoid a common
mis-configuration, JMRI applications will notify you if the Internal connection is selected
across all the columns. If you choose to use an all-Internal set of defaults and want to
silence this notification, edit the profile properties, setting the property
jmri-managers.allInternalDefaults to true.
These allow you to set the default location for where scripts and user files are loaded and stored.
Note that when changing the User Files Location, this will also change the default location for where the following are stored:
There's a separate Help page with information on sharing files between computers using Dropbox.
Start Up preferences allow windows and files to be opened, scripts to be run,
and additional buttons to be placed on the main window when the application starts.
A very common use is a load file action (see below) to automatically load your last stored
layout configuration file at
startup, so all your turnouts, sensors, panels etc. are available again.
Click the Add ▾ button and select the type of start up action to add. The new action will be added last.
Start up action order is important, and can be changed by selecting a start up item and moving it up or down in the list. For the best performance when loading an XML file, ensure that "Load table content and panels..." occurs before any "Perform Action..." to "Open" any "Table". And, in most cases, scripts should be the last items in the start up order.
Individual start up actions can be enabled or disabled. The default is Enabled.since 5.5.6
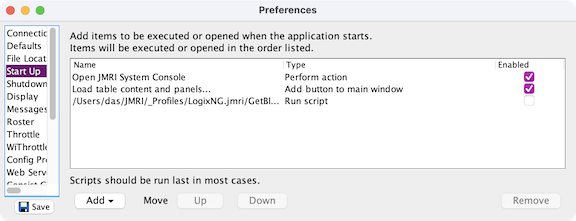
There are seven types of start up actions:
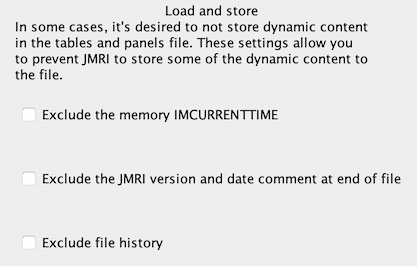
When the layout configuration data is stored, the new xml file includes several items that can have different values with each store. When a version control system is used to manage the files, such as Git, conflicts can occur. Select the items to be excluded.
When JMRI is stopped using Quit, a process is run that determines if any tables or panels have been changed since the last PanelPro store occurred. This provides an opportunity to do a final store before shutdown.
The check process uses two shutdown preferences and options for ignoring special cases that can result in unnecessary store requests.
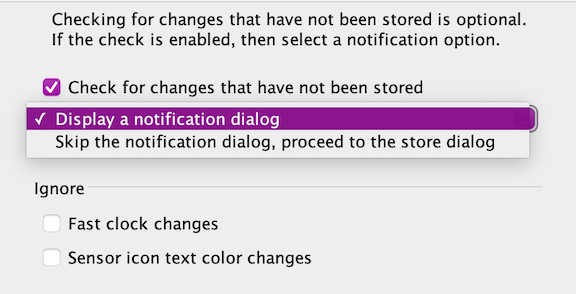
Check for changes that have not been stored is the master switch for the process. If this is unchecked, no checking will occur. Checked is the default setting. Starting PanelPro creates some default Fast Clock table entries. If these are the only table entries, a store request will not occur.
If the check process has been enabled and there are changes that should be stored, a dialog will be displayed. The changes normally occur due to table and panel changes. They can also occur when a connection, such as Digitrax, automatically adds sensors and turnouts.
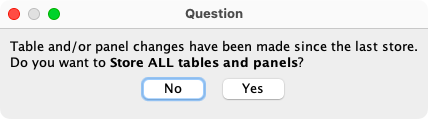
The default is to show the store request dialog and if Yes is selected, the actual store dialog will be displayed. If No is selected, the store dialog is skipped and the shutdown continues. If Cancel is selected, the store dialog is skipped, and the shutdown is also cancelled.
The Skip option can be selected to go directly to the store dialog.
Some of the message dialogs include an option to ignore the message in the future. They provide a checkbox with either Skip message in future? or Remember this setting for next time? as the description. If the checkbox is selected, the dialog will no longer appear. A second dialog is displayed with a reminder to use this preference to re-display the suppressed message. This reminder can also be suppressed.
The Messages preference provides the ability to undo the selections. It can also be used to manually set the preferred settings.
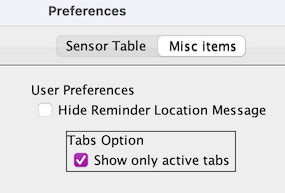
The Messages preference will show 17 tabs, one for each standard item such sensor or turnout. Each tab will show the possible messages that can be displayed. Active Messages will have an active checkbox or the current combo box selection. There is also a Misc items tab for messages that are not related to the standard items. With the exception of the fixed entry for User Preferences (the second dialog), these will only be shown when active.
THe Misc items tab also includes the Tabs Option. When the option is selected, only the standard tabs with active messages are displayed.
This section also has checkboxes for options:
More detail: A single bad write with this option off trashes one CV; writing a bad index with this option off trashes the CV that was supposed to be written and the wrong one addressed by the bad write, but the write to the next CV in the sequence is OK due to the redundant next write of the index; writing a bad index with this option on leaves that badly-written index value in place, so writes a sequence of bad CV values. Bottom line: If working with a complicated decoder with lots of CVs, you need a reliable programming connection, see next option.
If you're having intermittent trouble writing to a decoder, this may improve reliability. If DecoderPro is never able to properly write, this won't help; it only helps if the problem is occasional, and retrying will get it right more often than not.
Some DCC systems will check for a "write acknowledge pulse" from the decoder before declaring the write a success. Those are almost as reliable as this, and much faster. So if you're using one of those DCC systems, this might not be needed. On the other hand, if you're using a DCC system that "writes blind", with no check, this might be really useful. To tell if you have one of those, try writing CVs with the locomotive off the track. If DecoderPro thinks the write succeeded, then the DCC system is writing blindly, without checking.
This doesn't help (but doesn't hurt) if you can't read back the decoder. Most DCC systems can't read during ops mode programming, for example. Some command stations (Digitrax DB150) can't read from the decoder. In those cases, this option just asks the command station to write without reading back.
To configure it, click the "Set..." button and follow the directions.
The "Reset" button restores it to the default location. Note that this just changes where the program looks. If you've stored roster information somewhere else and want it back in the default location, you have to move the files there yourself.
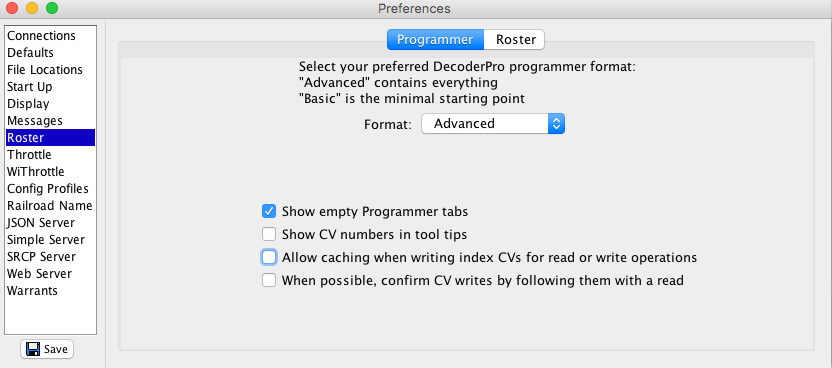
You can also enter a default value for the "Owner" field in DecoderPro roster entries here. This fills in the value for new entries, which can save you a little bit of typing. It has no effect on existing entries, even if changed.
This Preference pane tab lets you select whether the extended Throttle features are available, and which ones can be used.
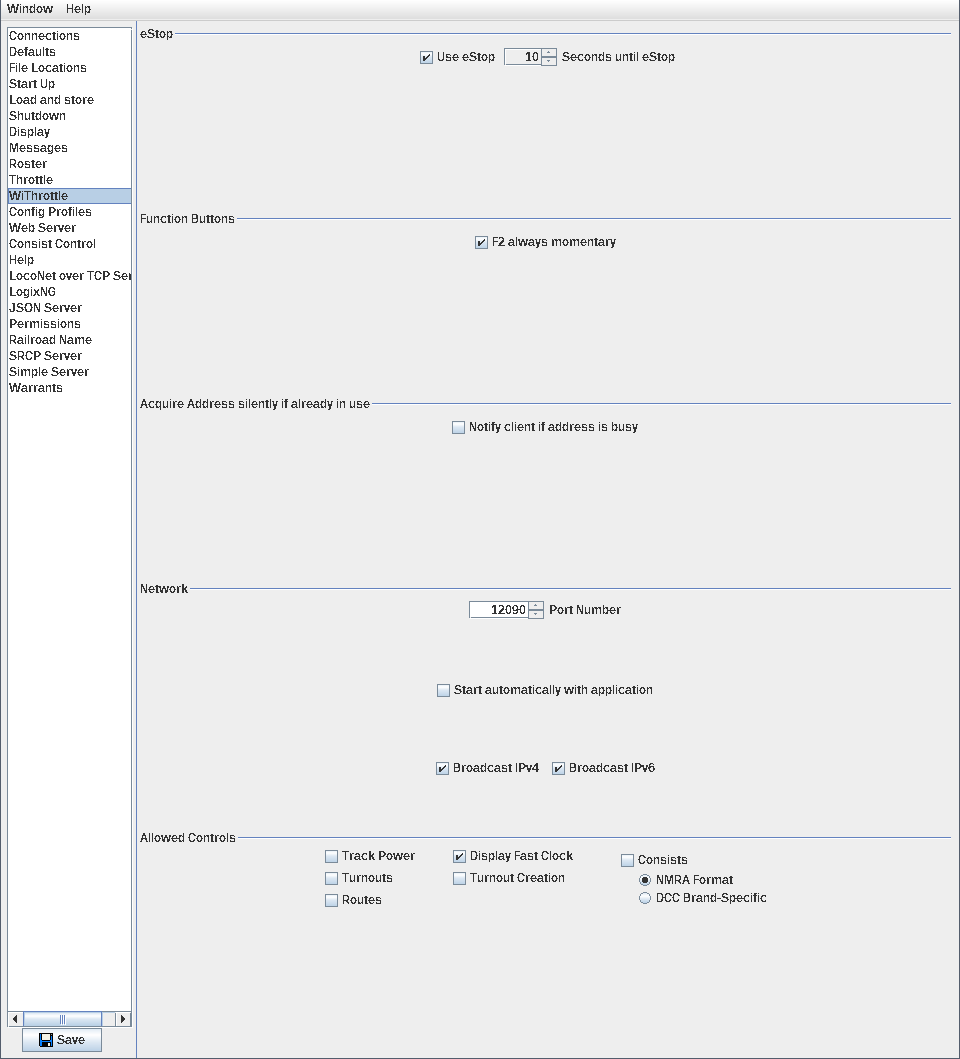
If selected: If the WiThrottle Server does not receive any communication in the chosen time, the affected JMRI throttle will send an emergency stop command to its train.
The chosen time is approximate; the response may be a few seconds earlier or later.
The "Save" button at lower left puts any changed settings into effect. For a connected throttle to use the new settings, you'll have to restart JMRI (and then restart WiThrottle) as instructed by the dialog.
JMRI Configuration Profiles make it easy to set up your JMRI applications to work with different setups. Each profile specifies one set of Preferences. You can then select which one to use.
For more information, see the Configuration Profiles help page.
The JMRI Web Server lets you connect to JMRI from a web browser on your computer, tablet or phone and work with your railroad.
This tab lets you control what the web server provides. For more information, see the Web Server Preferences pane page.
When checked, attempt to update CV19 in the roster entry when changing the consist.
When Help ⇒ Window Help or Help ⇒ General Help is selected, JmriHelp will display the help page in the default browser.
There are three options that can be selected.
See LocoNet over TCP
The JMRI JSON server is used by applications on other computers, including tablets and phones, to connect to JMRI to operate your railroad.
On this pane you can specify the port for the connection (usually left at default) and how often the server checks for whether the connection has failed via a heartbeat message.
The Permissions feature is used to control access to important functions such as loading and storing PanelPro table and panel files or changing Preferences.
The details are at Permissions.
The Railroad Name tab lets you specify the name of your model railroad (module), as it is used by several server protocols.
The JMRI SRCP server is a standard way of connecting "client" user programs to a "server".
On this pane you can specify the port for the connection (usually left at default).
JMRI Simple Server is a part of JMRIClient, a method to remotely connecting one JMRI program to another.
On this pane you can specify the port for the connection (usually left at default).
This tab sets parameters used in computing routes and speed changes for Warrants and for controlling the events that warranted trains may encounter.
When an automatically running train encounters a Signal aspect that calls for a speed change, the speed map table provides the information of what the speed change should be. Other parameters control the way the speed change is made.
The Aspect Speed Name Table maps the speed names found in the aspects definition of a signal system to a value. It is important that all the speed names used in your signal system be listed in the Speed Map Table. Rows can be added or deleted to conform to the Signal System aspects.
The value associated with a speed name can be interpreted in four different ways when a signal aspect requires a speed change. There are four radio buttons for you to choose the meaning of the value.
Choosing the interpretation is a matter of what you want to happen when a warranted train reaches a signal or block aspect. Percent Normal will always make the train change speed and Percent Throttle most likely will also. The last two choices are the most prototypical, but if the train is already within the speed limit called for, no speed change will occur.
The Head Appearance Table is used when Signal Heads are used as signals. It maps signal head appearance names to aspect speed name which in turn are mapped by the Aspect Speed Name table to values that interpret speed limits.
It is important that the correct Layout Scale is chosen since it is needed to convert throttle settings and track speeds to and from scale speeds.
The Max Number of Blocks in Route is the depth to which JMRI will search for a route when defining a warrant. This is a global value that can be overridden when creating a warrant.
The smoothness for slow down and speed up are done by stepping up and down with two "ramp" parameters; the throttle increment per step and the time interval of each step. These two parameters are paired to make a "stair step" pattern for changing speed. Generally, they are paired in that a small throttle increment should be done in a short time interval and a large increment in a longer time. When setting them, the time interval should be long enough for the speed increment to complete given the momentum you have programmed into your decoders.
You should experiment by watching how NX Warrants start and end or by issuing "Stop" and "Resume" commands to a recorded warrant.
The value of Throttle Setting/Speed Factor along with Layout Scale adjusts a throttle setting to be a layout track speed. The Throttle Factor set here is a global default.
For more information on Warrant speed parameters, see Modifying Warrant Speeds and follow its links.
since 4.19.2Warrants can compute a track speed when traversing a path with known length and known throttle setting. These measurements are made for each Roster Id that is run under a warrant and are kept for the entire layout session. When JMRI is quit, at shutdown, these Session Speed Profiles may be merged into their Roster Speed Profiles. The following choices are available at shutdown.
since 4.24.5A record of the warrants that have been run can be output to the console. This can be done in lieu of using the "Open Session Log" menu item to write the record to file. Press this button to enable or disable the feature.
since 4.24.5The ramping parameters and speed interpretation apply to all locomotives when speed changes are required by signal aspects, obstacles ahead or a user "Halt" control command. You may have a balky engine in your fleet that may not perform well at low throttle settings. Should such a speed be specified before entering a block, the engine might stall and never get there. "Slow Speed Assistance" can be given when a train is inordinately late in getting to the next block of the script. This done only when the train approaching the block has a speed less than a specified throttle setting. If the train has not reached the block within 10 seconds of its scheduled script time, its speed is increased by one "Ramp Step Throttle Increment". This is done at 10 second intervals until either the train reaches the block or has attained the specified throttle speed. Upon entering the block the original script speed is restored.
The default setting for triggering Slow Speed Assistance is 10% throttle. Slow Speed Assistance is disabled by setting the trigger speed to 0%.