DecoderPro provides a communications monitor window so that you can see what is happening on the communications link between the program and the layout hardware.
When the monitor window opens, it will automatically display all traffic on the communications link.
The Title bar will display the name of your DCC systems communications link.
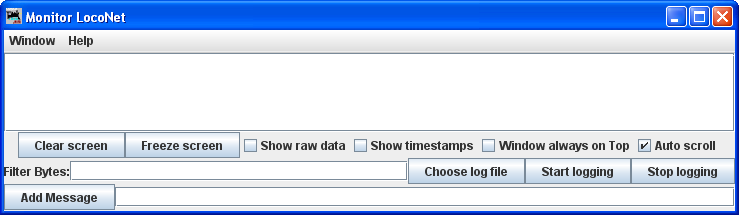
The messages that are sent and received over the communications link are displayed in the main pane of the window.
Clear screen button- Erases the log area of the screen where the messages are displayed.
Freeze screen button-Stops acquiring new information, so that the captured information stops scrolling.
Show raw data-Normally, the monitor displays the program's interpretation of what it's seeing. If you want to see the raw bytes, check this box.
Show timestamps-Normally, the program just displays the data from the communication link.. If you would like each message to be preceded by the time it was sent or received, check this box.
Window always on Top -- Always displays the Monitor window.
Auto scroll -- Scrolls the data in the window continuously.
Filter Bytes:
Choose log file button -- Log monitor data to a file for recovery for diagnostics, and sharing data with others.
Start logging button -- Starts sending data in Monitor Window to selected file.
Sometimes, it is useful to capture the events that are happening. If a problem occurs, then the information capture in the log file can be sent to the group for analysis of the problem. Small amounts of information can be copied from the display pane of the monitor window. If more information is needed than is provided by the window, you need to write the information to a log file on your computer's disk.
To do this:
Type your message in the Add Message text box, then click on the Add Message button to add your message to the log file.