The action descriptions are grouped by the socket type and category.
since 5.1.3For, For each , If Then Else, Sequence, and Table: For each have been moved from the Common category to the Flow Control category. Call Module has been moved from the Other category to the Flow Control category.
When the category and type has been selected, the detail action dialog will be displayed. The content of the dialog will vary depending on the category and type. The typical digital action item dialog is described below.
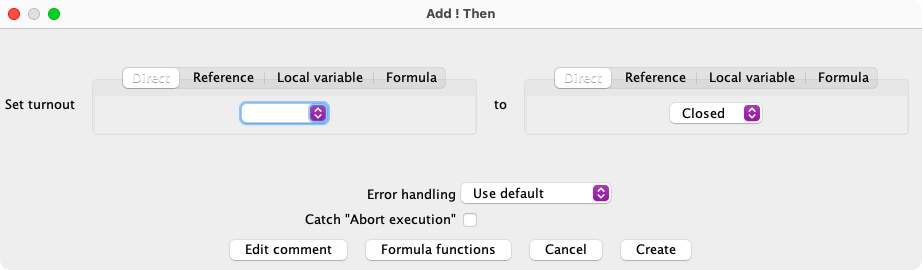
The dialog for adding and editing digital action items consists of an upper part that contains the item and the actions for that item. The lower part is common to all actions.
For some actions, for example Signal head, you need to first select the item and then you can select the action to do on that item. For example, for Signal head, you first select the signal head to act on and then you can select the appearance to set for that signal head.
The Edit screen is the same except for the title, the Create button and the current content will be in the fields.
The left section is normally used to select the item, such as a turnout or a sensor. The right section is the action to be performed. The default mode will be to use the Direct tabs.
See Reference, Local Variable and Formula for details about the other tabs.
The lower section contains a standard set of items
Control an Audio source.
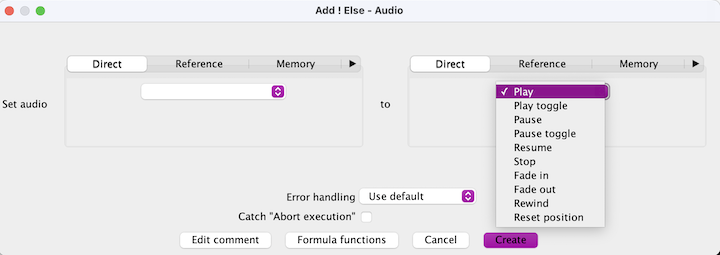
Select an audio source from the list and the action to be performed.
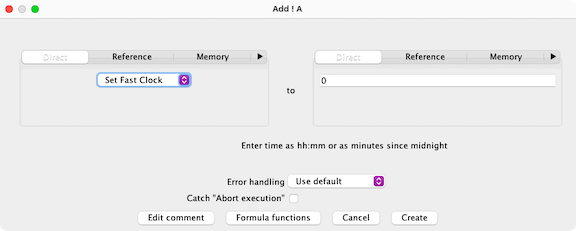
In addition to setting the time using a constant value, the other LogixNG modes can be used. For example, the new time can be in a memory variable which will be used to set the fast clock time.
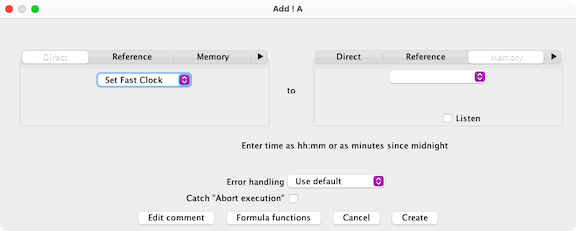
The Memory listen option can used to automatically update the fast clock time when the memory variable changes. This eliminates the need to have a separate expression to invoke the Set Fast Clock action.
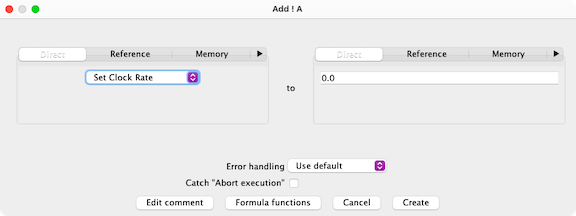
The rate values can be whole numbers or decimals, such as .5. The rate values can also be supplied from the other LogixNG modes, such as a memory variable.
A Dispatcher train only exists from the time it is created until it is terminated. LogixNG uses the Dispatcher TrainInfo file to refer to a potential Dispatcher train. See the Saving and Retrieving Active Train Information section at Activate New Train. If the related train does not exist when the LogixNG action occurs, the action will be ignored. There will be no notification.
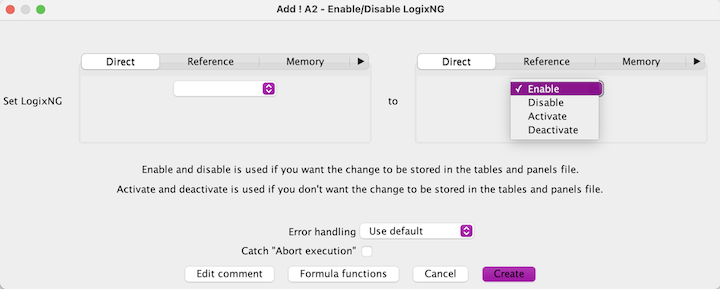
A LogixNG has to be both enabled and activated before it will execute.
Enable/Disable are intended to be persistent changes. Activate/Deactivate are temporary changes.
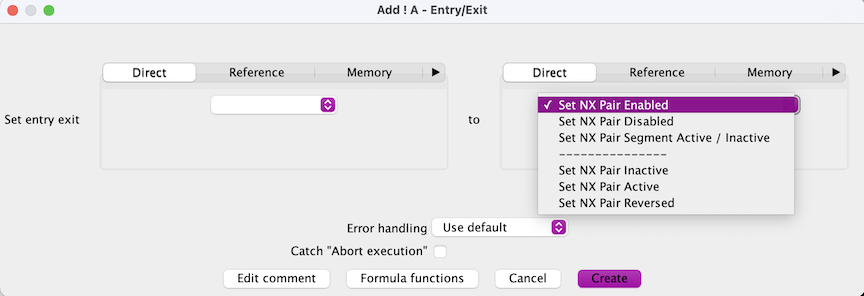
Manage an Entry/Exit pair. The last three items are implemented in JMRI 5.5.7.
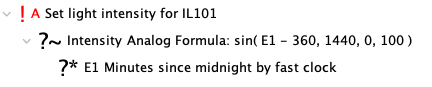
The Light intensity action is an alternate method to set the Variable Light Intensity value. The standard method sets the value directly from the action using any of the standard input methods.
This action creates a child analog expression called Intensity. Analog
expressions are normally used to create a dynamic values, such as random numbers. Using the
sin() function along with the Minutes
since midnight analog expression, it is possible to change light intensity based on the
time of the day using the fast clock or the system clock.
Here is an example using the sin() function.
Local variables are described in Chapter 8 - Local Variables.
Instead of specific actions, local variables use tabs to select the action.
Note: The Memory, Block and Reporter tabs have an option to listen to changes to their value.
Instead of specific actions, memory uses tabs to select the action.
The Program on Main action provides the ability to change CV settings. This is similar to the Single CV Programmer.
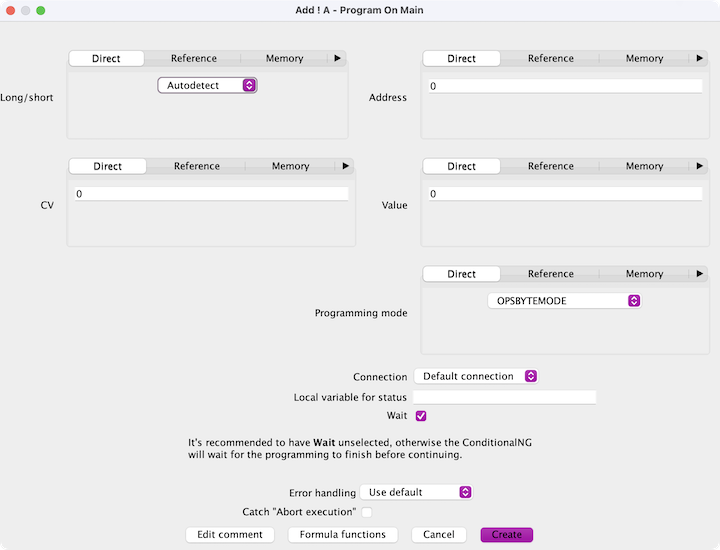
Depending on the command station, selecting a Long address for address less than 128 might be ignored or create an error.
The roster is not used or updated.
A local variable can be assigned which will contain the results of the operation. The local variable is only updated if there are actions in the Execute action. If the value is not zero, there was an error.
LogixNG: IQ:AUTO:0001
ConditionalNG: IQC:AUTO:0001
! A
Many
::: Local variable "result", init to None ""
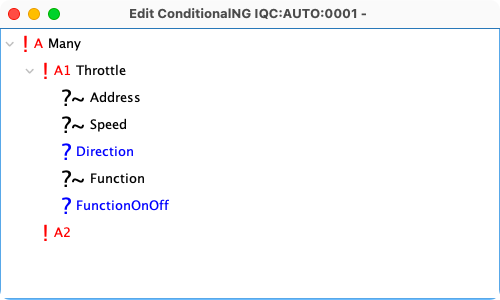
! A1
Program CV 29 to 32 for address Autodetect 1234 using programming mode OPSBYTEMODE
! Execute
Many
! A1
Log data: Only text: pom returned
! A2
Log local variables
The Reporter action is used to copy the report content to a memory variable or a LogixNG local variable. There are three kinds of information.
Note: The meaning of the reports and the state number are defined by originating hardware.
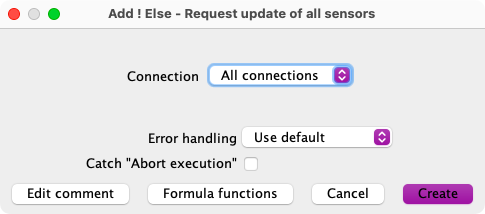
Request the current status of sensors. The request can be limited to specific connections or all connections. The action depends on whether the connection supports sensor state requests.
As of JMRI 5.7.5, supported connection types include :
For connections that send individual Sensor status requests, the delay between individual requests uses the connection Output Interval within Additional Connection Settings.
Some hardware types, eg. Acela and NCE, are constantly polled so this action may have little consequence.
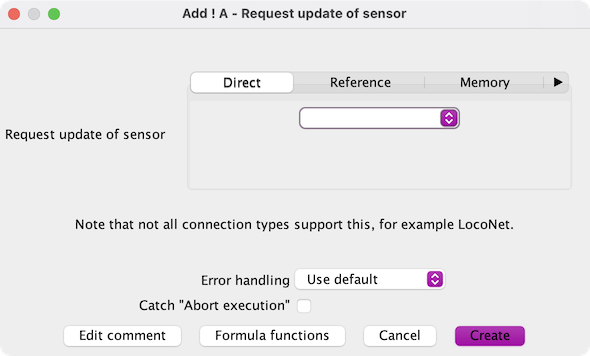
Request the current status of a specific sensor. The action depends on whether the connection supports sensor state requests.
As of JMRI 5.7.5, supported connection types include :
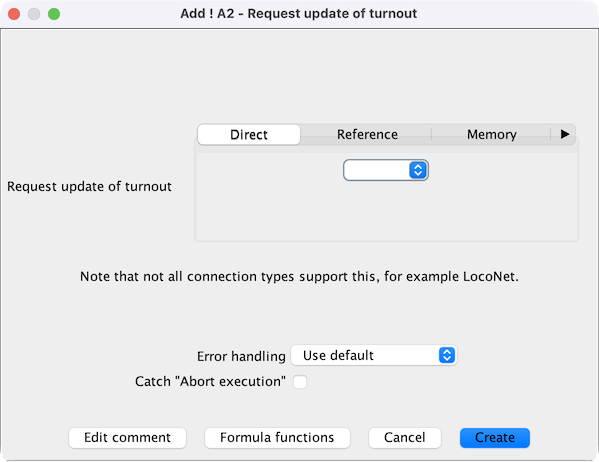
Request the current status of a specific turnout. The action depends on whether the connection supports turnout state requests.
Depending on the accessory decoder a LocoNet request might work if the turnout feedback is set to MONITORING or INDIRECT.
As of JMRI 5.7.5, supported connection types include :
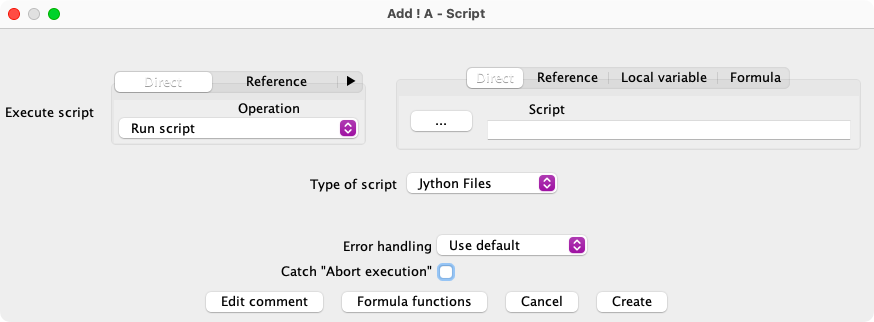
For details on accessing LogixNG objects from a script see Chapter 13 - Jython Scripting Support.
The delayed options are handled by Execute Delayed.
Set a value for the selected Reporter.
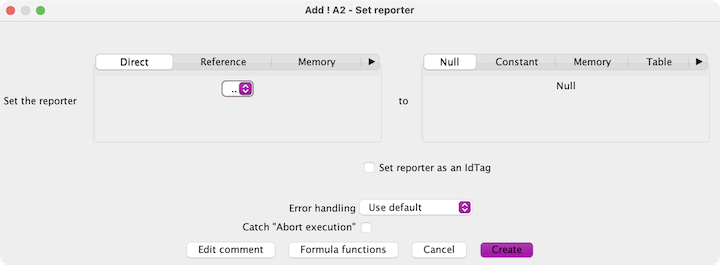
The Set reporter as an IdTag option is used to provide the report as an IdTag if it's not an IdTag already.
Plays the specified sound file. Specify the sound file to play by entering its name in the field provided. Click the file selection button to bring up a file selection dialog to aid in finding the file. Navigate to your sound file, then click your sound file's name in the dialog and the name will be copied to the field.
Replace the content of the specified table cell.
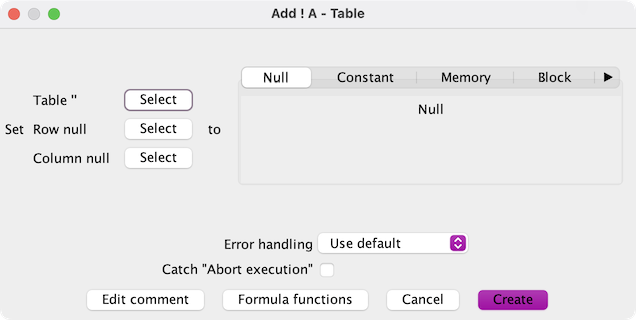
Note: Since tables are created from CSV files during PanelPro startup, the content changes are temporary.
The Throttle action controls a throttle.
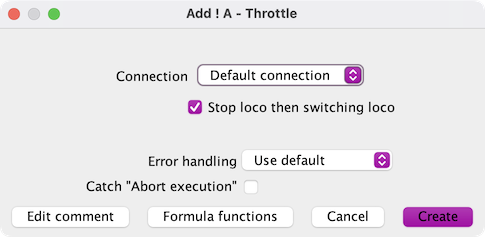
The LogixNG throttle can use either the default throttle connection or an alternate throttle connection. The default connection is defined in Preferences ⇒ Defaults. If there is more than one connection, other connections might support a throttle.
since 5.9.5When enabled, the Stop loco when switching loco option stops the loco before switching to another loco. This is the default and was the previous behavior. Warning: When the option is disabled and and a loco change occurs, the previous loco will continue running until some other process tells it to stop.
The analog expressions can be an analog memory expression or an analog constant expression. In the future, AnalogIO will also be available.
The digital expressions are either Always true or Always false .
The Throttle function action is similar to the Throttle action, except that it only sets a throttle function On or Off.
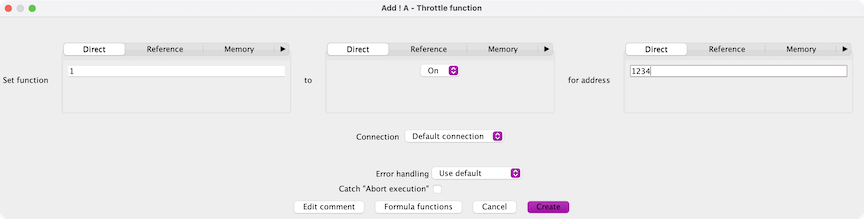
The Connection drop down can be used to specify the connection to be used.
The delayed options are handled by Execute Delayed.
Locks or unlocks a turnout. Select the name for the turnout, and choose the operation from the popup menu. Note: To control the type of turnout lock go to the Turnout Table and select the Lock Mode.
The Digital Formula action provides the ability to create formulas that are not directly related to other items, such as sensors, which use the Formula tab.
The formula action is in particular useful when working with local variables. You can for
example increase a local variable by the formula index++ or make some
calculations, like turnout = name.substring(2) which removes the first two
characters from the string.
The dialog for creating a Digital Formula consists of a single text field.
See Chapter 9 - Formula for details.
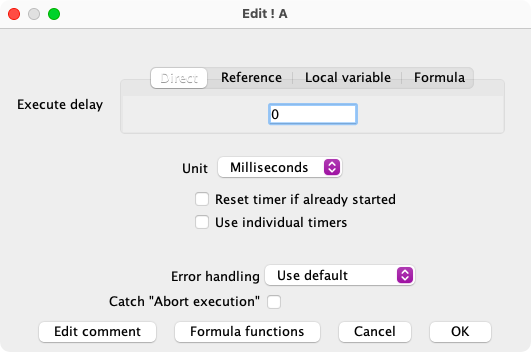
Delay the execution of the following action for a specified amount of time. The action can be a single action similar to the Logix Delayed Set ..., but this can be any item, such as signals. The action can be a series of actions by using the Many action. It can be a complex action by using an If-Then-Else action.
Note: When using If-Then-Else, the Always execute option is required. Any expressions that refer to JMRI table items, such as sensors, turnouts, signals, etc., need to use the No Listen option.
When the timer starts, a copy of the current local variables is attached to the action that will be run when the timer delay is done. This makes it possible to pass data to the future action.
The time delay units are milliseconds, seconds, minutes and hours.
The default mode is that once a timer starts, subsequent requests will be ignored. If this option is enabled and a timer is already running, it will be canceled and started again. The local variables will be based on the current values at the time of the reset.
This option makes it possible to pass different local variable values to a series of timers. The actions will be the same but the data can be different. Note: This option disables the reset option.
There is no Cancel timer capability. If there might be a need to prevent the action from running, an If-Then-Else as the first step of the action can be used to check some item, such as a sensor, to see if the action should proceed.
See Timeout for a conditional delayed execution.
The Many action executes many child actions.
Read an analog child expression and execute an analog child action.
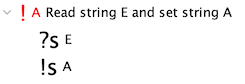
Read a string child expression and execute a string child action. This is used to copy string values from a Memory, a StringIO or as a constant. The destination will be a Memory or a StringIO. There are special expressions and actions.
Expressions
Actions
Timer has a number of actions, each executed after a period of time. The time to wait can be 0, which means the related action is executed immediately.
Options:
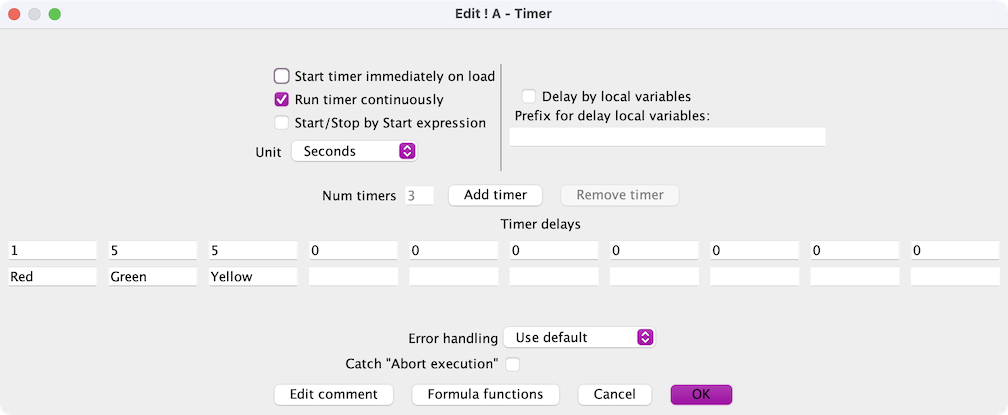
If all times to wait are zero, the timer will automatically stop after executing all the actions once, even if it is set to run continuously. This is a safety feature to avoid locking up JMRI.
To add a socket for the Timer action, edit the Timer and click the Add timer button and a new socket will be added to the end. To remove a socket for the Timer action, edit the Timer and click the Remove timer button and the last socket will be removed. The socket can only be removed if there is no action connected to it.
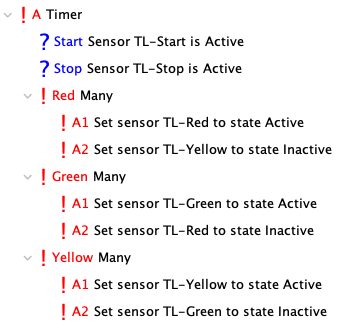
This example shows using the Timer to implement a traffic light. Note: This example shows renaming the A1, A2, etc. sockets to meaningful names.
Another example is using a Timer to blink a light. Create a Timer with a single socket and a Light action that toggles the light on/off. If you want different times for on and off, create a Timer with two sockets where the first socket turns the light on and the second socket turns the light off.
The Timer action can be used in LogixNG Modules. Due to the nature of repetitive timer events, there are some restrictions.
Breaks the execution of a For, For each or Table: For each action.
If Break happens in a Module and there is no loop in the Module itself, it breaks the loop in the calling ConditionalNG or Module.
See Chapter 10 - Modules for details.
Continues the execution of a For, For each or Table: For each action.
The current execution is aborted and the next loop is executed.
If Continue happens in a Module and there is no loop in the Module itself, it continues the loop in the calling ConditionalNG or Module.
Triggers an error and displays the standard error dialog.
since 5.15.1The error message has been changed from a simple text box to multiple input options including formulas. This makes it possible to create better messages. Note: The storage format has changed. Any existing occurrences of Error actions will prevent loading the xml data file with previous versions of JMRI.
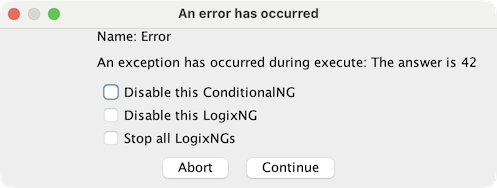
This might be useful if a particular condition should never occur in the ConditionalNG or Module. In this case, the Error action can be used to alert the user.
Exits the execution of the ConditionalNG. If the Exit action is in a Module, the Module and the ConditionalNG will be exited.
For is a for-loop. It has four children.
When For is executed, the Init action is run once. After that, the While expression is evaluated. If the While returns true, the Do action is executed and at last the AfterEach action is executed. Then the process is repeated, except that the Init action is only executed once.
For each takes a Collection, a Map or a Manager as parameter and loops
thru all the items. For maps, each item is a Map.Entry. Use getKey() and
getValue() to get the key and the value of each item in the map. If the
parameter is a manager, the method getNamedBeanSet() is called to get all the
named beans in the manager.
Each item is placed in a specified local variable. The action is then invoked for each item.
The following example sets all of the sensors to Inactive.

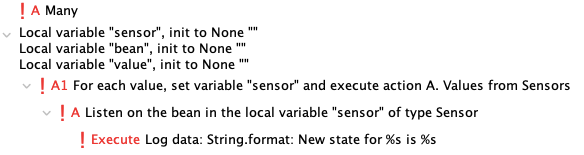
For another example, see Listen on beans - Local variable.
For each with delay combines For each with Execute delayed. Compared to For each, the difference is that the action to be executed for each item will be delayed. A good example is setting turnouts to a known state without overloading the command station or the DCC connection.
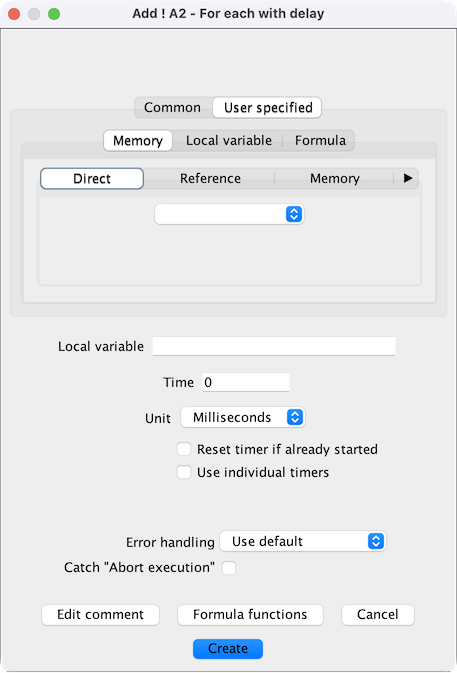
While the timer options work the same as Execute delayed, there are some potential issues if either option is selected.
For best results do not use the timer options.
Reads a digital child expression and if the answer is true it executes the then child action, else it executes the else child action.
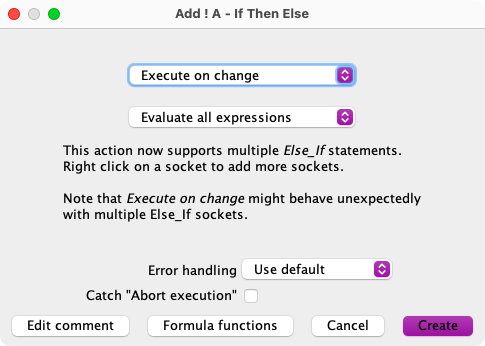
There are two settings that control the if-then-else processing.
When is the If-Then-Else executed
The default execution setting can be change using Preferences ⇒ LogixNG.
How is the If expression evaluatedsince 5.1.6
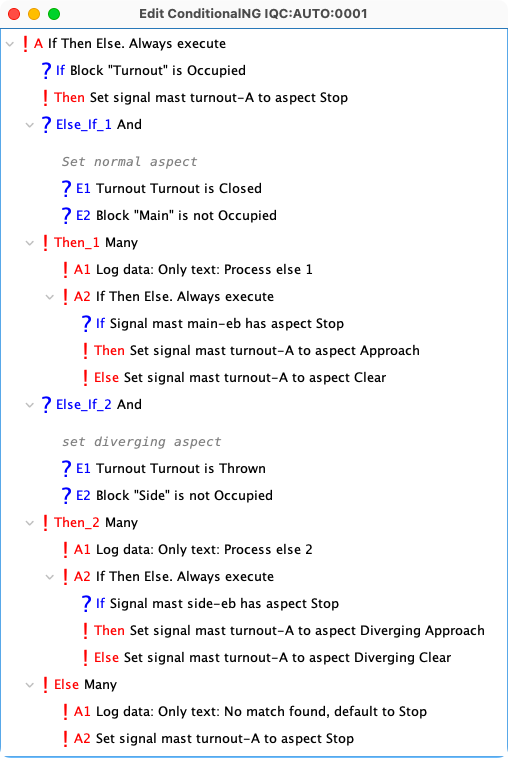
The Else_If option provides a compact method to collapse a repetitive nested If-Then-Else tree.
To create a new Else_If expression/action pair, right click on the Else row and select Insert new socket before.
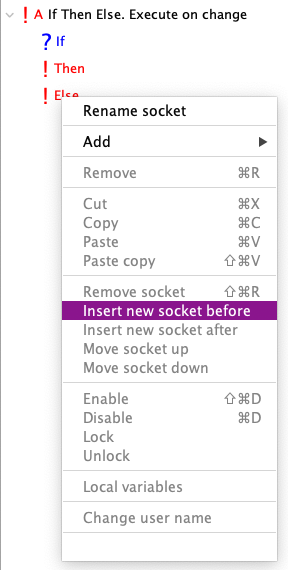
A new expression/action pair will be added before the Else.
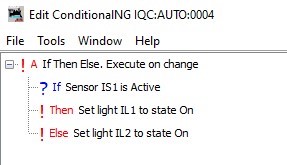
Here is simple example of using LogixNG to create signal logic.
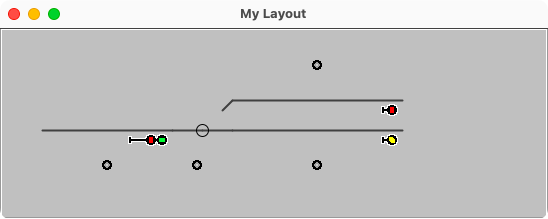
The example first checks the turnout block. If that is ok, it then checks the route to each possible destination signal based on the turnout state. If nothing works, it sets the signal to display Stop.
Returns from the Module or the ConditionalNG.
If Return is in a ConditionalNG, it's the same as Exit. But if it's in a Module, it only exits the Module, not the ConditionalNG.
Run the assigned action only one time during a JMRI session.
The assigned action will be the Many action if there is more than one action to be performed. This provides an alternate method compared to Trigger once for startup initialization.
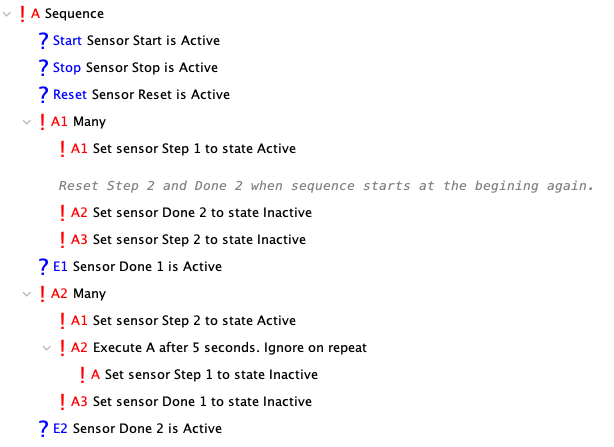
The Sequence action executes a series of action/expression pairs. For each pair, the action will be performed and then the expression will wait until it becomes true. When it is true, the next action/expression pair will be started. The Timer expression can be used to do a time based step instead of an event based step.
When a Sequence is created, it has one A/E pair. To add more pairs, right click the last Expression entry and select Insert new socket after. To insert a new A/E pair, right click an Action item and select Insert new socket before or right click an Expression item and select Insert new socket after.
If an Action is used with a socket after or an Expression is used with a socket before, the new pair will be between the old pair A and E. Now the sequence is old A ⇒ new E ⇒ new A ⇒ old E. The socket names don't actually have any meaning. It is the sequence in the editor display which creates the actual A/E pairs.
To delete a pair, right click on the Action and select Remove socket. The A/E pair has to be empty before it can be removed.
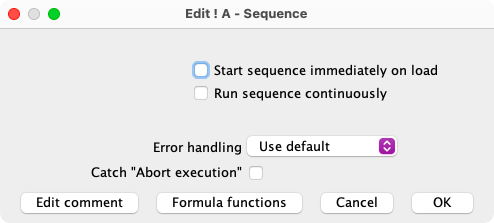
Options:
When a sequence action is added, it has connections for Start, Stop and Reset expressions.
See Chapter 11 - Table Actions for details on table actions.
This is similar to the Error action but it uses a standard dialog instead of the error dialog.
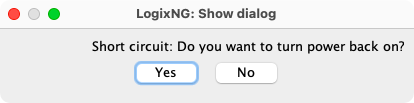
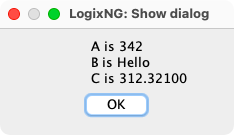
Enter the text to be displayed using one of the input types. The format() function can be used to insert content such as local variable values into the text string.
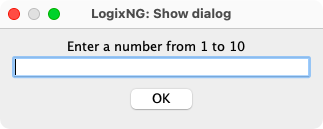
This is a sample dialog.
The Audio Icons on JMRI panels can be used to play sounds on devices displaying JMRI panels using a web browser. The Audio icon on web panel action can be used to start and stop the audio source assigned to the audio icon. For example, LogixNG can play notification sounds on a dispatcher panel.
Note: The sound will not be played on the computer running JMRI. If desired, use the Audio action to play the sound locally.
Before creating the action, assign an id to the Audio Icon using Edit Id from the icon context menu.
Select the panel, the id for the Audio Icon and whether to Play or Stop the sound.
If the Audio Icon is to be used only by the action, the icon can be hidden.
Disable/Enable/Hide/Show all of the icons or labels on a specific panel that been assigned a class name.
Icons and labels don't have names. To identify the icon or label, the Edit Classes... menu item in the right click context menu is used to assign a class name. A class name cannot have a comma. Multiple classes separated by commas can be assigned.
Select the panel and one of the classes. Select the desired action.
Disable/Enable/Hide/Show an icon or label on a specific panel.
Icons and labels don't have names. To identify the icon or label, the Edit Id... menu item in the right click context menu is used to assign a name.
Select the panel and one of the ids. Select the desired action.
Disable/Enable a turnout item on a specific Layout Editor panel. A separate action is needed since the turnout image on a Layout Editor panel is not an icon.
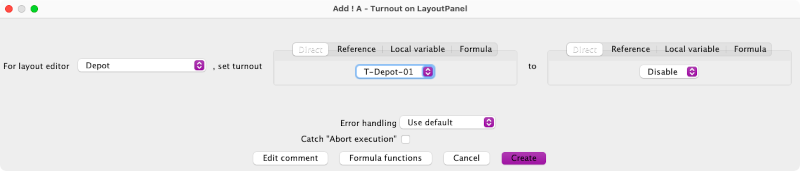
The action applies to a single turnout item. To change all of the turnouts, use a For each action.

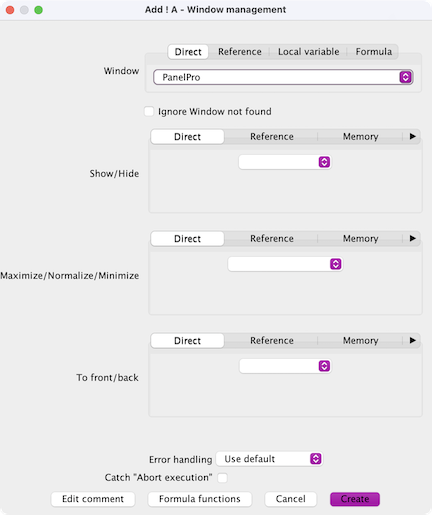
JMRI uses a lot of windows. Each panel is a window, various tools have windows, tables can be shown in windows, etc. The Window management action provides three tools to help manage the windows.
The Ignore Window not found option is used to prevent errors when optional windows are not currently open.
A simple implementation of this can done using the LogixNG icon with an inline LogixNG. See Inline LogixNG and LogixNG icon.
The Window to front action has been replaced by the Window management action. Existing actions will be automatically converted.
This action publishes a message. Both the topic and the message can be entered directly in the action or indirectly using a local variable or a memory.
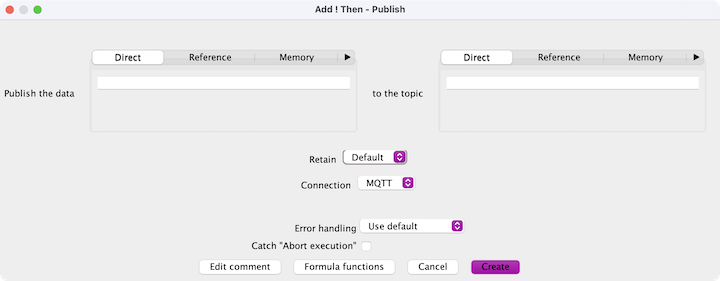
since 5.9.1Retain is used to tell the MQTT broker if it should also send the message to new subscribers or if it should only send the message to current subscribers.
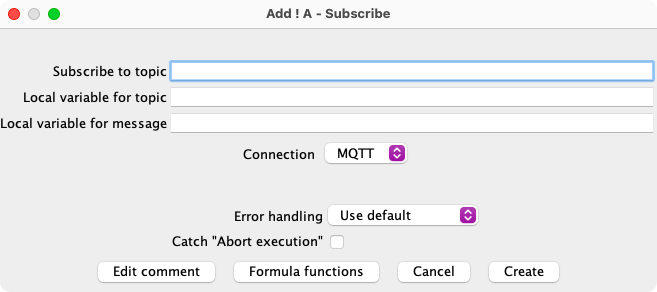
This action subscribes to a topic. When someone publishes a message, this action triggers the execution of the ConditionalNG. It can also optionally put the topic and the message into local variables. The topic can use wildcard, like loco/# where # is the wildcard.
This action clears the slot status in the command station if you are using LocoNet.
Sets the speed of the Digitrax command station slots to zero.
This action forces an update of the LocoNet slot status in JMRI.
This action sends a MERG event to a node.
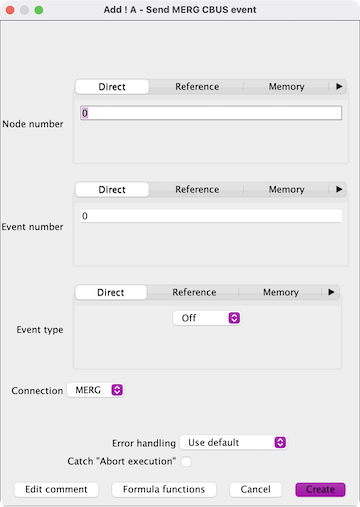
The Event types are Off, On and Request.
The Connection defaults to the first MERG connection. If there is more than one, other connections can be selected.
This action is used to run an OperationsPro Automation. These are defined using the Automation tool in Trains ⇒ Tools ⇒ Automation.
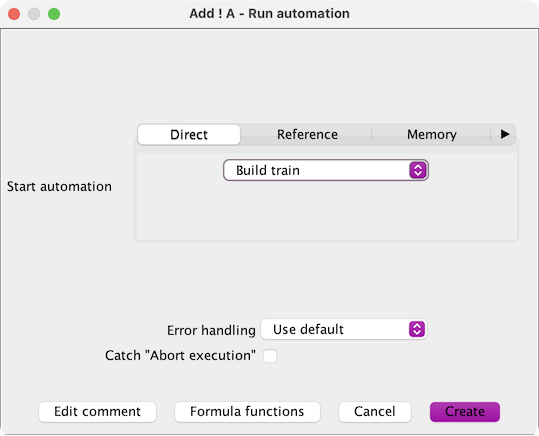
Select an Automation from the list.
See Chapter 11 - Table Actions for details.
A JSON string in the first variable is decoded as a JsonNode tree and placed in the second variable.
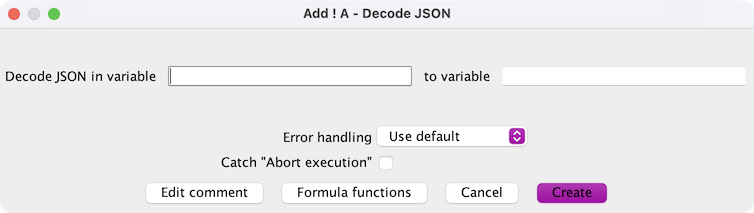
The decoding process translates the JSON string into a nested set of LogixNG Maps and Arrays. Use a LogixNG formula to access a particular node.
Here is a sample JSON structure.
{"menu": {
  "id": "file",
  "value": "File",
  "popup": {
    "menuitem": [
      {"value": "New", "onclick": "CreateNewDoc()"},
      {"value": "Open", "onclick": "OpenDoc()"},
      {"value": "Close", "onclick": "CloseDoc()"}
    ]
  }
}}
Here is a LogixNG that gets the second menuitem value and prints it to the JMRI system console. In this example, node value = Open is printed
       1:  LogixNG: test read
       2:      ConditionalNG: IQC:AUTO:0002
       3:          ! A
       4:              Many
       5:                 ::: Local variable "node", init to String ""
       6:                  ! A1
       7:                      Set variable node to the result of formula "str(jsondecoded{"menu"}{"popup"}{"menuitem"}[1]{"value"})"
       8:                  ! A2
       9:                      Log data: String.format: node value = %s
jsondecoded is the global variable that has the result of the Decode JSON action. The items in the JSON tree are delimited by braces. The JSON list rows are referenced by row number in brackets. Note: The first row is zero. In this example, all of the node values are strings, so the formula is enclosed with a str() command. Node values can also be other data types such as integer and float. LogixNG has int() and float() commands to handle those data types.
Execute action is used to execute a different part of the current ConditionalNG. This can be useful if you need to execute a part of the ConditionalNG at several different places, for example if you have several Listen On Beans - Local variable in the same ConditionalNG. This is similar to calling a sub-routine.
The first step is to assign a user name to the action to be executed. Right click on the action and select Change user name. Enter the user name and click on OK.
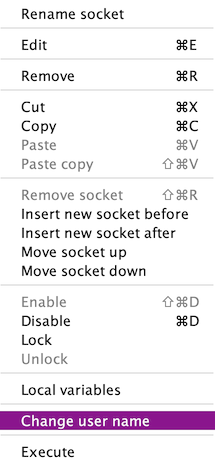
When the Execute action is added, a dialog is displayed. Select the user name from the combo box and click on OK.

This example calls a sub action to display the current local variables.

Normally a ConditionalNG will execute all of the actions in the top level Many. In this example, that would result in a second execution of the sub action. The Return action is used to finish the ConditionalNG execution sequence.
Note: This example was used to verify that the local variable list varies depending on when the sub action was called.
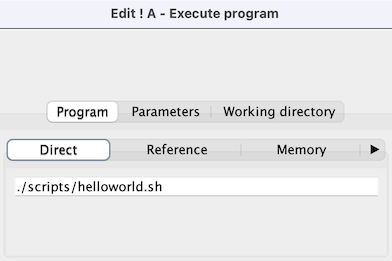
Execute program is used to execute a program/script outside of JMRI. The program has no access to the JMRI run-time environment. The File as flag expression can be used to notify JMRI of the program state. Program output is not captured. This includes print and echo statements. Using redirect does not work. To retain output, it must be written to a file.
The dialog has 3 tabs. The Program tab has the name of the program and if necessary, the path to the program. This will vary depending on the operating system. In the image it is a script in the scripts directory within the user files location using the macOS/Linux command line format.
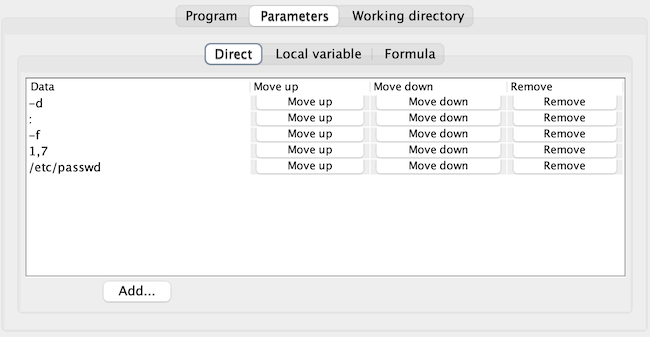
The Parameters tab is used to define the command line parameters. Each
parameter is a separate row. If a parameter has arguments, those are also separate. For
example, cut -d : -f 1,7 /etc/passwd, requires 5 entries.
The Working directory tab sets the working directory before starting the program. This is used for relative path execution and file references. The default working directory is the profile's User Files Location.

See Chapter 11 - Table Actions for details.
See Chapter 7 - Listen on beans for details.
Add a listener to the bean referenced by a local variable. The local variable can have either the system name, the user name or the bean itself. The Execute socket provides the logic that will be executed when an event occurs.
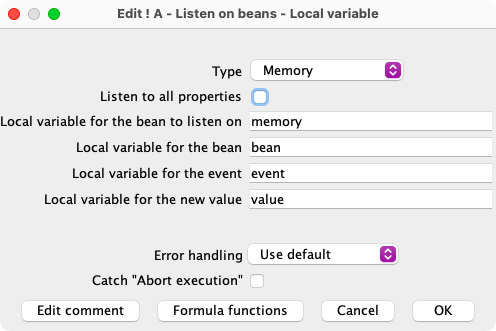
The bean Type and the listen local variable name are required. The other local variables are optional.
This action is especially useful together with the action For each. This sample listens for sensor state changes and prints a message on the system console.
See Chapter 11 - Table Actions for details.
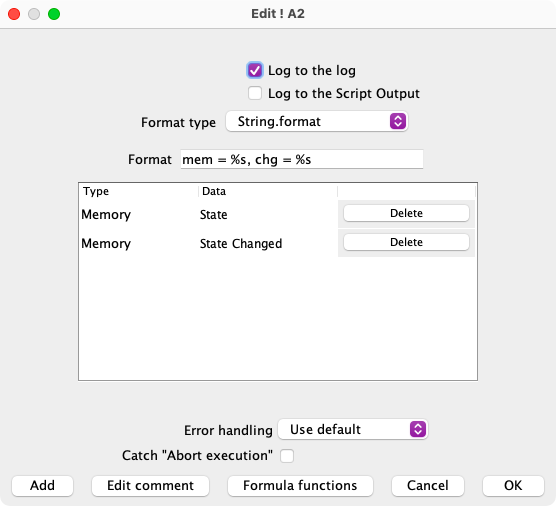
While developing a ConditionalNG, it can be helpful to see field content, make note of the location within the tree, etc. Adding the Log data type in the Other category will display a dialog to configure the Log data options.
Another approach for displaying data is to use the Show dialog action.
Select either or both Log options

There are three format types.
sprintf.
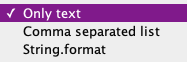
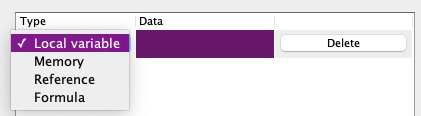
The table lists the data sources for the comma separated and and string format options.
Click on the Add button to add an entry to the table. Select the source type and add the name or a reference in the Data field.
This example uses the string.format option to combine text with the contents of two memory variables.
See Chapter 8 - Debugging local variables for details.
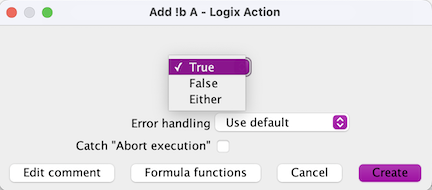
LogixNG has an action called Logix that emulates how JMRI Logix works. The action Logix has one expression and a Logix Action. The digital boolean Many action can be used to support multiple Logix Actions as shown in the example. A Logix Action responds to True, False, or Either Logix evaluation states. The action Logix was added mainly to support import of JMRI Logix to LogixNG.
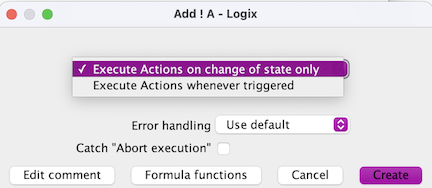
The Logix action supports On Change and When Triggered.
An example Logix within LogixNG. This is a tweaked import from Logix. The Log data actions were added and the individual True LogixNG actions were combined within a standard Many.
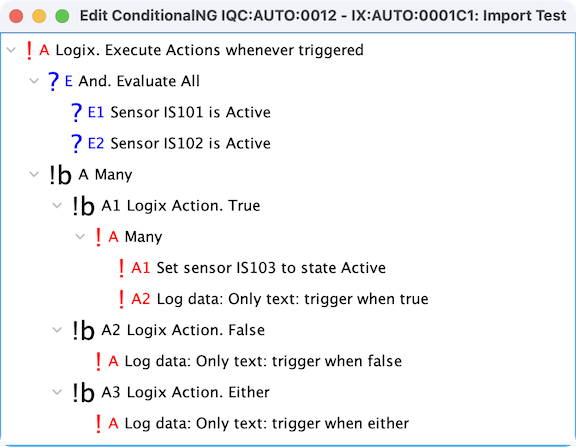
This example uses When Triggered. This means that one or more actions will be executed when either IS101 or IS102 changes. The On Change option only executes the actions when the evaluation of the expression changes between true and false.
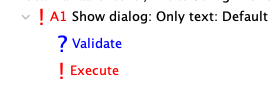
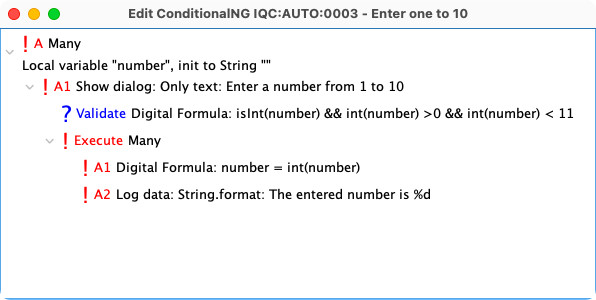
The Show dialog action displays a window that can be used to provide notification of an event that has occurred or needs to be handled. It can also be used to request whether an action should be performed by the LogixNG.
Normally, warnings and such can be handled by displaying a message in the system console. The dialog is useful when an immediate notification is needed.
The Show dialog definition is similar to the Log data definition. See Log data for details on formating and including variables.
Additional Features:
Note: When the dialog is displayed, the rest of the conditional continues to run. In the first example, the A3 action will execute while the dialog is displayed.
After the dialog action has been created, two new rows are added. These are both optional and can be left empty.

Create a task that will run before JMRI shutdown occurs.
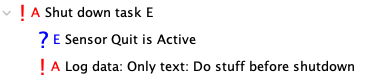
If the Expression is empty or returns true, the Action will be executed before JMRI shutdown continues. If the Expression returns false, the JMRI shutdown process is stopped.
The Shutdown action can either shutdown or restart the computer, or shutdown or restart JMRI. The default action is Shut down JMRI.
The Simulate turnout feedback action is used to make turnouts behave as expected when using a simulated layout connection. The feedback delay is 3 seconds.
The following feedback modes are supported. The available modes depend on the layout connection type.
The Connection name expression can be used to create a LogixNG that automatically enables turnout feedback when using a simulated layout connection.
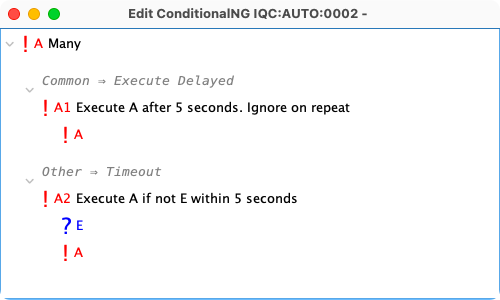
The Timeout action is used to execute a default action if an expression is not true within the specified time internval.
The Timeout action dialog is similar to the Execute Delayed dialog. The Timeout configuration also requires an expression. If the expression is true before the time expires, the action is not executed.
The Web Browser action opens a web page in the default web browser.

The URL is supplied using a string expression.
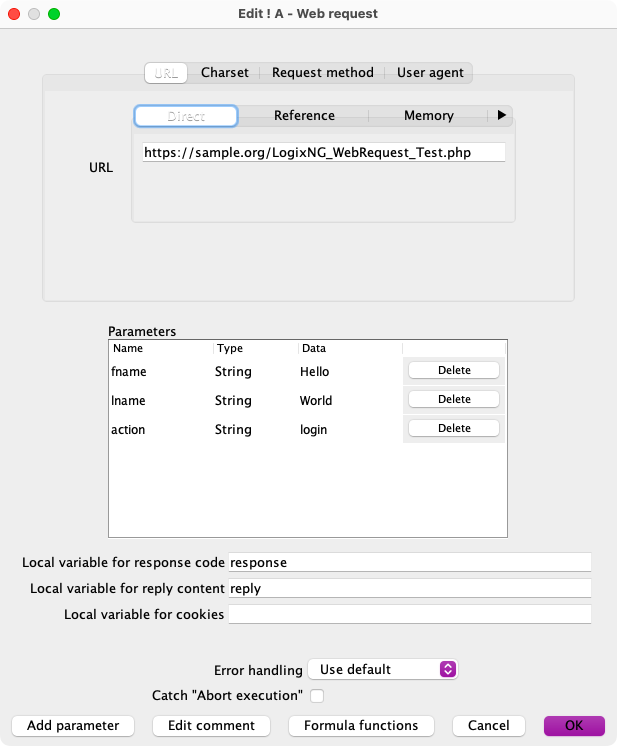
The Web Request action sends a GET or POST request to a web server. When the request has completed, the Execute action is performed.
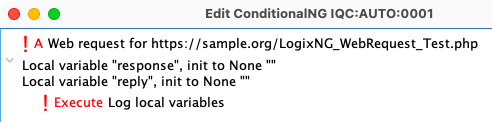
The request information is defined using the Web Request dialog. The dialog settings will depend on the web server application requirements.
Note: The LogixNG_WebRequest_Test.php portion of the URL is a sample application.
The URL contains the address of the web server. For GET requests, parameters can be added to the URL using the ?name=value&name2=value2 format. Parameters in the Parameter section are also added to the GET request URL.
For POST requests, the parameters are defined in the Parameters section.
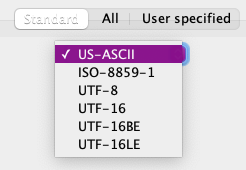
Specify the character set to used for the application.
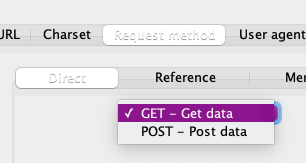
Specify the request method to used for the application.
Specify the user agent to be used for the request. The default is Mozilla/5.0 .
The value of the local variable will be the numeric response code from the server. For successful requests, the value will be 200.
The value of the local variable will be the content returned from the server. Sometimes the content will have error messages detected by the server or the application.
The value of the local variable will have a copy of the current cookie. If the cookie needs to be shared by different ConditionalNGs, use a global variable.
There are two example files included in the JMRI distribution. They are located at help/en/html/tools/logixng/reference/WebRequestExample
This is a layout config xml file that has sample table entries.
This is a PHP program that acts as a web based application. This needs to be installed in a web server that has been configured to run PHP programs. The source code can be downloaded from GitHub.
To make import from Logix to LogixNG easier, LogixNG has a special action, Logix, that works similar to a Conditional in Logix. The LogixNG Logix action has a digital expression socket and a digital boolean action socket. The usual setup in LogixNG is a Logix action with a Many child with a number of Logix Action children.
When a Logix expression is evaluated, a Logix Action is invoked to perform the LogixNG actions if its state matches the result of the expression evaluation.
See the example at Logix.
The Many action is used together with the Logix action to let the Logix action have more than one action child.
Sets the intensity of the selected variable light to an analog value.
Sets a memory to an analog value.
Sets the value of many analog actions.
Sets a memory to a string value.
The StringIO action sets the string value of a StringIO. StringIOs are defined in the StringIO table. LCThrottles is a default StringIO for LocoNet. This is used to send a message to the LocoNet throttles.
Sets the value of many string actions.
Chapter 6 - Expression Descriptions