Eclipse (available at www.eclipse.org) can be used for working with JMRI. NetBeans is recommended unless you are already familiar with Eclipse.
Eclipse is a complex environment to work with. If you're already familiar with IDEs like Microsoft Visual Studio it won't be too hard to get used to, but it is definitely worth buying a textbook (e.g. The Java Developer's Guide to Eclipse).
JMRI developers use Git for source control. Source control using Git has been included as part of the Eclipse since the "Oxygen" download in 2017. For more information or an alternate method for getting the JMRI source, see JMRI: Getting the Code.
These instructions were developed and tested using "Eclipse IDE for Java Developers" version "Oxygen Release (4.7.0)" and have been updated as of September of 2023.
Note that you must also install a Java Development Kit (JDK) Java version 11 (not included with Eclipse) to build JMRI with Eclipse.
Also note that since version 4.99 JMRI requires Java version 11. You must confirm that JRE 11 is the default Java Runtime Environment.
The "Proton" and later versions of Eclipse require a Maven project update after downloading the JMRI source files. To do this, right click "jmri [...]" in the Package Explorer, then in the menu, select "Maven" and in the sub menu "Update project ...". After the update is complete, do a project clean to rebuild the source files.
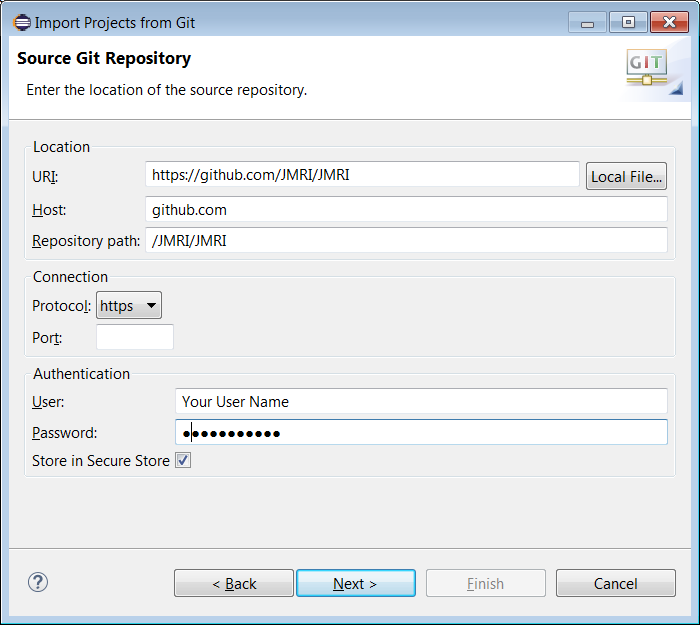
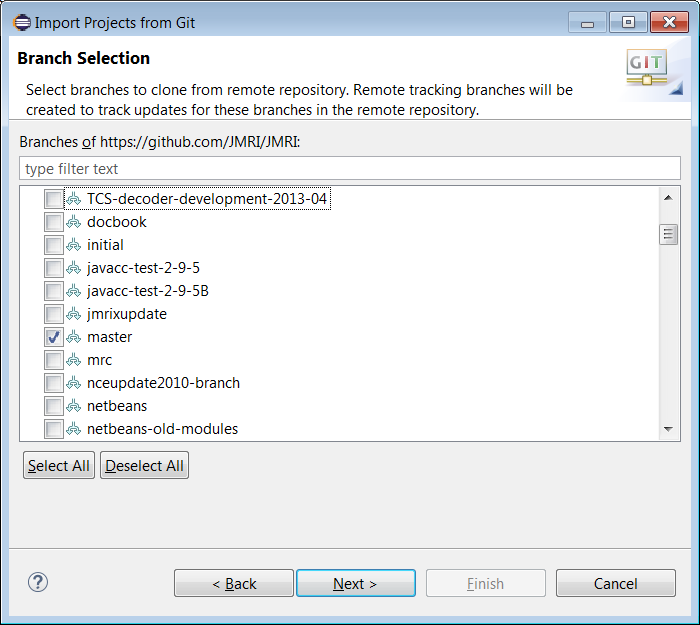
To get the source code from GitHub using Git you need to do the following:
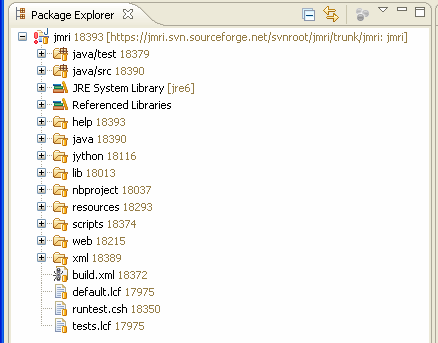
After the import is complete the Eclipse Package Explorer should look like this:
Note that the first build can take a while and will require Internet access.
If you get the error "Cannot read lifecycle mapping for artifact", open the "Run" menu, select "Run As", and then select "Maven generate-sources" to fix the error and start the first build.
To run an application do the following:
To run an application native to Eclipse you might need the communication library. For for
the application you want to run, select the "Arguments" tab, and under VM argments enter
(You should probably cut and paste): If you're using a 32 bit windows system add the library
path:
-Djava.library.path=.;lib;lib/windows/x86
Note if you're using a 64 bit windows system change the library path to:
-Djava.library.path=.;lib;lib/windows/x64
If during the launch of DecoderPro or PanelPro the program hangs, or errors are reported to the console, there's a good chance that the META-INT files weren't created. To fix, run the Ant "build.xml" as described below with only two targets selected, "realclean" followed by "tests".
We also recommend that you deselect "Scrub output folders when cleaning projects" found under Window->Preferences->Java->Compiler->Building Output folder. This keeps the META-INT files in place after they are created by the Ant build.
Afterwards refresh the project, and if necessary do a project clean. The refresh should fire off a build and hopefully cleanup the errors.
If the Ant build fails, most likely it is because you need a JDK (Java Development Kit)
rather than a JRE (Java Runtime Environment) which is the default. To change the JRE, select
"Run As" "2 Ant Build" and a new window should appear. Select the "JRE" tab. The change the
JRE, select the "Separate JRE:" radio button, and then press the "Installed JREs" button. If
you don't see a JDK, you need to add one (from site above).
A new JMRI checkout
should build cleanly. If not, please check with the JMRIusers or jmri-developers mailings
lists for help.
If the Ant build succeeds, you can now launch any of the JMRI applications from Ant, and create a jmri.jar file if you wish. Use the "2 Ant Build" and in the window select the "Targets" tab, and use the appropriate checkbox to generate what you want. Two targets that are worth running if you're experiencing error messages in the Eclipse console window are "realclean" followed by "tests".
The standard practice for getting your changes included in main JMRI code repository is to commit them to your local repository periodically, then when ready to publish "push" an entire set of changes to a repository belonging to you on GitHub, and then finally making a request for somebody to "pull" your changes into the main JMRI repository. See JMRI: Git FAQ "Setting up a Git environment for JMRI Developers" for more information.
It is also good practice to "pull" all of the recent changes from the main JMRI repository before performing your commits. After a "pull" your workspace and eventually your remote GitHub repository will be in synch with the main JMRI repository. To perform a "pull" select your project, then "Team" then "Pull" from the menu.
If you want to see which files are going to be modified before the "Pull", you can use the "Team Synchronizing" feature. To do so, right click on your project, the "Team" then "Synchronize Workspace"
Pushing to your GitHub branch:
To commit a set of changes, right click on the project that you want to commit, and select "Team" followed by "Commit". Enter a commit message and select the files you wish to commit.
Before you can push your changes to GitHub for the first time, you'll have to create your own GitHub repository (which you may have done above) and "fork" the JMRI repository. Log on to your account at GitHub.com and then navigate to the JMRI repository https://github.com/JMRI/JMRI In the upper right hand corner of the page you will find a button labeled "Fork". Press the "Fork" button to create your own repository of the JMRI source.
To push to your GitHub repository, again select "Team" then "Remote" then "Configure Push to Upstream". In the "Configure Push" window, click on the "Push URIs" and then the "Add" button. In the "New URI" window enter the URL of your GitHub repository along with your username and password. After pressing "Finish" the "Configure Push" window should look like the image below:
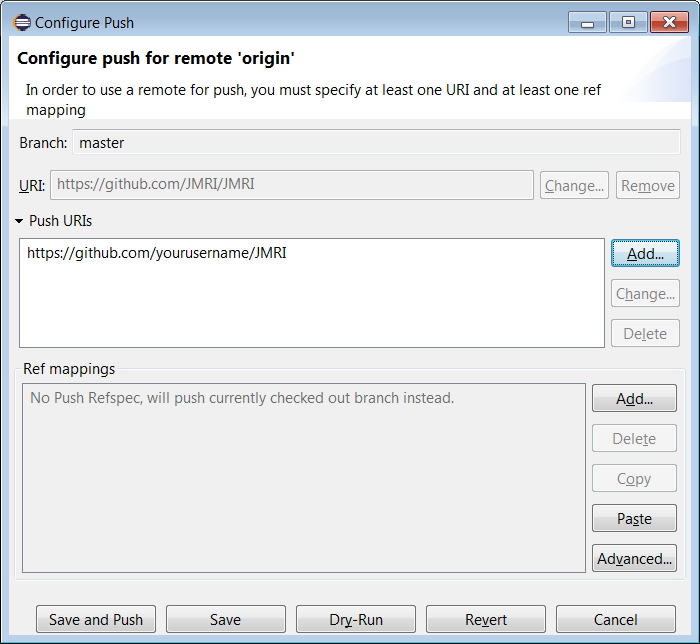
Press either the "Save and Push" or the "Save" button. Later when you want to push new changes to your repository on GitHub, you can simply commit them as described above, and then use the "Push" icon in the Synchronize window.
To do this, start by signing on to the GitHub web site, selecting your repository and clicking the Pull Request button. For more info, see the developer instructions,
As of 9/14/2025 roughly 2000 warnings were being reported by the Eclipse. You can ignore these for now.
If you wish to run the test coverage tool, you need to add this VM argument to the run configuration:
-Djmri.shutdownmanager=jmri.util.MockShutDownManager
You also need to run Ant build.xml with the two targets "realclean" followed by "tests" enabled. This configures the logger routines to log correctly during testing.
If you want to run a test coverage report accessing all of the tests in sub-directories, you'll need to create a test class that will invoke all of the tests within a directory and sub-directories. Below is an example that will run all of the tests in the directory "jmri.jmrit.operations":
package apps.tests;

import org.junit.internal.TextListener;
import org.junit.platform.runner.JUnitPlatform;
import org.junit.platform.suite.api.ExcludeClassNamePatterns;
import org.junit.platform.suite.api.SelectPackages;
import org.junit.platform.suite.api.SuiteDisplayName;
import org.junit.runner.JUnitCore;
import org.junit.runner.Result;
import org.junit.runner.RunWith;
import org.junit.runner.notification.RunListener;

/**
 * Invoke all the JMRI project JUnit tests via a GUI interface.
 *
 * This file is part of JMRI.
 *
 * JMRI is free software; you can redistribute it and/or modify it under the
 * terms of version 2 of the GNU General Public License as published by the Free
 * Software Foundation. See the "COPYING" file for a copy of this license.
 *
 * JMRI is distributed in the hope that it will be useful, but WITHOUT ANY
 * WARRANTY; without even the implied warranty of MERCHANTABILITY or FITNESS FOR
 * A PARTICULAR PURPOSE. See the GNU General Public License for more details.
 *
 * @author Bob Jacobsen
 */
@RunWith(JUnitPlatform.class)
@SuiteDisplayName("OperationTests")
@SelectPackages({"jmri.jmrit.operations"})
@ExcludeClassNamePatterns({"HeadLessTest","FileLineEndingsCheck","ArchitectureTest"})
public class JUnitOperationsTests {

    static public void main(String[] args) {
        run(JUnitOperationsTests.class);
    }

    /**
     * Run tests with a default RunListener.
     *
     * @param testClass the class containing tests to run
     */
    public static void run(Class testClass){
        run(new TextListener(System.out),testClass);
    }

    /**
     * Run tests with a specified RunListener
     *
     * @param listener the listener for the tests
     * @param testClass the class containing tests to run
     */
    public static void run(RunListener listener, Class testClass) {
        JUnitCore runner = new JUnitCore();
        runner.addListener(listener);
        Result result = runner.run(testClass);
        System.exit(result.wasSuccessful() ? 0 : 1);
    }
}