JMRI: Extending the JMRI Programs
The original goal of the JMRI project was to produce a library upon which people could use
to build their own applications. Although some people do that, more use the existing
applications such as DecoderPro and PanelPro.
We want to make this more flexible by providing a way to extend those programs without having
to rebuild them from scratch.
There are three supported mechanisms that can be used to plug additional capabilities into
JMRI:
See also the separate pages on
adding a new system (i.e.
another set of hardware that implements Turnouts, Sensors, clocks, etc) and
adding a new type (e.g. something in addition to Turnouts, Sensors,
clocks, etc).
Script JMRI
Scripting JMRI is often the easiest way to extend
JMRI, however there are limitations to that which are covered by the other mechanisms.
The principal limitations to scripting JMRI are:
- scripts can only be run late in the application start process
- scripts cannot be used to define new connection types
- scripts cannot be used to add items to the preferences window
The details of scripting are covered elsewhere.
Examples of scripts that modify JMRI behavior are:
-
AddButton.py sample script adds a
script button to the main window.
-
DisableOpsMode.py shows how how
to modify the main window to remove the ops-mode programming button.
-
ReporterFontControl.py
sample script is an even more advanced example that changes the appearance of items on
panel screens.
Adding Java Code
If you want to add a function that'll need significant code, ideally eventually as a part of
JMRI itself, the usual sequence is to write Java code
- that creates objects to run as part of the usual JMRI
structures
- which are stored and loaded via configurexml classes
that load and store those objects into standard panel files
- optionally has a GUI that starts from an action class fired
from some button or menu item,
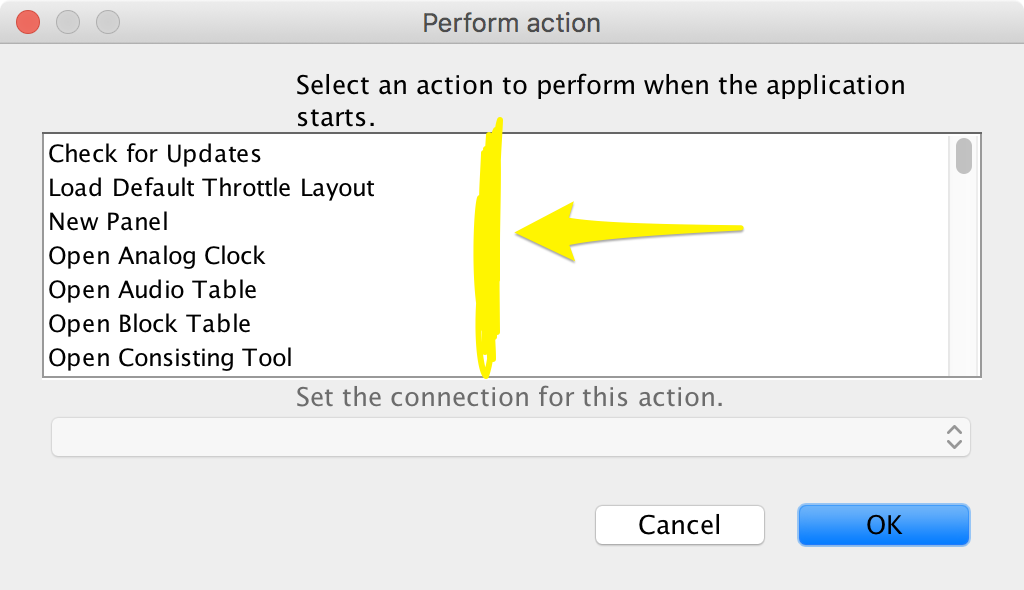
- optionally can fire that action at startup to open the GUI by selecting it under
"Peform action.." in the Startup pane in Preferences,
- optionally can have its own preferences pane to store more info, and
- eventually has CI unit tests, documentation and help pages.
Operationally, that's often the best order to develop new function: First, write the code
(item 1) so that it runs inside JMRI, and use a script to create and start those objects.
There are two places to put it:
- In a top level package, i.e. a new
java/src/mycooltool directory alongside
java/src/jmri and java/src/apps. Your Java files will start with
"import mycooltool;" as a package declaration.
- In a new tools package within the JMRI code
structure, i.e. a
java/src/jmri/jmrit/cooltool directory with your java
files starting with import jmri.jmrit.coolltool;.
Next, write the configurexml load and store classes, so
that once you've got the objects, you can store and reactivate them. You still need the
script (or an XML editor if the info is simple enough) to create them the first time, though,
so as a third step write a GUI to create that. That can be invoked
by a one-line script at first, and eventually attached to a menu button.
Once those first three steps are working and you've created a GUI action class, you can connect that to "Peform action.." and
"Add button to main window .." in the Startup pane in Preferences by having it extend
apps.startup.StartupActionFactory.
The jmri.jmrit.sample
package is an example of this. (See Javadoc) If
contains:
- A single functional class,
SampleFunctionalClass who's only role is to save a sample string. Classes like this
would be built out to do the work of your project.
- A
configurexml.SampleFunctionalClassXml class that stores and loads the
SampleFunctionalClass object contents to a panel file.
- A
swing.SampleConfigPane class to provide the basis of a GUI configuration pane. This
one just shows a label in its window, but you can build it out with whatever else is
needed. It's connected to the rest of JMRI so that you can access configure connections
to it in the Preferences.
- A complete set of basic test classes. They just check the constructors now, but can be
built out as needed.
We encourage you to
contribute your code to for inclusion in
JMRI. That way, lots of people benefit. But if you don't want to do that, you can package
it up as a separate .jar file which can just be dropped into the JMRI lib directory
in the user's settings directory. By
using the approach listed above (and the services listed below), JMRI will automatically pick
it up and use it. For more on this mechanism, see the
discussion on the Patterns page.
Implement a Service Provider
Sometimes what you want to add provides a very specific technical function. Many of those can
be (though historically, perhaps weren't) written as Service Provider classes. When they can
be done that way, they should be, because it simplifies their connection to the rest of the
code.
Java contains a Service Loader
that allows classes implementing a specific API to provide a service to a Java application
without requiring that the application have prior dependencies defined for that service.
Services are provided by creating a JAR for that service and appending it to the JMRI
classpath. See Startup Scripts for details on appending a
JAR to the classpath and the Service Loader
documentation concerning what needs to be in that JAR.
JMRI uses Service Loaders to allow a JMRI application to be extended in specific ways:
-
StartupActionFactory
-
Startup Actions can be run at application start or via a button attached to the application's
main window. Implementations of this factory class appear as possible selections
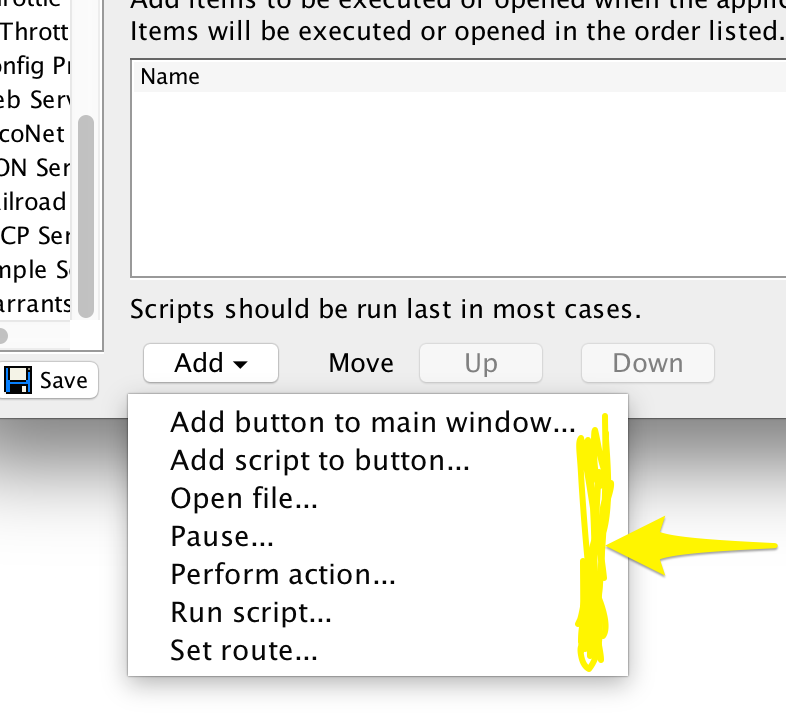
for the Perform Action... and Attach Action to Button... selections in the Add... button on
the Startup pane in JMRI Preferences.
One example is
the RosterFrameStartupActionFactory class which opens the DecoderPro roster window.
They can also expose additional startup actions that can be selected by the user, i.e. to
select one of several possible connections to act on.
-
StartupModelFactory
-
Startup Models provide a mechanism to define optional items to be automatically run
during the startup process itself. They can take user-specified arguments.
Implementations of this class appear under the "Add" button in the Startup pane of the
Preferences.
One example is
the PerformActionModelFactory class which provides the Perform Action... item.
PerformActionModelFactory makes the StartupActionFactory implementations available for the user
to select. A PerformActionModelFactory object then remembers that selection, and during
JMRI startup invokes that StartupActionFactory item to do that particular thing.
Similarly,
the CreateButtonModelFactory class will take a user StartupActionFactory selection
and attach it to a button at startup, for execution later.
Implementations of this factory class provide the hooks so that the Startup
preferences can allow a user to set the parameters for a given action.
-
ConnectionTypeList
-
Every manufacturer selectable when creating a configuration is defined by a
ConnectionTypeList service. Implement this (and other required classes) to create a new
system connection type. See Adding a New System for
details.
-
InstanceInitializer
-
Add new factories for creating default instances of objects managed by the InstanceManager.
-
JsonServiceFactory
-
The JMRI JSON services used in the JMRI web services can be extended using service
implementations of this class. See the JsonServiceFactory
Javadocs for details.
-
PreferencesPanel
- Additional preferences can be displayed in the preferences window by providing an
implementation of this class.
-
PreferencesManager
- Add a new preferences manager to JMRI. Preferences managers store, retrieve, and
validate preferences within a JMRI configuration profile. If a plugin needs to take action
very early in the JMRI application startup sequence, it would need to provide a
PreferencesManager service.
-
ToolsMenuAction
-
Let you add a new item at the bottom of the main Tools menu.
Implementing ToolsMenuAction in a class that inherits from
Action,
AbstractAction, or
JMenuItem
and providing the appropriate service provider annotation will
result in your item being added at the bottom of the main Tools menu.
For an example, see the SampleToolsMenuItem class
here.
Note that this sample has some indicated lines commented out so that
it doesn't actually appear in the menu. Remove those comments
and rebuild to see how it works.
-
SignalMastAddPaneProvider
-
Provides the Add/Edit pane for a new type of SignalMast.
If you define a new type of SignalMast in your code, also define a service class of
this type. It will automatically be used to add or edit signals of your new type in the
SignalMast
Table.
See the SignalMastAddPaneProvider class nested within the
DccSignalMastAddPane class for an example.
-
HttpServlet
with WebServlet
annotation
- Additional servlets in the web server can be added using these mechanisms. Note that
the WebServlet annotation needs to provide a name and urlPatterns.
-
WebServerConfiguration
- Additional file paths, redirections, explicitly blocked paths in the JMRI web server
can be specified by providing a service that implements this.
Distributing and Installing the Plug In
Once you have Java code that you'd like to distribute to JMRI,
you have to tell users how to install it.
Prior to JMRI 5.7.1, you should have them place your jar file
in the lib/ directory within the JMRI program directory. On Linux and macOS
this will have to be done every time the user updates or reinstalls JMRI.
Starting with JMRI 5.7.1, you should have them place your jar file
in the lib/ directory that's found within their
JMRI settings directory.
One easy way to locate this directory is to open "File Locations"
in the JMRI Help menu and click "Open Settings Location". The lib/
directory should be available in the file manager window that opens.