There are three steps in creating a Warrant:
When a Create Warrant menu is selected, a window to define the warrant is displayed. At the top, you may enter a System Name and a User Name. After the warrant is saved by pressing the Save button at the bottom of the window, the System name cannot be changed. The User Name may be changed anytime the warrant is edited.
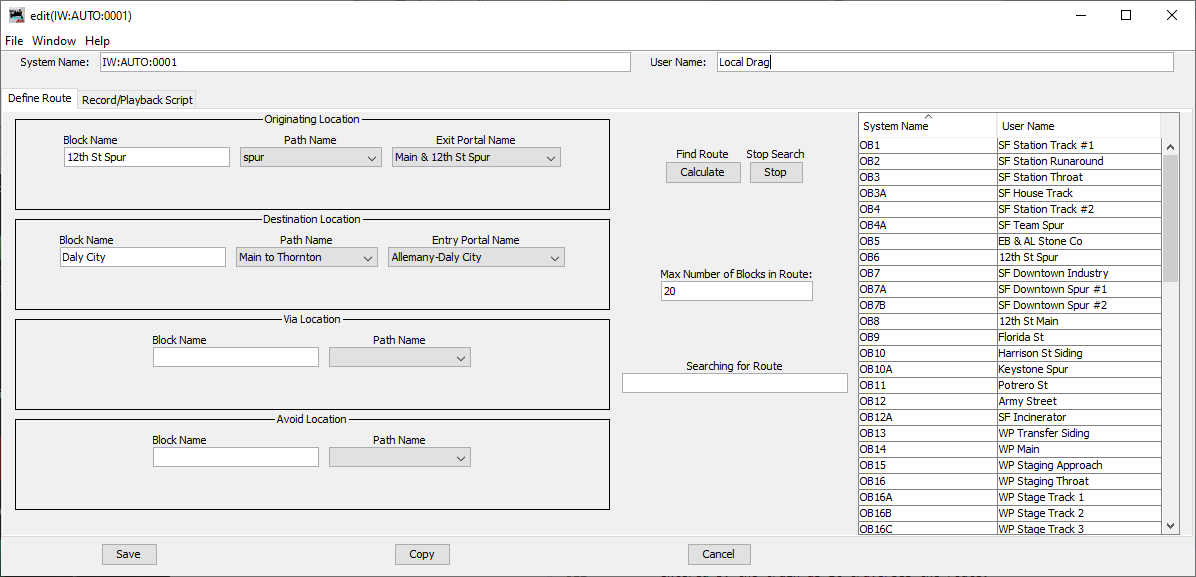
After selecting the block and path where the train will begin its trip and the portal by which it should leave and similarly the block, path and entry portal where the train should end its trip, pressing the Calculate Route button will determine all the intermediate paths needed to make the trip.
After the Stop button is pressed or the computer exhausts all the possible routes less
than or equal the "max length", it presents a list of the routes that it found and their
lengths. Choose a route by pressing its radio button. Pressing the
Review button will display the route for you to examine in a Train Route
Table. Each block, its path and portals used to traverse the route is displayed. Also you
can view the route on the PanelPro layout diagram if the track icons are Indicator
Track, icons.
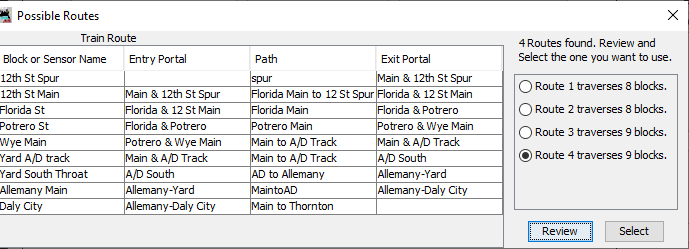
You may inspect all the routes in this manner. Choosing a route and pressing the Select button will dismiss the dialog. and bring up the Record/Playback Script tab. If exactly one route is found, the list dialog is skipped.
Frequently, more than one route will be found and the list may be quite long - especially when the route is a repeating loop. If the list is too lengthy, there are several ways you can restrict the number of routes found.
Sometimes the dialog message "No Route found from "Origin Block', path ..." etc. is displayed. Responding Yes to the question, "Show the search tree?" will open a window with a graphic description of all paths beginning at the Origin block, path and exit portal. Trace what you believe to be a likely route by clicking on the nodes. Each node is a block path and will display its path and block name and the entry and exit portals it uses. At the end of each branch, the leaf node will be the point where the route could not continue. Normally these leaves are spurs. However, these are also the places where you may find an error or omission that you made when defining the OBlocks, OPaths and Portals. As you trace the attempted routes you may find that you have forgotten to enter a path or mis-labeled the correct portal to a path. A common mistake is to incorrectly specify the path or portal that must be used to leave the starting block or to enter the destination block.
Another possible reason is the search depth was reached before the route can be completed. In this case, increase the maximum number of blocks to use in a route by entering a larger number in the Max Number of Blocks in Route box.
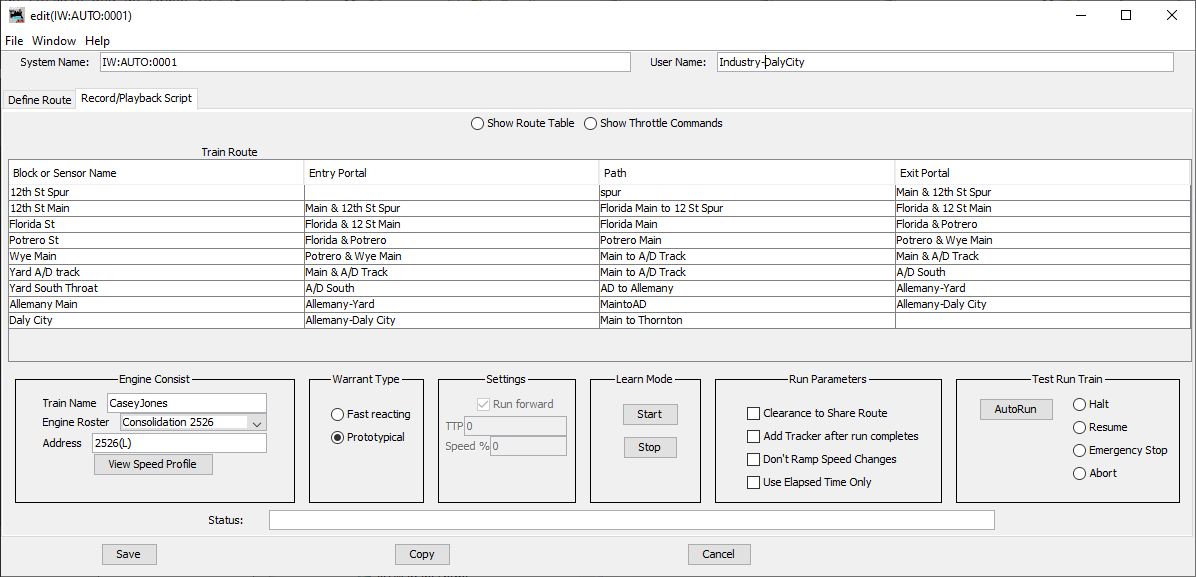
The bottom half displays six outlined areas; Choose Engine Consist,
Select Type, Settings, Learn mode,
Run Parameters, and Test Run Train. More about the use of
these areas will be discussed below.
The first thing to do is to choose an engine to power your train.
Alternatively a DCC address can be typed into the Address text field and it will be used whether or not it is found in the JMRI Engine Roster. Chose or enter the address of the train positioned on the "Origin" block of the route.
Be sure that the train is located on the path of the Origin block of the route and note the direction of you intend the train to take. If needed, the first command you make on the learn throttle should be the engine direction toward the exit portal of the Origin block.
The learn script should be done with a completely clear route - All turnouts should be set
for the route, all blocks unoccupied (except the origin), all signals should be set for clear
running and no changes made during the recording period. The recorded speeds and elapsed
times should be for unrestricted "Normal" speeds. Once the Start button is
pressed and recording has begun, the Route Pane is replaced by the Throttle Commands
Pane.
In normal operation, when the script is played back, the train will follow the commands as recorded. However if a track condition ahead of it is detected that requires a speed change, the warrant will modify the recorded speed accordingly. When the warrant makes such a speed change it "ramps" the change in small steps to give a more prototypical smooth look to the change. When decreasing speed it calculates and issues these step-wise speed changes so that the required speed is achieved just at the point where the speed limit must be enforced. When increasing speed it begins a similar "ramp up" when entering the block permitting the speed increase. Warrant Speed Changes has details about how warrants modify recorded speeds.
Note: The train should not be moving when the recording is stopped. When play back of the warrant ends, the train might continue to run without a warrant to control it! After recording a script, check the ending throttle commands to see that the speed is set to 0.0
When the route has been traversed and all throttle commands are done, recording is completed by pressing the Stop button. After this, the throttle commands can be edited and additional run parameters set.
The throttle commands of the next block will be delayed until the train enters the block. That is, the elapsed time of the NoOp command must be reached before any more commands are issued to the running train. This will be the case if the train is late in arriving at the block. On the other hand if the train arrives earlier than expected the remaining commands of the preceding block are executed in fractions of a second to catch up.
The warrant sends commands to the addressed engine in the order they were recorded with the same number of elapsed milliseconds between them. In spite of an exact repeat of the recorded throttle settings, the track speed and position of the train may not be at the same place as they were when it was recorded. Changing the consist of the train or even a temperature change between recording and playback, may result in the train not performing a throttle command at exactly the same place on the on the route where it was recorded.
If a more precise way is needed to have a script event occur at a particular location, see the section Triggering External Events From Scripts below.
After a script is recorded, reset the train to the Origin block and press the AutoRun button in the Test Run Train box. This sends the throttle commands to the train specified in the warrant.
The Test Run Train box has four radio buttons to control the train and override the Throttle commands.
Name and save the warrant when you are satisfied by its performance by pressing the Save button. This adds the warrant to the Warrant Table and closes the Create/Edit Warrant window.
The View Speed Profile button displays a table of the track speeds corresponding to the throttle settings for the addressed locomotive or consist. The speed units can be changed to scale speed.
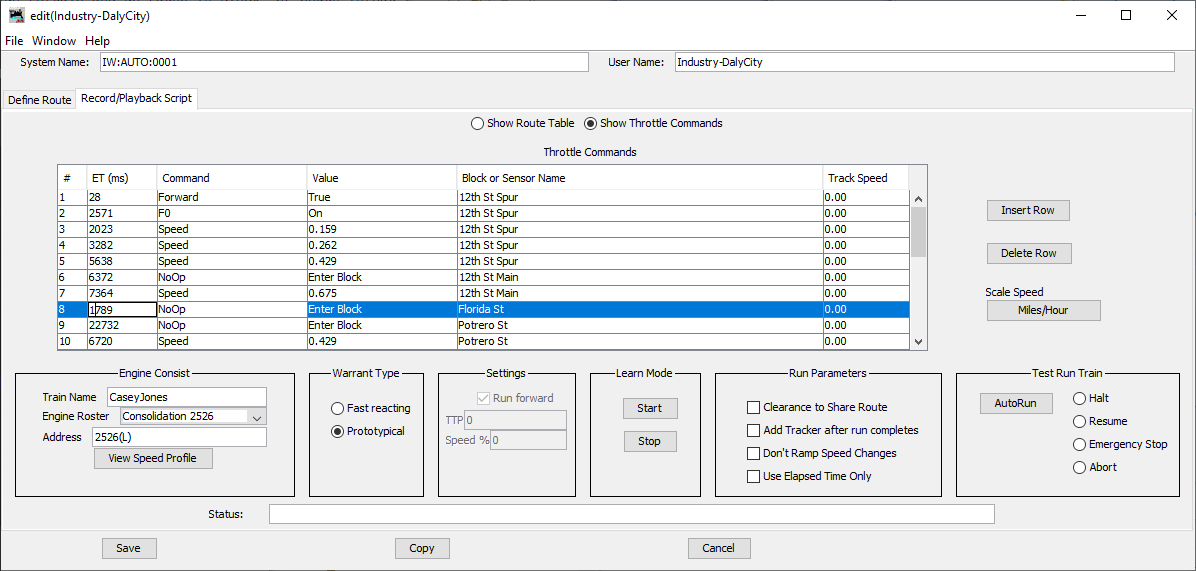
Rows may be inserted or deleted from the table using the Insert and Delete buttons to the right of the table. Note that an inserted row has 0 elapsed time from the previous command so you may want to adjust this by taking time away from either the previous row or the following row and entering it into the inserted row. Also, when a row is deleted, its elapsed time is added to the time of the following row. These default elapsed times for inserting and deleting rows are entered to keep the total elapsed time in the block constant.
Some caution should be taken to only make modest changes since new commands when executed in playback could cause dramatic events. It may be wiser to re-record the commands in a new Learn Mode session if major changes are made.
On the right of the Throttle Command table is a button labeled Track Speed or Scale speed. Pressing the button will display the last column of the Throttle Command table (estimated layout speed of throttle setting) in terms of one of four kinds of units - millimeters per second, inches per second track speed or miles per hour, kilometers per Hour scale speed.
The DCC address used in the recording is the "standard power" of the warrant. To base the track speeds on a different address or roster entry, select that entry and press the track/scale speed button. Warrants recorded before Release 4.9.2 can be upgraded this way.
External animation or other events may be triggered by the "Set Sensor" command. To do this insert a row, then select Set Sensor from the list of items under the Command column. Next select the action (active or inactive) you want from the Value column. Lastly, enter a sensor name in the Block, Sensor or Memory Variable Name column. Also enter or adjust the elapsed time when to trigger the setting of the sensor. On playback when this command is executed the state of the sensor will be set.
Additional synchronization can be done within a block. For example stopping a train at a water tower or over an uncoupling device or for any reason where using the elapsed time of a command is not precise enough. To do this, there is a Wait Sensor command. Insert a row and follow the same procedure as was done with set Sensor. On playback when this command is executed the script is suspended and the current movement of the train is sustained until the sensor changes to the specified state. When that happens the script continues to execute according to the recorded times.
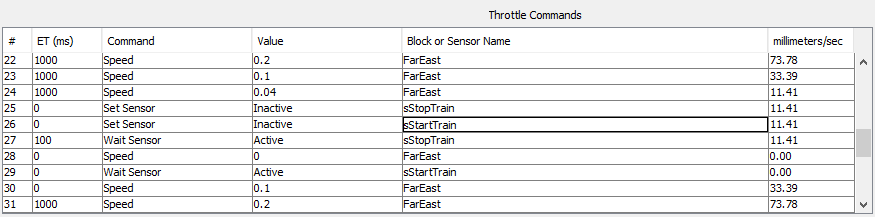
For example the "Wait Sensor" might be an optical sensor named "sStopTrain" positioned to
detect specific point. The "Wait Sensor" command is bracketed with speed commands, the one
before with a very slow speed and the one after with speed 0. Sensor "sStopTrain" is set
inactive and then the script is set to wait until it goes active. The script will then have
the train creep at the current slow speed of 11.4 mm/sec until the sensor detects the trains
desired position. Then the script continues to set speed to 0, which stops the train.
Following that, the scrip must wait for another sensor named "sStartTrain" to go active
before it can continue.
The script and train will stay stopped until the second "Wait Sensor" command triggered from
an external event allows the script to continue.
It is possible to start another script from a script. To do this, insert a row and select the Run Warrant in the Command column. Enter the name of a warrant in the Block or Sensor column. This command launches the second warrant. Note that a train with the address specified in the second warrant must be present in the starting block of the second warrant. Otherwise, the second train will start running in uncontrolled places.
This feature can be used to loop a train repeatedly by using the same warrant name. If a script terminates with the destination block equal to the origin block, it will repeat for the number of times entered into the Value column. If a negative number is entered the script will repeat indefinitely until an abort command is manually issued. Another possibility would be to use warrant "from A to B" and warrant "from B to A", where warrant "from A to B" runs warrant "from B to A" and warrant "from B to A" runs warrant "from A to B" and each Warrant specifies the same train ID and the same number of repeats.
The Set Memory Value command is similar to the Set Sensor command. Instead of being limited to Active/Inactive sensor states, the memory variable value can be set to any text data. The text data can be used by Logix, LogixNG or Jython scripts to perform external actions.
After inserting a row, select Set Memory Value from Command item list. Enter the text in the Value field. Enter the name of an existing memory variable in the Block, Sensor or Memory Variable Name field.
Also enter or adjust the elapsed time when to trigger the setting of the memory value. On playback when this command is executed the memory value will be set.
Note that entry into a Dark Block is detected differently than an Occupancy Block. Obviously, entry into an occupancy Block is recorded when the occupancy block detects occupancy. However entry into a Dark Block can only be recorded when the previous occupancy Block shows no occupancy. That is, the elapsed time for entry into a Dark Block is recorded by the tail of the train entered the dark, not the head.
Back to Warrants Help.