The Signal Head Table
All the Signal Heads that JMRI knows about can be referenced using the "Signal Head Table"
tool in the Tools > Tables menu of most JMRI programs. Signal Heads may also be used to
build Signal Masts in a later step.
You may change the order of the columns by dragging their titles, and sort the rows by
clicking one of the sort triangles next to a column title.
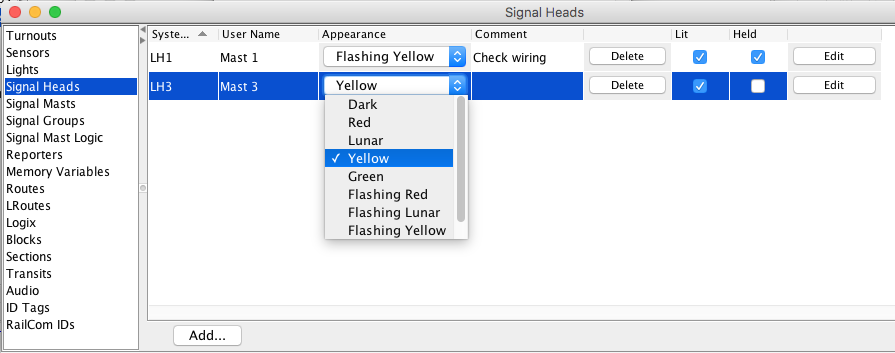
There are eight columns in the Signal Head Table:
- The System Name is assigned to the Signal Head when it's created, and can't be changed
later.
- If you're interested in having your Signal Heads carry "human readable" names, you can
doubleclick in the "User Name" column and change that information to whatever you
want.
- As the Signal Head changes, for whatever reason, the current Appearance will show in
the table in the "Appearance" column. Change the Appearance of a head by choosing one of
the available states from the combo box: Red, Yellow, Green, Flashing red, Flashing Yellow,
Flashing Green, or Dark. Some Signal Heads may also have Lunar and Flashing Lunar
available.
- The "Comment" column is for your use to record any comment you may want to help keep
track of your Signal Heads. It is for information only. Doubleclick to edit the
contents.
- Click the "Delete" button in a specific row to delete the Signal Head. Be sure to first
remove any Signal Head icons associated with this Signal Head, any associated Simple Signal
Logic, and all references to this Signal Head. Use this button with caution!
- The check box in the "Lit" column lets you control whether the Signal Head on the
layout is lit (checked) or stays dark (unchecked).
- The check box in the "Held" column shows the "held" property of the Signal Head, and
allows you to change it. This property is used by e.g. CTC machine logic to say "Don't
change this Signal Head from red, even if it would be safe to do so, because I want to hold
a train here".
- Click the "Edit" button in a row to view or change optional information for a Signal
Head.
Notes: System Name and Signal type cannot be changed. Only one Signal Head may be edited at
a time.
To define a new Signal Head, click on the "Add..."
button at the bottom of the Signal Head Table. It will prompt you for the Signal Head
connection type and whatever information is needed.
Use the Store item in the File menu to save signal information to disk. For details, see
Loading and Storing Your Work.
For more information on creating and displaying panels, including how to show signals on
your panels, please see the Panels
pages.
Back to the Signal Heads help
page.