Section Table Help
Using the Section Table
All the Sections that JMRI knows about can be viewed using the Section
Table.
To open this tool, select Sections in the Tables submenu
of the Tools menu of the main JMRI program window.
Section Table Columns
You may change the order of the columns by dragging their titles, and sort the rows by
clicking one of the sort triangles next to a column title. There are eight columns in the
Section Table:
- System Name - The system name is assigned to the Section when it's
created, and can't be changed.
- User Name - If you're interested in having your Sections carry "human
readable" names, you can click in the "User Name" column and change that information to
whatever you want.
- State - The state of a Section tells whether a section is "allocated"
or "in use" by a train. The state of a newly added section is always FREE.
When a Section is allocated for travel in the direction from the "First Block" toward the
"Last Block", the state is FORWARD. When allocated for travel in the
opposite direction, the state is REVERSE.
- Comment - This column is for your use to record any comment you may
want to use to keep track of your Sections. It is for information only.
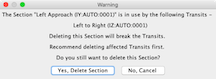
- Click the Delete button in a specific row to delete the Section in
that row. Remember to remove any Transits that are using this Section. Any Transit that
uses a deleted Section will be broken! Review the warning dialog and use this button with
caution!
- First Block - This column displays the first block in the Section.
Since a section is a group of one or more connected blocks, there is always an entry.
- Last Block - This column shows the final block in the Section. Since a
section may contain only one block, the Last Block may be the same as the First Block.
- Click the Edit button in a row to view or change entered information
for a Section. System name cannot be changed. User name may be changed, blocks may be
redefined, entry points may be reconfigured, etc. Only one Section may be edited at a time.
A Section may not be edited while another one is being created.
Creating a new Section
To Create a new Section, click the "Add..." button at
the bottom of the Section Table pane. A window will be brought up that will allow you to
define the blocks included in the new Section, and if necessary, designate which entry points
to the section result in travel in the FORWARD and REVERSE directions.
The Section Table has a Tools menu to facilitate use of Sections.
Normally these tools would be used after all Sections are defined. The menu items and their
use are described below:
- Validate All Sections... - When this item is selected, each Section is
tested for self consistency. Current tests include checking the connectivity between
multiple blocks, checking that there are no missing Entry Points or extra Entry Points,
and, if a Layout Editor panel is available, checking that Paths are correctly set up for
the Blocks in the Sections. This tool does not check if the FORWARD and REVERSE
directions are correctly set for each Entry Point, but that feature is a planned
future addition. After testing is complete, a message is displayed giving the results of
the testing. Detailed error messages, if any, are placed in the JMRI error log.
-
Set Direction Sensors in Logic... (Not applicable when using Signal Mast
Logic) - When this item is selected, direction sensors defined for each Section are
placed in the signal logic of appropriate signal heads--those signal heads internal to
the Section or protecting entry to the Section. Direction sensors follow the allocation
status of their Sections. When a Section is FREE (not allocated), both of its direction
sensors are set ACTIVE. By placing these sensors in appropriate signal head logic, all
signals internal to or protecting entry points to the Section are forced RED when the
Section is FREE. When a Section is allocated for travel in the FORWARD direction, its
forward direction sensor is set INACTIVE, allowing signal head logic to function normally
for travel through the Section in the FORWARD direction, but keeping signals governing
travel in the REVERSE direction set RED. Similarly, when the Section is allocated for
travel in the REVERSE direction, the reverse direction sensor is set INACTIVE, and the
forward direction sensor is set ACTIVE, allowing signals to clear travel in the REVERSE
direction, but to block travel in the FORWARD direction. Setting the state of direction
sensors is done automatically by software in Dispatcher that allocates Sections.
Note: Dispatcher can place direction sensors in SSL signal logic automatically when a
train is activated. Dispatcher will place direction sensors if it is provided with a
Layout Editor panel and allowed to use its connectivity (required for automatic running).
This allows using direction-based signaling even if the panel is stored with these
sensors removed from signal logic.
This tool should only be used after all Sections have been defined and all signal head
logic has been set up. A Layout Editor panel is required, because the software needs the
panel's connectivity to figure out which signal heads need which direction sensor. If a
direction sensor is already in the Simple Signal Logic (SSL) for a signal head, it is not
duplicated. However, if an incorrect direction sensor is present in the SSL, it is not
removed. (Use the tool described below to remove direction sensors.) After placing
direction sensors is complete a message is displayed giving results. Detailed error
messages, if any, are placed in the JMRI error log. When an error occurs, the most common
reasons are 1) missing information (signal heads missing or signal logic not set up) or
2) errors in setting up Section Entry Point directions.
-
Remove Direction Sensors from Logic... (Not applicable when using Signal
Mast Logic) - This tool assembles a list of all direction Sensors defined in Sections
currently in the Section Table, then removes all Sensors that are contained in this list
from the Simple Signal Logic (SSL) of all Signal Heads. This tool cancels the effect of
the Set Direction Sensors in Logic... tool, removes any direction
Sensors that may have been placed by Dispatcher, and in addition removes any defined
direction Sensors that might be in an incorrect SSL. If errors were noted while setting
direction sensors using the above tool, then corrected, running this tool before
attempting to set direction sensors again is sometimes useful.
- A Layout Editor Panel is required to run this tool. After
removal of direction Sensors from Signal Logic is completed a message is displayed giving
the results of running the tool. Detailed error messages, if any, are placed in the JMRI
error log.
Saving Sections to Disk
See Loading and Storing Your
Work.
Back to Sections Documentation.