YetAnotherAutoTrain.py -- Data driven automatic trains
Jython (Java based Python) scripting is a common tool for running trains automatically.
The Python language is relatively easy to use and provides easy access to JMRI facilities,
such as turnouts, sensors, blocks, etc. Access to JMRI throttles provides the ability to
control locomotives.
The typical script sets turnouts, acquires a locomotive, runs the locomotive while keeping
track of its location. Some scripts use occupancy sensors for the location, others rely on
time durations.
Frequently the original script needs modifications as additional details are added. When a
second train is added which has to share track with the first one, the script becomes ever
more complicated.
YAAT is designed to eliminate the programming by using text files that contain English
like phrases. For example:
      sensor = sensors.getSensor('S-Sensor')
      If sensor is not None:
          sensor.setKnownState(ACTIVE)
vs.
Set sensor S-Sensor active
Each train has its own text file, but they can coordinate actions by using JMRI sensors,
etc.
Note: The JMRI preference: keyword refers to the
user files location. See Help ⇒ File Locations to see the current path
for the user files location.
Using YAAT
YAAT works by referencing JMRI objects, such as turnouts, sensors, etc. This means that
the layout definition needs to accurately describe the layout that will run the trains that
YAAT will be controlling.
Some of the YAAT actions have specific requirements. The signal head and signal mast
actions are obvious. The block actions need to have blocks assigned to Layout Editor track
components, such as track segments and turnouts.
Since the YetAnotherAutoTrain.py script needs to be modified, the script
should be copied from the JMRI install location to the user files location. See Help
⇒ File Locations.
YAAT 3.0 — YetAnotherAutoTrain3.py
The process for managing train definitions has been changed so that the script does not
need to be manually changed. The script can be run from the standard JMRI install location.
The script options are stored in the preference:yaat/config.txt file. If
the file does not exist, a file will be created with a default set of options.
The train definition text files are also stored in the preference:/yaat
directory.
When the script is started, the train text file names listed in the
preference:/yaat/LoadTrains.txt file will be loaded. Each line in the file
is a single file name, such as Back and Forth.txt. Train file names not
listed in the LoadTrains.txt can be loaded on demand using the memory
variable specified by the yaatMemory option.
The support for embedded train definitions has been removed.
The support for custom extensions has been removed.
The detail comments in the script have been removed. The script was approaching the JMRI
limit on script file size. The content was previously moved to this help page.
Global Settings
- logLevel
- YAAT sends logging information to either the JMRI system console or the script monitor
located at Scripting {Old: Panels} ⇒
Script Output. Zero is no logging, 4 provides the maximum detail.
- statusSensor
- Optional. Provide feedback to JMRI indicating that one or more train threads are
running.
- masterSensor
- Optional. If this sensor becomes active, YAAT will terminate all of the train threads.
NOTE: Trains might keep running at their last speed.
- saveYAATcompiles
-
If set to True, the train compiles will be retained. See Compiled
Trains.
- yaatMemorysince YAAT 3.0
-
Optional memory variable that contains a filename for starting a train. This makes it
possible to start a train using Logix, LogixNG, scripting or even a YAAT train using
the Set <memory name> to <value> YAAT action.
- enableIncludessince YAAT 3.4
-
Set to True to enable the @include filename statement. See Includes.
Trains
The following applies to YAAT 2.3 and below. See above for YAAT 3 changes.
Each train needs a set of actions. The orignal design had the actions included in the
script file. That feature will be removed in a future release.
Define actions:
- External File
- Create a text file with one action per line. Blank lines and lines starting with a
comment character, #, are ok. Add the train name and file name to the
trainList. The file name can be the complete path or the file name can
include a keyword for the location, such as "preference:" which is replaced by the path to
the user files location at run time.
- File of files
- In addition to modifying the script's trainList, it is possible to create a text file
that has the same format as the trainList. If the file exists, its
contents will be added to the trainList. The file is located in the
yaat directory in the user files location. The filename is
TrainList.txt. This file is optional.
- Embedded
- The actions are added to a Python list. Each action is enclosed in single or double
quotes and end with a comma at the end of the line. The embedded method requires a unique
block of code at the end of the script for each embedded action list. Note: This method
will be removed in a future release. It requires too much manual code
modification.
Action Phrases
The following descriptions used the following formatting:
- <?? | ??> — List of choices
- <????> — Required values, usually names or numbers
- Brackets, [], are optional phrases
- Text and names are case sensitive
Standard Actions
- Assign <long | short> address <dccaddr>[ as <train name>[ in
<block name>]]
- Create a JMRI throttle using the DCC address. If a block name is supplied, the
optional train name will be used for block tracking.
- Haltsince YAAT 3.0
- Do an unconditional stop of the train. Prior to doing the Halt action,
the throttle speed should be set to zero and the throttle should be released. This is
generally used when starting another train using the Set memory action.
- Hold signal head <name>since YAAT 3.2
- Enable the Held state for the signal head table entry.
- Hold signal mast <name>since YAAT 3.2
- Enable the Held state for the signal mast table entry.
- Loop
- Marks the end of the one time start up actions, such as the throttle assignment,
positioning a train before starting repeating actions, etc.
- Print <message text>
- Display a message in the script output window or the system console log. Useful for
debugging.
- Release signal head <name>since YAAT 3.2
- Disable the Held state for the signal head table entry.
- Release signal mast <name>since YAAT 3.2
- Disable the Held state for the signal mast table entry.
- Release throttlesince YAAT 3.0
- Normally the throttle is released by the Stop action. This action can be used when
preparing to chain train definitions.
- Repeat if sensor <sensor name> is <active | inactive>
- Skip the remaining steps and start over. Use the same sensor as Stop with the opposite
test. This provides a cleanup section before Stop. Requires that a "Loop" action was
included in the action list.
- Set block <block name> <occupied | unoccupied | reserved | free>
- The occupied and unoccupied states are used to simulate train movement. It works best
if a simulation sensor is used in conjunction with an If statement. Reserved and free
control the alternate track color.
- Set direction to <forward | reverse>
- Set function key <0 to 68> <on | off>[, wait <n> seconds]
- Set the function key on or off. The number can be from 0 to 68. If seconds is greater
than zero, the opposite action will be performed after the number of seconds has
passed.
- Set memory <memory name> to <value>since YAAT 3.0
- Set the memory value to a constant. By setting the memory variable to a YAAT train
definition, it is possible to chain YAAT trains.
- Set route <route name>
- Set sensor <sensor name> <active | inactive>
- Can be used to pass status to other trains.
- Set speed to <0 to 1.0>
- Set turnout <turnout name> <closed | thrown>[, wait <n> seconds]
- The process will wait for up to 5 seconds for turnout feedback. If seconds is entered
and greater than zero, a wait allows the turnout command to complete, capacitors to
recharge, etc.
- Set turntable <turntable name> on panel <panel name> to ray <#>
since YAAT 2.3
- Set the turntable position to the ray index using the
setPosition(int)
method. The turntable name is the internal name on the layout editor panel, such as
TUR1. The panel name is the panel's title. The time required to move the
turntable bridge is variable. The following statement should be a wait for n
seconds or a wait for sensor active if a turntable
position sensor is available for each ray.
- Start when sensor <sensor name> is <active | inactive>
- An optional action that defers running the train until the condition has been
satisfied. This can also be used to pause a train between runs.
- Stop if sensor <sensor name> is <active | inactive>
- This action needs to be the last one in the list. If the sensor state matches, the
throttle will be released and the script stopped. If it does not, the script will do the
sequence of actions again. If the Stop action is missing, the script will run forever,
until the script thread is killed, or JMRI is stopped.
- Wait for <n> [to <n>] seconds
- Wait until the time has expired. Normally used for station stops.
- The optional second number is used to provide a random wait time between the two
values.since YAAT 3.1
- Wait for block <block name> to become <occupied | unoccupied | reserved |
free>
- Wait for memory <memory name> value to changesince 5.11.7
- Wait for sensor <sensor name> to become <active | inactive>
- Wait for signal head <head name> to [not] show <appearance name> [or
...]
- The appearance names are language specific. Use the signal head table to get the
available appearance names.
- Wait for signal mast <mast name> to [not] display <aspect name> [or
...]
- Use the signal mast table to get the valid aspect names. Remember that the names vary
based on signal mast type.
- Wait while signal mast <mast name> speed is less than <aspect name>
speed
- Use the signal mast table to get the valid aspect names. Remember that the names vary
based on signal mast type.
If/Else/Endif Actions
The If and Endif actions are required.
The Else action is optional and is used to separate the true and
false actions. Nesting is supported.
- If block <block name> is <occupied | unoccupied | reserved | free>
- If sensor <sensor name> is <active | inactive>
- If signal head <head name> does [not] show <appearance> [or ...]
- If signal mast <mast name> does [not] display <aspect> [or ...]
- If speed for signal mast <mast name> is <eq | ne | lt | gt | le | ge>
<speed name>
- For information on speed names, look at the JMRI install location:
xml/signals/signalSpeeds.xml
- If value for memory <memory name> is <eq | ne | lt | gt | le | ge> <value>
since 5.11.7
- Else
- Endif
GoSub/Sub/EndSub Actions
The sub routines are placed at the end of an embedded list or text file. The sub routines
cannot be nested, but a sub routine can call another sub routine. The sub routine name cannot
have spaces. Control returns to the statement after the CallSub when the sub routine is
finished.
- CallSub <subname>
- Sub <subname>
- EndSub <subname>
Dispatcher Support (Created by Bill Fitch)
- Dispatch using file <traininfo.xml>[, type <USER, value <dccAddress> |
ROSTER, value <roster entry name> | OPERATIONS, value <train name>>]
-
The Dispatcher train info filename is required. The optional USER, ROSTER and OPERATIONS
keywords can override the train info content. Examples:
- Dispatch using file routefrom1-2.xml (uses the train info xml file set up by "Save
Train info" in "Create New Train" in dispatcher)
- Dispatch using file routefrom1-2.xml, type USER, value 3 (uses train with dcc
address 3 instead of the train in the xml file
- Dispatch using file routefrom1-2.xml, type ROSTER, value diesel104 (uses diesel104
from roster instead of the train in the xml file)
The <traininfo.xml> file will have been generated by dispatcher prior to running
YAAT and will have been placed in preference:dispatcher/traininfo by dispatcher. Note:
"preference:" is the keyword for the user files location.
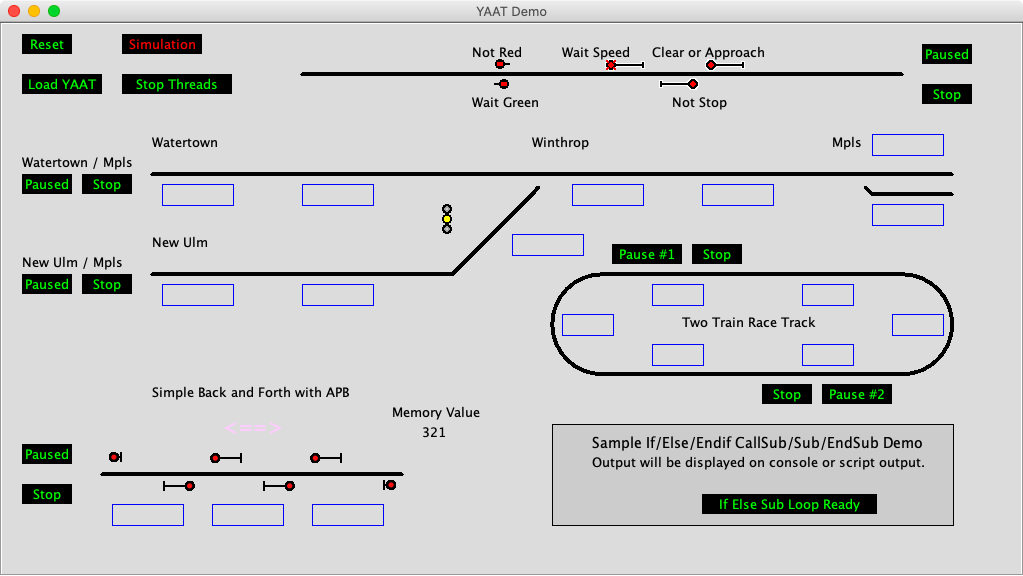
YAAT Demo
A demonstration system is available at YAAT Demo. The zip file
is a JMRI profile. After expanding the zip file, place the YAAT.jmri
directory next to the other profiles and it should show up in the profile list. The demo
panel is based on JMRI 4.20.
A second demonstration system which includes an example for turntable control and
linking trains is available at YAAT3 Demo. The zip file
is a JMRI profile. After expanding the zip file, place the YAAT3.jmri
directory next to the other profiles and it should show up in the profile list. The
demo panel is based on JMRI 5.3.7.
Running the demo
After starting PanelPro, click on the Open Panel File
button and select yaat demo.xml.
Click on the Load YAAT button to start the process. After several seconds
the button label will change to Running. Click on the
Paused button to start a train. The button label will change to
Run. Clicking again will pause the train when it finishes a loop. Click on
Stop to terminate the train and remove it from the system.
The Stop Threads button will terminate all trains immediately. Active
trains might continue running at the last throttle setting.
Advanced Features
Compiled Trains
The standard YAAT process compiles each train from its text file. The result of the compile
process is a set of tokens that are interpreted while the train is running. The duration of
the compile step depends on the number of trains and the number of actions.
If the saveYAATcompiles option is true, a compiled train will be used
instead of doing the compile step.
A compiled train is located in the preference:yaatp/<trainname>
directory. When YAAT is started, the date/time for each train source file is checked when it
is loaded. If it is greater than the compiled train, if any, the compile will occur. Otherwise
the compiled version will be loaded.
Includessince YAAT 3.4
The Includes feature inserts blocks of YAAT code while a program file is
being loaded. This is enabled by setting enableIncludes to True
in the config.txt global settings file. The included files are located in
the includes sub-directory within the yaat directory. The
@include some file name.txt line is replaced by the YAAT text located in the
indicated file name. The included file cannot have includes.
Here is an example.
# Move 2019 from SCS 1A to SCS 1

Assign long address 2019 as 2019 in SCS-1A
Set direction to forward

@include SCS1A-SCS1.txt

Set sensor 2019-SCS1A-SCS1 inactive
Release throttle
Halt

@include _sub_SCS-Turnout-Locks.txt
@include _sub_SCS-Signals.txt
@include _sub_SCS-XO-Locks.txt
Custom Extensions
This feature has been removed from YAAT 3.0.
An extension is a separate Python file that contains additional actions.
Each action requires a do<name> method (def) and a
compile<name> method (def). The format of an action name is
verb_noun, such as Set_memory... The typical space for
built-in actions is replaced with an underscore.
The custom actions are added to the customExtensions dictionary. The key
is the file name and the data is a list of actions.