The Logix Table
A Logix is a small group of Conditionals focused on a single task on the layout. Each
Conditional may be viewed as a statement of the form:
if (logical expression) then (action).
The "logical expression" part of a Conditional tests the state of a group of user-specified
conditions on the layout, for example, whether certain turnouts are closed or thrown, or
whether a block is occupied. The "action" part of the Conditional specifies what action is to
be taken if the state of the logical expression changes.
The Logix Table lists all currently defined Logix by their System Name and User Name.
Columns in the Logix Table
You may change the order of the columns by dragging their titles, and sort the rows by
clicking one of the sort triangles next to a column title.
The last column of the table provides four things you can do with a Logix: Edit it, Browse
it, Duplicate it, or Delete it. Simply clicking Select will drop down a menu
with the choices: Edit, Browse, Copy,
Delete.
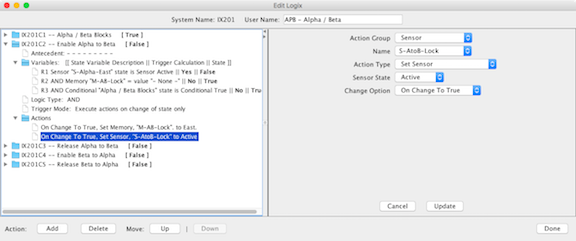
- Selecting Edit will bring up the Edit Logix window which provides a
way to edit a Logix and its Conditionals. See List Editor or Tree Editor help pages for more
information on creating and editing Logix Conditionals.
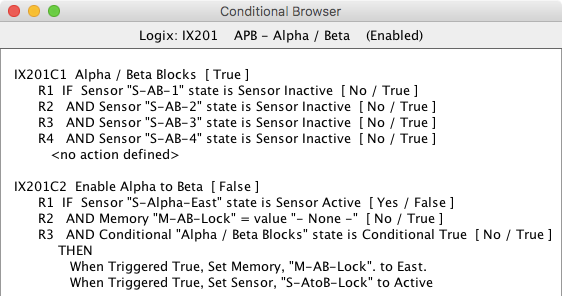
- Selecting Browse will bring up the Conditional Browser window. The
window provides a summary view of the Conditionals and their definitions in the Logix. The
values in brackets indicate the current state and for conditional variables, whether it
acts as a trigger. When you are done, close the window. since
4.7.3
- Selecting Copy will bring up windows that allow you to make a new copy
of Logix and its Conditionals or to copy its Conditionals into an existing Logix. See the
Conditional Copy help page for
information on copying Logix Conditionals.
- Selecting Delete will delete the Logix and its Conditionals.
The Enabled column allows you to enable (checked) or disable (unchecked)
a Logix. A Logix does not have a state as many JMRI entities do. A Logix does have the
capability of being "enabled" or "disabled". When a Logix is not enabled, the logical
expressions of its Conditionals are still evaluated, but the actions specified in the
Conditionals are not taken. When a Logix is enabled after having been disabled, its
Conditionals are recalculated and appropriate actions taken.
Creating a Logix
To create a new Logix, click the Add... button at the bottom of the Logix
Table. This will bring up a "Create Logix" pane. Entering a System Name and optionally a User
Name, then clicking Create Logix, will create the Logix, and bring up the
Edit Logix window. Once a Logix is created, its System Name cannot be changed. Its User Name,
however, may be changed in either the Logix Table or the Edit Logix window. A new User Name
may be any useful text, provided the new User Name was not already assigned to another Logix.
(See also the separate help page on adding Logix and a
step-by-step guide.)
Logix Table Menu
The File menu at the top of the Logix Table provides for printing this
table and for storing the Logixs and their Conditionals in a layout configuration file. For
details, see Loading and Storing Your
Work.
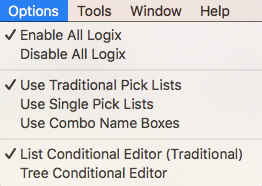
The Options menu has 3 sections.
The first section is used to Enable or Disable all of
the Logix definitions.
since 4.7.3 The second section is used to select one of three
methods for entering item names for the Logix Conditional Variables and Actions:
- Traditional Pick Lists, the default method, uses a text field where the system or user
name is entered, such as a turnout or sensor. This method also provides a Pick List window
with tabs for each type of object. When an object is selected, such as a sensor, the
appropriate Pick List tab is automatically selected.
Drag a name from the pick list and drop it on the name field.
- The Single Pick Lists method also uses a text field, but the Pick List only displays
the names for the current object, such as sensors. Clicking on a name in the Pick List will
automatically copy the name to the text field.
- The Combo Name Box method changes the text field to a drop down combo box. Click and
select an item from the list.
since 4.9.2 The third section is used to select the Conditional
Editor.
- List Conditional Editor - This is the traditional editor that opens multiple windows
depending on the current activity. This is the default selection. See List Editor for detail information.
- Tree Conditional Editor -This is a single window editor that uses a tree structure to
navigate the Conditional data for a Logix. See Tree Editor for detail information.
The Tools menu has 5 items:
- Open PickList Tables - Opens the tabbed Pick List tables as described above for the
first method.
- Find Orphaned Items - Identify standard items, such as turnouts, that have been defined
but never used.
- Find Empty Conditionals
- Find Cross References - Create a list of places where an item, such as a sensor, are
used.
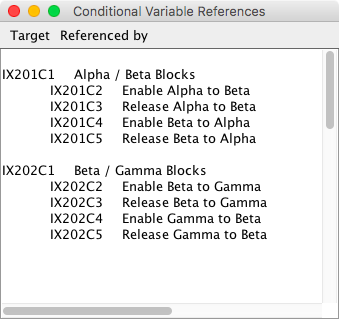
- Conditional Variable References - Create a list of conditionals that are referenced by
other conditonals. since 4.7.4
For more information, consult the main Logix
documentation.
Logix Documentation Pages Logically Listed
Logix documentation is divided into eight different help pages. While these are referenced
via links in various places, not all are easy to find (perhaps three links down). They are
additionally listed here for convenience.